VR4XSU
Introduction
Location of the required Marking
Power Source
Cleaning
Accessories
POWER-CORD Protection
Overloading
Power Lines
Lightning
Object and Liquid Entry
Connecting Laser Beam
Replacement Parts
Safety Check
Disc Tray
Contents
Editing the disc
Tape playback
Recording
Dubbing
Recording function
Features
Playback function
Edit function
Discs which can be played back
Disc
Handling discs
Discs on which video can be recorded
VR mode
Video mode
Recording format
Disc playback in other players
When recording in the VR mode
When recording in the Video mode
Title/Chapter/Track
Front
VCR indicator DVD indicator Input 2 jack Dubbing button
Parts and functions
Rear
Appears when a DVD-R is inserted
Appears when a CD is inserted
Appears when a DVD-Video is inserted
Appears when a DVD-RW is inserted
Remote control
Input Select
Remote control basics
Power Source
Inserting Batteries into the Remote Control
To USE AC Power Source
Separate UHF and VHF antennas
Antenna connections
Combination UHF/VHF antenna with 75 ohm coaxial cable
TV with single 75 ohm UHF/VHF antenna input
TV with 300 ohm UHF and 75 ohm VHF antenna inputs
Scrambled and unscrambled
Cable TV connections
Allows
Channel selected at the converter box
Recording of nonscrambled channels
Recording of one channel while watching another
Connect to a TV with S-Video output
Connections with the TV or audio component
Connect to a TV with Audio/Video output
Connect to a TV with Component video output
Connect to an AV Amplifier with built-in digital surround
Connecting the optical digital cable
Connect to a stereo amplifier with audio output
Setting the video channel
Auto clock setting / Setting the video channel
Auto clock setting
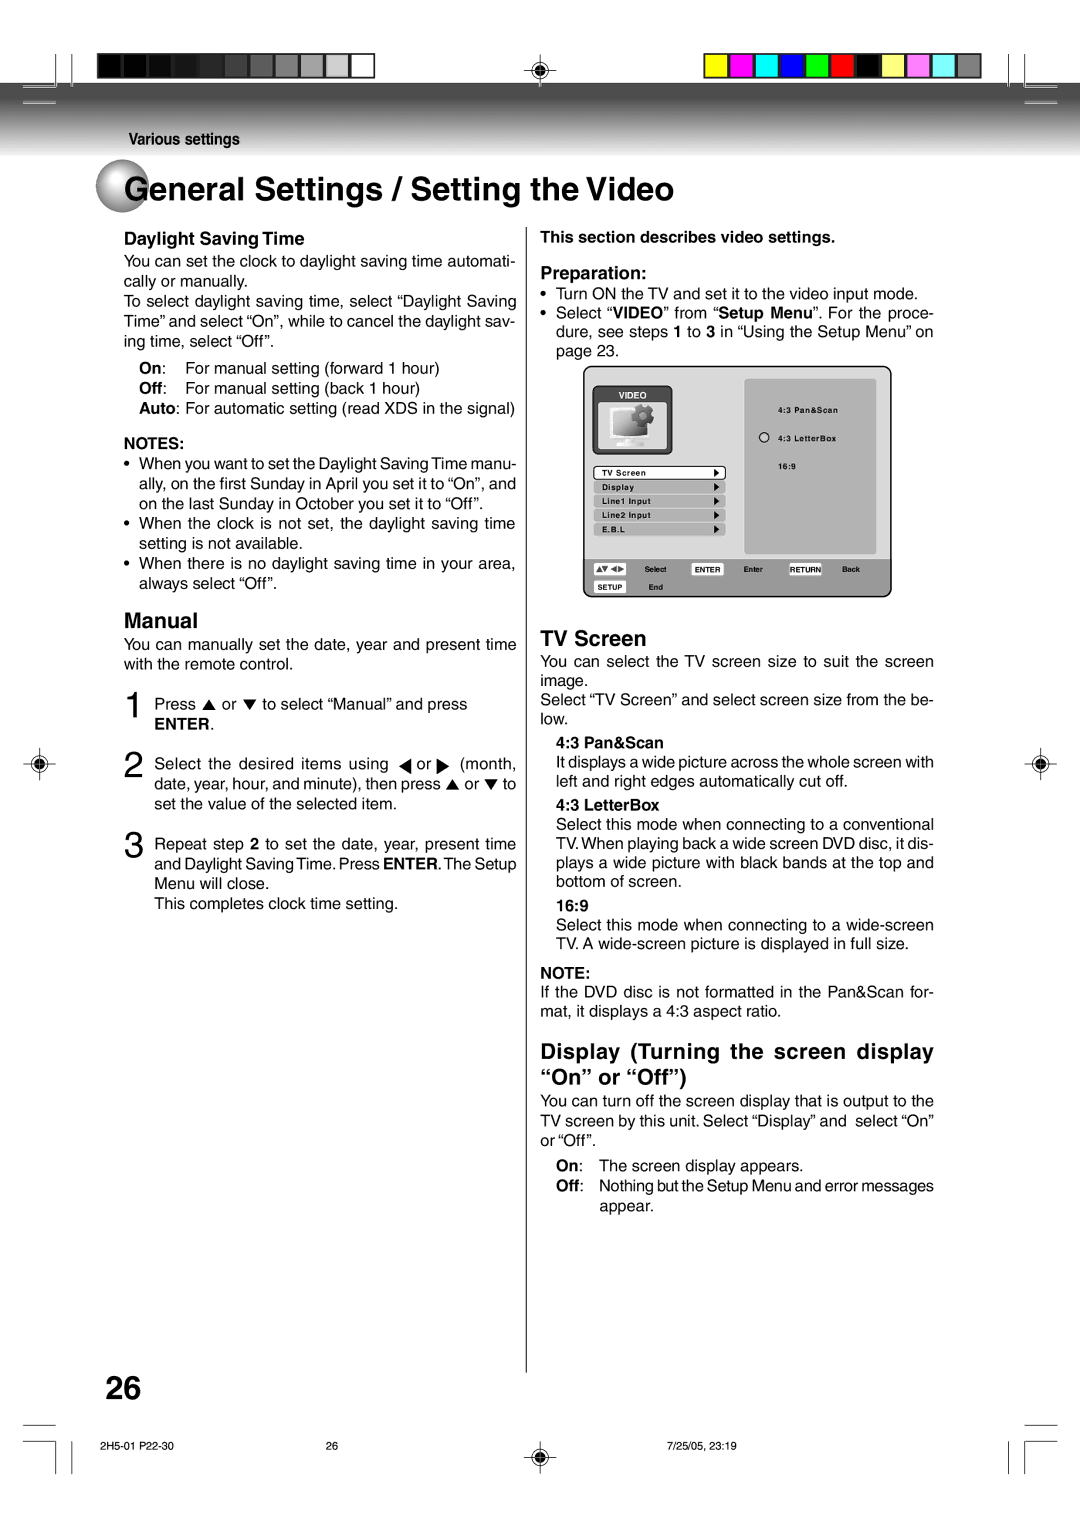
Preparation
Various settings
Setup Menu
Using the Setup Menu
Enter
To change the password set for the parental control level
General Settings
Parental / Password
Temporarily cancelling parental control
CH Add/Delete channels
TV/Cable Select
Auto CH Memory
Clock
TV Screen
General Settings / Setting the Video
Manual
Display Turning the screen display On or Off
Dolby Digital Output
Setting the Video / Setting the Audio
Line1 Input/Line2 Input
Surround
DVD Menu
Setting the Language
OSD Language
Audio
Black Level REC
Setting the Record / Setting the Disc
Auto Chapter
Initialize
Protect Disc
Setting the Disc
Finalize
Rename Disc
Playback procedure
TYPE1/TYPE2/TYPE4
ORG Title List will appear
Playback by selecting a title
Press Title Menu
Press / / / to select the title you want to playback
Checking media information
Next media information will appear
Special playback
Locating a specific scene
Instant skip / Locating a specific scene
Instant skip
Use this function to skip commercials while playback
Repeat playback
Repeat playback
Instant replay
Title/Chapter repeat playback
Title selection / DVD menu
Title selection
Zooming
Changing angles / Zooming
Changing angles
To turn off the PBC Video CD version
Changing soundtrack language
Subtitles
Playing back programs
Various operations with CD Playback
Playing back a selected track
Press Enter Menu list will appear
Repeat playback
Locating a specific track
Playing back track by specifying the time
Random playback
Limitations on MP3/WMA/ Jpeg CD playback Preparation
Using the Music List/Photos List screen
MP3/WMA/JPEG playback
Playing back MP3/WMA files
Carry out either of the item a or b below
Playing back Jpeg files
Press DVD Menu to select the Photos list
Press ENTER, then press From the menu list and press Enter
Different scanning modes Interlaced scan
Progressive indicator on the display window will go off
Progressive scan
Loading and unloading a cassette tape
To stop playback
Forward/Reverse picture search mode
Cassette tape playback
To rewind the tape or forward it rapidly
Still picture
Adjusting tracking condition
Picture search
Slow motion
Video index search system
Zero Return function / Video index search system
Zero Return function
Recording modes
Read this before recording on disc
Types of disc
Disc remaining time
Copy Never recording prohibited
Images that cannot be recorded
Copy Free unrestricted recording
Copy Once one-time recordable
MODE/SPEED is pressed
Auto Rewind feature
Recording a TV program
VHF/UHF/CABLE Channels
Recording one program while watching another
To stop recording
To stop recording temporarily
Recording mode
One-touch Timer Recording OTR
To cancel OTR
Press Stop Will appear on screen for about 4 sec- onds
Press Setup Easy Menu screen appears
Timer recording
Setting timer recording Preparation
Press To select ÒTimer Rec SetÓ and press Enter
11/20 Sun 800 PM 930 PM
Cancelling the timer recording
Stopping the timer recording
Checking or changing the timer recording
Case Timer programs overlap
Fast forward/Review playback
Chase playback
Still playback
Locating a chapter
Output selection for DVD
Stereo recording and playback
Output selection
Playlist
Editing the disc
Original title
Editable items
ORGOriginal Title List will appear
Editing a playlist
Creating a playlist
Editing menu of original title will appear
Changing a title name
Select OK and press ENTER. It returns to the PL Title List
Press To select Play
Adding a chapter mark
Press To select the playlist
Skip + , Skip , PAUSE/STILL , Slow , Instant Skip for
Erasing an unnecessary scene
Then erase a chapter see
Press
Combining chapters
Press To select Chapter List
Combining chapters are completed
Erasing a chapter
Press To select Chapter List
Combining the titles
Erasing a playlist
Press To select Delete
Press To select Play
Set Index Picture
Press To select the playlist
Editing an original title
Changing an original title name
Playback
Mark Selected title is played back
Skip +, Skip -,PAUSE/STILL, SLOW, Instant Skip for
Erase a chapter see
TITLEEnd
From the playlist including the chapter Yes No
Erasing an original title
Press To select the original title
Set Index Picture
Changing a disc name
You can change a disc name from the Setup Menu
Changing a disc name
Using the keyboard screen
You can record video or audio on a video tape onto a disc
Dubbing a tape onto a disc
Dubbing
Press DUBBING, or press To select Yes and press
TER
Dubbing a disc onto a tape
Dubbing only the specified titles or the playlist
You can connect another VCR or camcorder for dubbing
Dubbing using other equipment
When a video is recorded using this unit Preparation
Disc with enough recording space
DTS
Glossary
Cable
MP3
Setup Menu
PBS
Language code list
DVD
Problems and troubleshooting
Symptoms Possible Solutions DVD/VCR
Disc information
Symptoms Possible Solutions VCR
Problems and troubleshooting / Video head cleaning
Video head cleaning
Video head clogging
Recording
Error/Warning message list
General
Dubbing
VCR section
Specifications
General
DVD section
Limited warranty
Limited Ninety 90 Day Warranty on Labor
How to Obtain Warranty Services
2H5-01 P91-BACK 23/05, 132 PM
J2H50101A SH 05/08
 General Settings / Setting the Video