INTRODUCTION
TIMER RECORDING
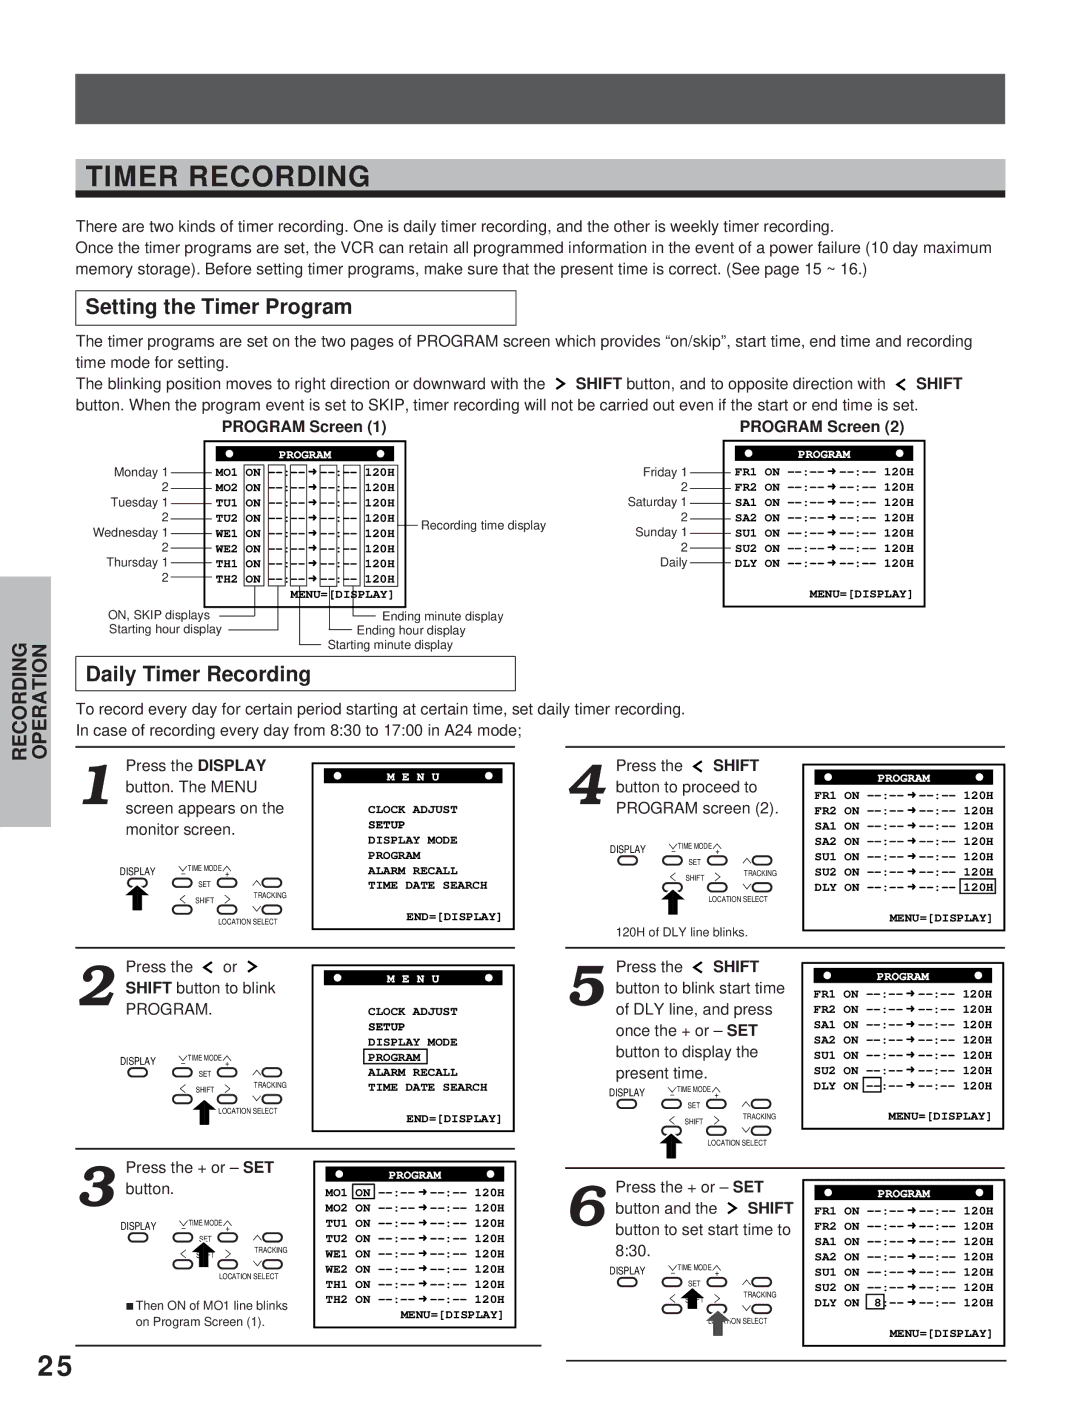
There are two kinds of timer recording. One is daily timer recording, and the other is weekly timer recording.
Once the timer programs are set, the VCR can retain all programmed information in the event of a power failure (10 day maximum memory storage). Before setting timer programs, make sure that the present time is correct. (See page 15 ~ 16.)
Setting the Timer Program
The timer programs are set on the two pages of PROGRAM screen which provides “on/skip”, start time, end time and recording time mode for setting.
The blinking position moves to right direction or downward with the ![]() SHIFT button, and to opposite direction with
SHIFT button, and to opposite direction with ![]() SHIFT button. When the program event is set to SKIP, timer recording will not be carried out even if the start or end time is set.
SHIFT button. When the program event is set to SKIP, timer recording will not be carried out even if the start or end time is set.
PREPARATION
PROGRAM Screen (1)
|
|
|
|
|
|
|
|
|
|
|
|
|
|
|
|
|
|
|
|
|
|
|
|
|
|
|
|
|
|
|
|
|
|
|
|
|
|
|
|
| PROGRAM |
|
|
|
|
|
|
|
|
|
|
| |||||||
Monday 1 |
|
|
| MO1 |
|
|
|
|
|
|
|
| ➜ |
|
|
|
|
|
|
|
|
|
|
|
|
| Friday 1 | ||
|
| ON |
| : |
|
|
|
|
| 120H |
|
|
| ||||||||||||||||
|
|
|
|
|
|
|
|
|
|
|
| ||||||||||||||||||
2 |
|
|
| MO2 | ON |
| : |
| ➜ |
|
|
|
| 120H |
|
|
| 2 | |||||||||||
|
|
|
|
|
|
|
|
|
|
| |||||||||||||||||||
Tuesday 1 |
|
|
| TU1 | ON |
| : |
| ➜ |
|
|
|
| 120H |
|
|
| Saturday 1 | |||||||||||
|
|
|
|
|
|
|
|
|
|
|
| ||||||||||||||||||
2 |
|
|
| TU2 | ON |
| : |
| ➜ |
|
|
|
| 120H |
|
| Recording time display | 2 | |||||||||||
|
|
|
|
|
|
|
|
|
|
| |||||||||||||||||||
Wednesday 1 |
|
|
| WE1 | ON |
| : |
|
| ➜ |
|
| : |
|
|
|
| 120H |
|
| Sunday 1 | ||||||||
|
|
|
|
|
|
|
|
|
|
|
|
|
|
|
| ||||||||||||||
|
|
|
|
|
|
|
|
|
|
|
|
|
|
| |||||||||||||||
|
|
|
|
|
|
|
|
|
|
|
|
|
| ||||||||||||||||
2 |
|
|
| WE2 | ON |
| : |
| ➜ |
|
|
|
|
| 120H |
|
|
| 2 | ||||||||||
|
|
|
|
|
|
|
|
|
|
|
|
|
| ||||||||||||||||
Thursday 1 |
|
|
| TH1 | ON |
|
|
| : |
|
| ➜ |
|
| : |
|
|
|
| 120H |
|
|
| Daily | |||||
|
|
|
|
|
|
|
|
|
| ||||||||||||||||||||
|
|
|
|
|
|
|
|
|
|
|
|
|
| ||||||||||||||||
2 |
|
|
| TH2 | ON |
|
| ➜ | : |
| 120H |
|
|
|
| ||||||||||||||
|
|
|
|
|
|
|
| ||||||||||||||||||||||
|
|
|
|
|
|
|
|
|
|
|
|
|
|
|
|
|
|
|
|
|
|
|
|
|
|
|
|
|
|
|
|
|
|
|
|
|
|
|
|
|
|
|
| MENU=[DISPLAY] |
|
|
|
| |||||||||||
|
|
|
|
|
|
|
|
|
|
|
|
|
|
|
|
|
|
|
|
|
|
|
|
|
|
| |||
ON, SKIP displays |
|
|
|
|
|
|
|
|
|
|
|
|
|
|
|
|
|
|
|
|
| Ending minute display |
| ||||||
|
|
|
|
|
|
|
|
|
|
|
|
|
|
|
|
|
|
|
|
|
| ||||||||
Starting hour display |
|
|
|
|
|
|
|
|
|
|
|
|
|
|
| Ending hour display |
| ||||||||||||
|
|
|
|
|
|
|
|
|
|
|
|
|
|
|
| ||||||||||||||
|
|
|
|
|
|
|
|
|
|
|
|
|
|
|
| Starting minute display |
| ||||||||||||
|
|
|
|
|
|
|
|
|
|
|
|
|
|
|
|
| |||||||||||||
PROGRAM Screen (2)
![]() PROGRAM
PROGRAM ![]() FR1 ON
FR1 ON
MENU=[DISPLAY]
Daily Timer Recording
To record every day for certain period starting at certain time, set daily timer recording. In case of recording every day from 8:30 to 17:00 in A24 mode;
Press the DISPLAY
1 button. The MENU screen appears on the monitor screen.
DISPLAY – TIME MODE +
SET
SHIFT | TRACKING |
| |
| LOCATION SELECT |
M E N U
CLOCK ADJUST SETUP DISPLAY MODE PROGRAM ALARM RECALL TIME DATE SEARCH
END=[DISPLAY]
Press the  SHIFT
SHIFT
4 button to proceed to PROGRAM screen (2).
DISPLAY – TIME MODE +
SET
SHIFT | TRACKING |
| |
| LOCATION SELECT |
120H of DLY line blinks.
![]() PROGRAM
PROGRAM ![]() FR1 ON
FR1 ON
MENU=[DISPLAY]
Press the or |
|
2 PROGRAM.SHIFT button to blink | |
DISPLAY – TIME MODE + |
|
SET |
|
SHIFT | TRACKING |
| |
LOCATION SELECT | |
M E N U
CLOCK ADJUST SETUP DISPLAY MODE PROGRAM ALARM RECALL TIME DATE SEARCH
END=[DISPLAY]
Press the ![]() SHIFT
SHIFT
5 button to blink start time of DLY line, and press once the + or – SET button to display the present time.
DISPLAY | – TIME MODE + |
|
| SET |
|
| SHIFT | TRACKING |
|
|
![]() PROGRAM
PROGRAM ![]() FR1 ON
FR1 ON
MENU=[DISPLAY]
LOCATION SELECT
NOTICE
Press the + or – SET
3 button.
DISPLAY | – TIME MODE + | |
| SET |
|
| SHIFT | TRACKING |
|
| |
|
| LOCATION SELECT |
iThen ON of MO1 line blinks on Program Screen (1).
![]() PROGRAM
PROGRAM ![]() MO1 ON
MO1 ON
MENU=[DISPLAY]
Press the + or – SET
6 button and the ![]() SHIFT button to set start time to 8:30.
SHIFT button to set start time to 8:30.
DISPLAY | – TIME MODE + | |
| SET |
|
| SHIFT | TRACKING |
|
| |
|
| LOCATION SELECT |
![]() PROGRAM
PROGRAM ![]() FR1 ON
FR1 ON
MENU=[DISPLAY]
25