User’s Manual
Satellite C650/C655/C665 Satellite Pro C650/C665 Series
Table of Contents
General Precautions
Preface
Chapter 1 Getting Started
Chapter 6 Power and Power-Up Modes
Chapter 3 Hardware, Utilities and Options
Chapter 4 Operating Basics
Chapter 5 The Keyboard
Chapter 8 Troubleshooting
Appendix A Specifications
Appendix C Information for Wireless Devices
Appendix D AC Power Cord and Connectors
Disclaimer
Copyright
Trademarks
FCC information
FCC notice Declaration of Conformity Information
FCC conditions
Contact
CE compliance
EU Declaration of Conformity
Working environment
Video Standard Notice
Canadian regulatory information Canada only
Following information is only valid for EU-member States
Disposing of the computer and the computers batteries
Disposal of products
Disposal of batteries and/or accumulators
REACH - Compliance Statement
Optical disc drive safety instructions
Following information is only for Turkey
Panasonic System Networks
TOSHIBA Samsung Storage Technology
TEAC
UJ8A0
HITACHI-LG Data Storage, Inc
Precautions
GT30F/30N
Preface
Conventions
Abbreviations
Icons
Keys
Key operation
Display
Messages
Provide adequate ventilation
General Precautions
Creating a computer-friendly environment
Heat injury
Stress injury
Pressure or impact damage
Instruction Manual for Safety and Comfort
Mobile phones
Equipment checklist
Chapter
Getting Started
Hardware
Getting Started
Connecting the AC adaptor
Do not use a 3-pin to 2-pin conversion plug
1. Connect the power cord to the AC adaptor
Opening the display
Turning on the power
Turning off the power
Starting up for the first time
Shut Down Mode
3. Click Start 4. Click the Shut down button
Sleep Mode
5. Turn off any peripheral devices connected to your computer
Benefits of Sleep Mode
Executing Sleep Mode
2. Click System and Security and click Power Options
Sleep Mode limitations
Hibernation Mode
Benefits of Hibernation Mode
System Recovery Options
Restarting the computer
Data save in Hibernation Mode
System Recovery
Creating Recovery Media
1. Select either blank DVD or USB Flash Memory
Restoring the pre-installed software from your created Recovery Media
The Grand Tour
Front with the display closed
Legal Footnote Non-applicable Icons
Chapter
Left side
Universal Serial Bus
Universal Serial Bus ports, which comply to the
USB 2.0 ports
LAN jack
External monitor
port
Cooling vents
Security lock slot
Right side
HDMI out port
Battery pack
and Power-Up Modes
Back
DC IN 19V jack
Battery lock
Slide the battery lock to release the battery pack
Underside
ready for removal
Microphone
Front with the display open
Web Camera LED
Wireless LAN
Wireless WAN
Web Camera
such as Windows Live Messenger. TOSHIBA
Indicators
System indicators
Power button
DC IN/Battery
Keyboard indicators
This indicator glows green when letter keys are
When the NUM LOCK indicator glows, you can
Optical disc drives
AC adaptor
DVDs
Page
Operating Basics
Using the Touch Pad
Chapter
Web Camera
Double-click Tap twice
How to register the Face Recognition Data
Using the TOSHIBA Face Recognition
Disclaimer
Click the Back button to practice the guide once more
How to Delete the Face Recognition Data
How to launch the help file
1N Mode Login screen
Windows Logon via TOSHIBA Face Recognition
Using optical disc drives
11 Mode Login screen
Loading discs
6. Please face the camera will be displayed
2. Grasp the disc tray gently and pull until it is fully opened
3. Lay the disc, label side up, in the disc tray
Figure 4-3 Pressing the eject button and pulling the disc tray open
Figure 4-4 Inserting a disc
Removing discs
Figure 4-6 Removing a disc
How to remove discs when the disc tray will not open
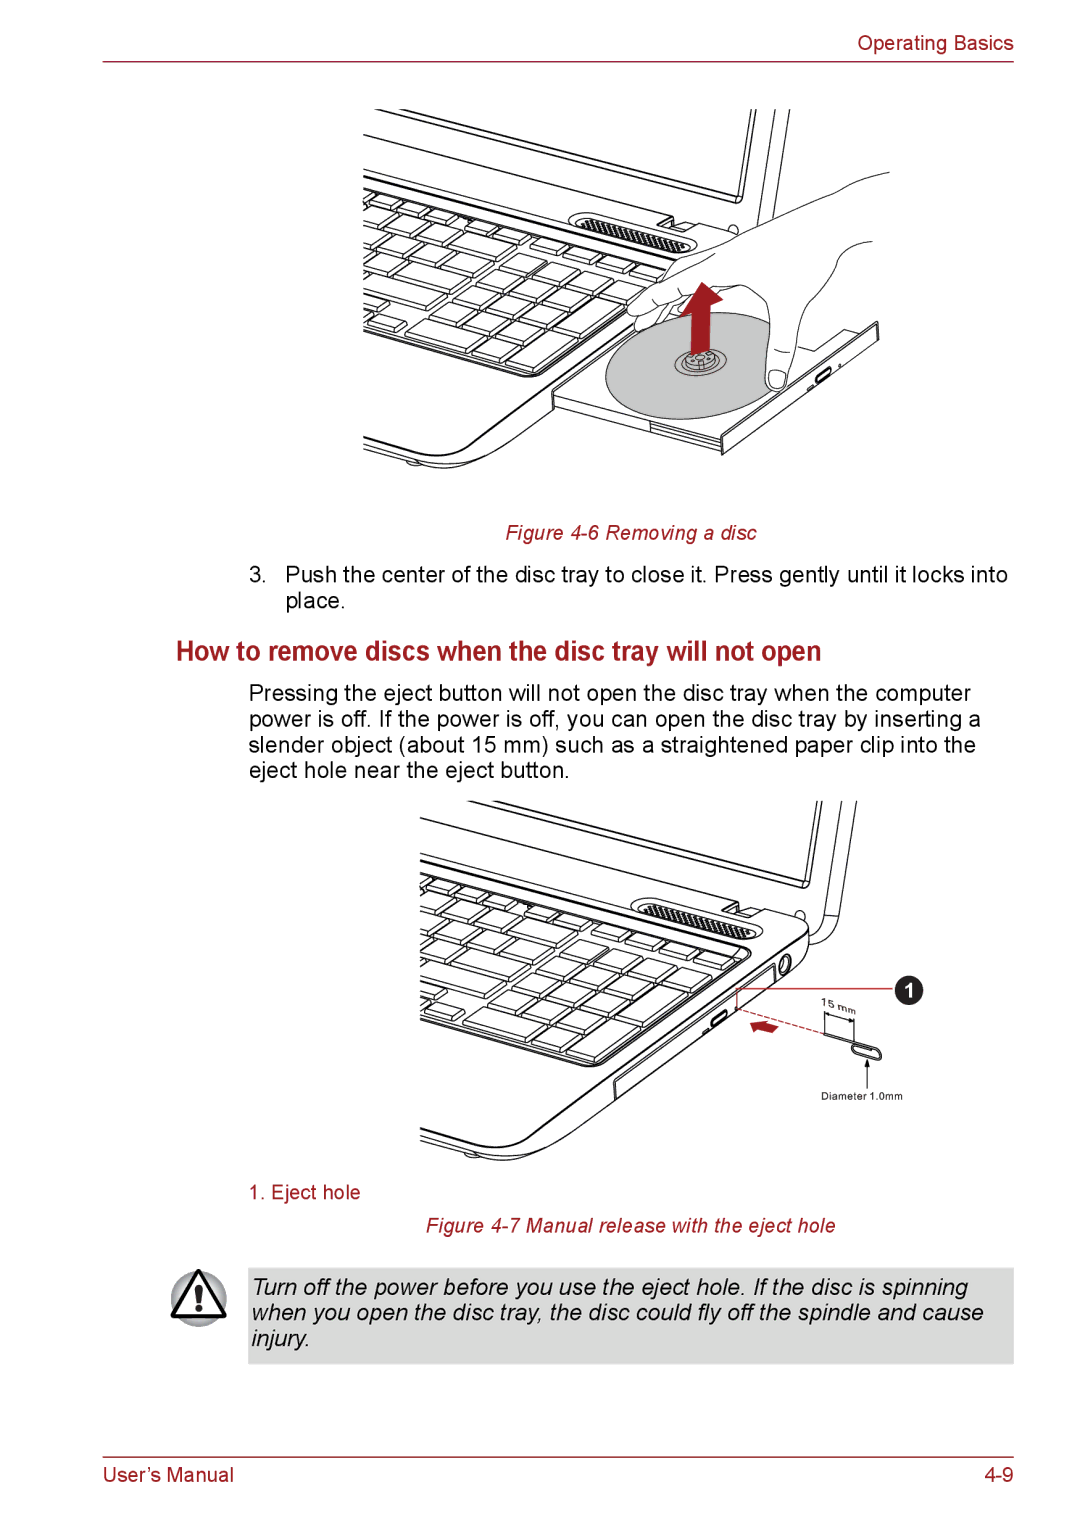
Figure 4-7 Manual release with the eject hole
Important message
Writing CD/DVDs
Disclaimer
DVD-R DVD Specifications for Recordable Disc for General Version
Before writing or rewriting with the DVD Super Multi drive
CD-R
CD-RW Multi-Speed and High-Speed
DVD Specifications for Recordable Disc for Version 1.1 or version
DVD-RW
DVD+RW
DVD-RAM
When writing or rewriting
TOSHIBA Disc Creator
How to learn more about TOSHIBA Disc Creator
Select Settings for Each Mode - Data CD/DVD in the Settings menu
Data Verification
2. Mark the Verify Written Data check box
TOSHIBA VIDEO PLAYER
Notes on use
Display Devices & Audio
Starting TOSHIBA VIDEO PLAYER
Adjusting System Volume
Media care
Sound System
Operating TOSHIBA VIDEO PLAYER
Adjusting Microphone Level
Changing System Sounds
SmartAudio
Starting SmartAudio Application
Wireless communications
Notes on Using the Microphone
Wireless LAN
Setting
3. Click Set up a new connection or network
Security
Bluetooth wireless technology
Bluetooth Stack for Windows by TOSHIBA
Release Notes related to the Bluetooth Stack for Windows by TOSHIBA
Worldwide operation
LAN cable types
Enable/Disable Wireless communication
Product Support
Connecting the LAN cable
Disconnecting the LAN cable
Computer Handling
Cleaning the computer
Moving the computer
Heat dispersal
Operating Basics
User’s Manual
4-26
TOSHIBA - Utilities - PC Diagnostic Tool
Hardware, Utilities and Options
Hardware
Processor
Power
Personalization - Display - Adjust
resolution
Memory
Legal Footnote Battery Life
RTC battery
TOSHIBA - Utilities - PC Diagnostic Tool
Disks
Intel Display Power Saving Technology
4. Clear the Display Power Saving Technology check box
Display
Legal Footnote LCD
Bluetooth
Legal Footnote Graphics Processing Unit GPU
Sound
Multimedia
Special features
Legal Footnote Wireless LAN
Display automatic power off *1
HDD automatic power off *1
Low battery automatic Hibernation Mode *1
Turning off the power section in Chapter
Heat dispersal *1
Hibernation Mode
TOSHIBA Power
Diagnostic Tool
HW Setup
Accessibility
Bluetooth Stack for
TOSHIBA VIDEO
PLAYER
Start - All Programs - TOSHIBA VIDEO
TOSHIBA Service
TOSHIBA - Utilities - Service Station
TOSHIBA Wireless
LAN Indicator
Optional devices
Cards/memory
Peripheral devices
Other
Memory media
Memory media slot
Points to note about the SD/SDXC memory card
Media care
Memory media format
Formatting an SD/SDXC memory card
Card care
Memory card care
Inserting a memory media
About the write-protect
2. Point to memory media and click the left Touch Pad control button
Removing a memory media
3. Grasp the media and pull it out of the computer to remove it
Installing a memory module
Additional memory module
Use a point size 0 Phillips screwdriver
Hardware, Utilities and Options
1. Memory module cover
Figure 3-4 Removing the memory module cover
8. Seat the memory module cover in place and secure it with the screw
10. Turn your computer over
Removing a memory module
Figure 3-7 Removing the memory module
Connecting the monitor cable
External monitor
Connecting the HDMI out port
HDMI
Settings for display video on HDMI
4. Click Change display settings 5. Click Advanced settings
Select HD Format
a. Click Start - Control Panel - Hardware and Sound - Sound
Connecting the security lock
Security lock
Display mode at List All Modes
HD Format
Optional accessories
Battery Pack
refer to Chapter 6, Power and Power-Up Modes
DDR3 Memory Kit
Typewriter keys
The Keyboard
Chapter
Soft keys FN key combinations
Function keys F1 … F9
Hot keys
Power Plan Pressing FN + F2 changes the power settings
Windows special keys
FN Sticky key
Generating ASCII characters
1. Hold down ALT key
The Keyboard
User’s Manual
Power and Power-Up Modes
Power conditions
Power on
DC IN/Battery LED
Monitoring of power condition
DC IN/Battery indicator
Power off
DC IN/Battery LED
Battery
Power indicator
Battery types
Battery pack
Care and use of the battery pack
Real Time Clock RTC battery
Procedures
Battery charging notice
Charging the batteries
Time
Monitoring battery capacity
Maximizing battery operating time
Extending battery life
Battery exhausted time
Replacing the battery pack
Removing the battery pack
Password Utility
User Password
Installing the battery pack
Registered
Power-up modes
Starting the computer by password
Supervisor password
Panel power on/off
System automatic Sleep/Hibernation
Windows utilities
Hot keys
HW Setup
Accessing HW Setup
HW Setup window
Utilities - HWSETUP
Setup
Password
User Password
Default
Power On Display
Boot Setting
Boot Setting Options
Owner String
Boot Speed
Panel Open - Power On
Enabled
Disabled
SATA Interface setting
Battery life
Built-in LAN
Legacy USB Support
Troubleshooting
Problem solving process
Preliminary checklist
Chapter
Analyzing the problem
Hardware and system checklist
System start-up
Overheating power down
Power
Self test
AC power
Battery
Problem
Procedure
power plan in the Power Options
Problem
Procedure
glow, allow the computer to charge the battery for
Keyboard
Real Time Clock
Leading Innovation screen
Problem
ProblemProcedure
Internal display panel
Hard disk drive
Problem
DVD Super Multi drive
Problem
Procedure
Problem
Memory Cards SD/SDXC Card, MultiMediaCard
Problem
Procedure
Recordable DVD DVD-R/-R DL, DVD+R/+R DL, DVD-RW, DVD+RW, DVD-RAM
Pointing device
Touch Pad
Click Start - Control Panel - Hardware and
Sound - Mouse
2. Click the Device Settings tab
USB mouse
1. Click Start - Control Panel - Hardware and Sound - Mouse
Panel - Hardware and Sound - Mouse
USB device
the Pointer Options tab
Legacy USB Support option within the
Problem
Sound system
ProblemProcedure
Problem
Procedure
Problem
Procedure
Try adjusting the contrast and brightness controls
External monitor
Bluetooth
Wireless LAN
Problem
Procedure
Recovery Media
The Recovery
TOSHIBA support
Before you call
Where to write
Outside of Europe
In Europe
Australia
Specifications
Physical Dimensions
Ambient temperature
temperature
Power Requirements
Signal Name
External RGB monitor port pin assignment
Computer
Appendix B
Display Controller and Video mode
Display controller
Video mode
Information for Wireless Devices
Wireless LAN Interoperability
Bluetooth wireless technology Interoperability
Appendix C
CAUTION about Wireless Devices
Wireless Devices and your health
Radio Regulatory Information
Europe
Restrictions for Use of 2400.0-2483.5MHz Frequencies in Europe
Restrictions for Use of 5150-5350MHz Frequencies in Europe
Restrictions for Use of 5470-5725MHz Frequencies in Europe
Luxembourg
Russian
Federation
Canada - Industry Canada IC
USA-Federal Communications Commission FCC
Caution Exposure to Radio Frequency Radiation
Caution Radio Frequency Interference Requirements
Using this equipment in Japan
2. Indication for Wireless LAN
3. Indication for Bluetooth
1. Important notice
Device Authorization
4. About the JEITA
Radio approvals for wireless devices
Page
Page
As of Mar
Morocco
AC Power Cord and Connectors
Wire size
Appendix D
Current rating
Finland
FIMKO
Sweden
SEMKO
Legal Footnotes
Appendix E
Non-applicable Icons
Memory Main System
64-Bit Computing
Hard Disk Drive HDD Capacity
Battery Life
Graphics Processing Unit GPU
Wireless LAN
Copy Protection
Glossary
Abbreviations
IDE integrated drive electronics
Index
4-23
LAN 3-5
Touch Pad 2-8, 4-1
Web Camera 2-8, 3-5