Setting up the wireless LAN (Continued)
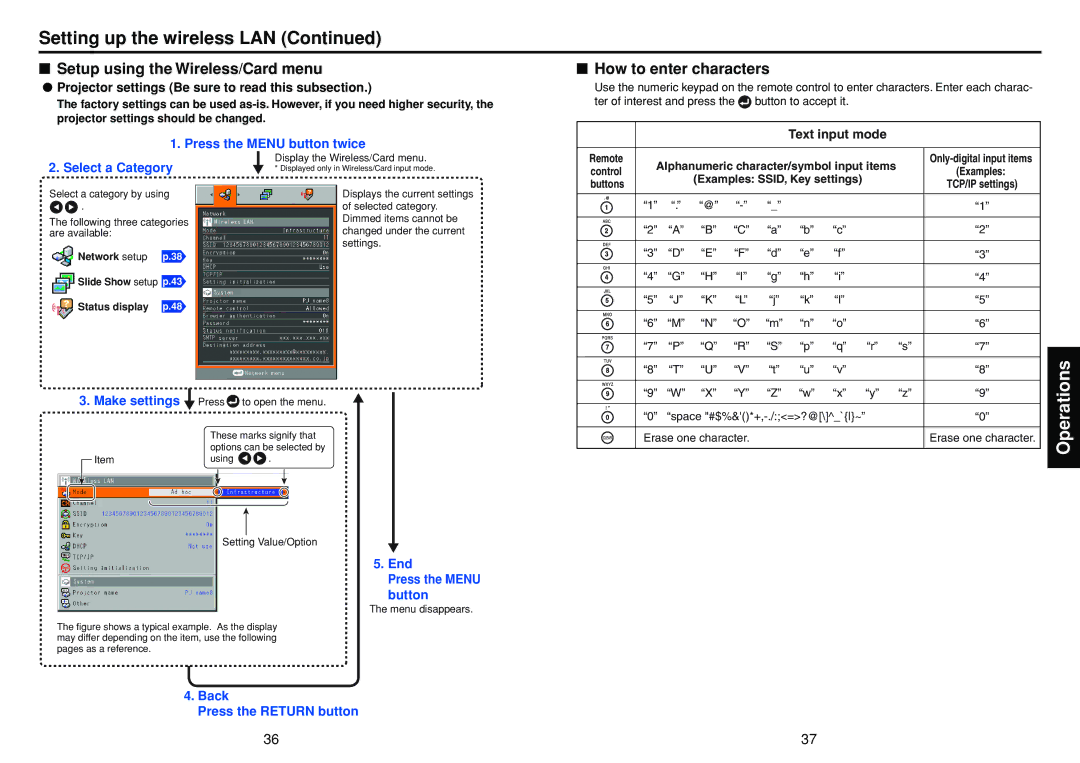
■Setup using the Wireless/Card menu
●Projector settings (Be sure to read this subsection.)
The factory settings can be used
1.Press the MENU button twice
■How to enter characters
Use the numeric keypad on the remote control to enter characters. Enter each charac- ter of interest and press the ![]() button to accept it.
button to accept it.
Text input mode |
2. Select a Category
Select a category by using ![]()
![]() .
.
The following three categories are available:
![]() Network setup p.38
Network setup p.38 ![]() Slide Show setup p.43
Slide Show setup p.43
Display the Wireless/Card menu.
* Displayed only in Wireless/Card input mode.
Displays the current settings of selected category. Dimmed items cannot be changed under the current settings.
Remote | Alphanumeric character/symbol input items | ||||||||
control | (Examples: | ||||||||
|
| (Examples: SSID, Key settings) | |||||||
buttons |
|
| TCP/IP settings) | ||||||
|
|
|
|
|
|
| |||
|
|
|
|
|
|
|
|
| |
| “1” | “.” | “@” | “_” |
|
| “1” | ||
|
|
|
|
|
|
|
|
| |
| “2” | “A” | “B” | “C” | “a” | “b” | “c” | “2” | |
|
|
|
|
|
|
|
|
| |
| “3” | “D” | “E” | “F” | “d” | “e” | “f” | “3” | |
|
|
|
|
|
|
|
|
| |
| “4” | “G” | “H” | “I” | “g” | “h” | “i” | “4” | |
![]() Status display p.48
Status display p.48
“5” | “J” | “K” | “L” | “j” | “k” | “l” |
|
| “5” |
|
|
|
|
|
|
|
|
|
|
“6” | “M” | “N” | “O” | “m” | “n” | “o” |
|
| “6” |
|
|
|
|
|
|
|
|
|
|
“7” | “P” | “Q” | “R” | “S” | “p” | “q” | “r” | “s” | “7” |
3. Make settings 
![]() Item
Item
Press ![]() to open the menu.
to open the menu.
These marks signify that options can be selected by
using ![]()
![]() .
.
Setting Value/Option
5. End
Press the MENU button
The menu disappears.
“8” | “T” “U” “V” | “t” | “u” | “v” |
|
| “8” |
|
|
|
|
|
|
|
|
“9” | “W” “X” “Y” | “Z” | “w” | “x” | “y” | “z” | “9” |
|
|
|
|
| |||
“0” | “space |
|
| “0” | |||
|
|
|
|
|
| ||
Erase one character. |
|
|
|
| Erase one character. | ||
Operations
The figure shows a typical example. As the display may differ depending on the item, use the following pages as a reference.
4.Back
Press the RETURN button
36 | 37 |