How to use the JPEG Conversion Tool (Continued)
■Converting files created with Microsoft® PowerPoint®
This process provides presentations without using a computer by converting presentation files created with Microsoft® PowerPoint® into JPEG files, storing them on a memory PC card, and displaying them in a slide show.
•To use this conversion mode, Microsoft® PowerPoint® must be installed on the computer.
•Only static images are supported by this process. Animation and audio are not supported.
Presentation files created with Microsoft® PowerPoint® usually
consist of several slides. For this reason, the tool creates a folder |
|
with the name specified in step (5), below, and file for each slide | (1) |
is created in the folder (starting with slide001.jpg). |
|
■ Making a presentation with converted JPEG files | |
(1) | Copy the folder created by the JPEG Conversion Tool, or its contents, onto a |
| memory PC card. |
(2) | Use the step 1 in “Playing a slide show from a thumbnail list” p.46 to display a |
| list of thumbnails. |
(3) | Follow the instructions in step 2 in “Playing a slide show from a thumbnail list” |
| p.47 to find the thumbnail of the first slide, Slide001.jpg, and move the orange |
| frame to it. (Select Slide001.jpg.) |
(4) | Press the button on the remote control. An enlarged view of the first slide |
| appears on the screen. This starts the presentation. |
(5) | To continue to the next slide, press the remote control’s button. To go back to the |
| previous slide, press the button. |
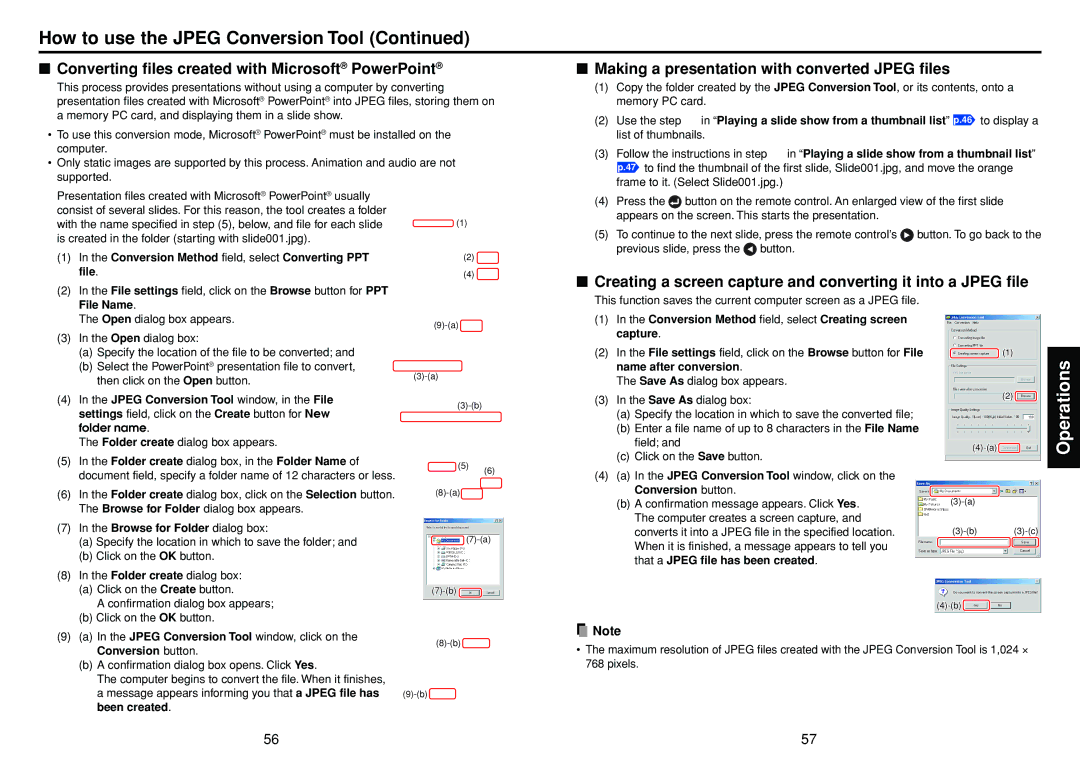
(1) | In the Conversion Method field, select Converting PPT |
| file. |
(2) | In the File settings field, click on the Browse button for PPT |
(2)
(4)
■ Creating a screen capture and converting it into a JPEG file |
| File Name. |
| The Open dialog box appears. |
(3) | In the Open dialog box: |
| (a) Specify the location of the file to be converted; and |
| (b) Select the PowerPoint® presentation file to convert, |
| then click on the Open button. |
(4) | In the JPEG Conversion Tool window, in the File |
| settings field, click on the Create button for New |
| folder name. |
| The Folder create dialog box appears. |
(5) | In the Folder create dialog box, in the Folder Name of |
This function saves the current computer screen as a JPEG file.
(1) | In the Conversion Method field, select Creating screen |
| capture. |
(2) | In the File settings field, click on the Browse button for File |
| name after conversion. |
| The Save As dialog box appears. |
(3) | In the Save As dialog box: |
| (a) Specify the location in which to save the converted file; |
| (b) Enter a file name of up to 8 characters in the File Name |
| field; and |
| (c) Click on the Save button. |
![]() (1)
(1)
(2)![]()
![]()
Operations
document field, specify a folder name of 12 characters or less. |
(6) In the Folder create dialog box, click on the Selection button. |
The Browse for Folder dialog box appears. |
(5)
(6)
(4) (a) In the JPEG Conversion Tool window, click on the |
Conversion button. |
(b) A confirmation message appears. Click Yes. |
The computer creates a screen capture, and |
(7) | In the Browse for Folder dialog box: |
| (a) Specify the location in which to save the folder; and |
| (b) Click on the OK button. |
(8) | In the Folder create dialog box: |
![]() (7)-(a)
(7)-(a)
converts it into a JPEG file in the specified location. |
When it is finished, a message appears to tell you |
that a JPEG file has been created. |
(a) Click on the Create button. |
A confirmation dialog box appears; |
(b) Click on the OK button. |
(9) (a) In the JPEG Conversion Tool window, click on the |
Conversion button. |
(b) A confirmation dialog box opens. Click Yes. |
The computer begins to convert the file. When it finishes, |
a message appears informing you that a JPEG file has |
been created. |
![]()
![]()
![]()
![]()
![]() Note
Note
•The maximum resolution of JPEG files created with the JPEG Conversion Tool is 1,024 ⋅ 768 pixels.
56 | 57 |