Using handy features (Continued)
■Cutting off the picture and sound temporarily (Mute)
When you want to project the images of another projector, overhead | Remote |
projector, etc. temporarily, this projector’s images and sound can be | Control |
turned off. |
|
Press the remote control’s MUTE button.
The picture and sound are cut off. (The Mute function is released when pressing the MUTE button again.)
![]() Notes
Notes
Using the menus
You can call up
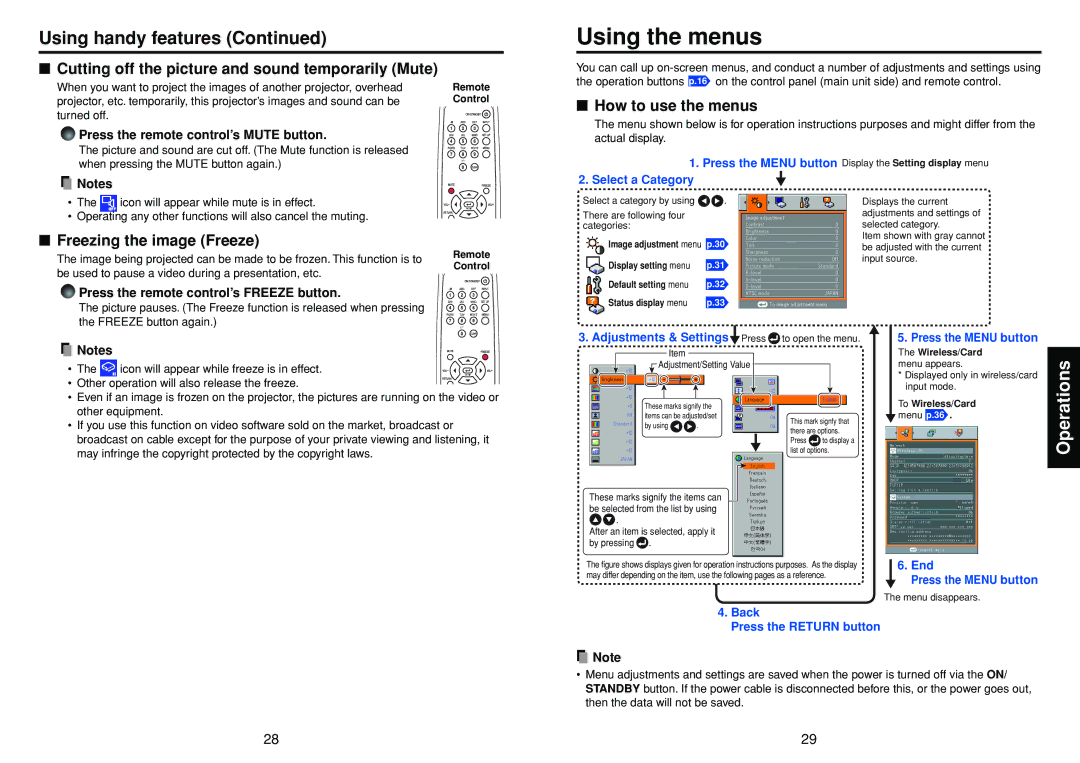
■How to use the menus
The menu shown below is for operation instructions purposes and might differ from the actual display.
1. Press the MENU button Display the Setting display menu
2. Select a Category
• | The | icon will appear while mute is in effect. |
• | Operating any other functions will also cancel the muting. | |
■Freezing the image (Freeze)
The image being projected can be made to be frozen. This function is to | Remote | |
Control | ||
be used to pause a video during a presentation, etc. | ||
|
Press the remote control’s FREEZE button.
The picture pauses. (The Freeze function is released when pressing the FREEZE button again.)
Select a category by using ![]()
![]() .
.
There are following four categories:
![]() Image adjustment menu p.30
Image adjustment menu p.30
Display setting menu | p.31 |
Default setting menu | p.32 |
Status display menu | p.33 |
Displays the current adjustments and settings of selected category.
Item shown with gray cannot be adjusted with the current input source.
![]() Notes
Notes
• The ![]() icon will appear while freeze is in effect.
icon will appear while freeze is in effect.
• Other operation will also release the freeze.
•Even if an image is frozen on the projector, the pictures are running on the video or other equipment.
•If you use this function on video software sold on the market, broadcast or broadcast on cable except for the purpose of your private viewing and listening, it may infringe the copyright protected by the copyright laws.
3. Adjustments & Settings![]() Press
Press ![]() to open the menu.
to open the menu.
Item
![]() Adjustment/Setting Value
Adjustment/Setting Value
These marks signify the items can be adjusted/set
by using 
 .
.
These marks signify the items can be selected from the list by using ![]()
![]() .
.
After an item is selected, apply it by pressing ![]() .
.
This mark signfy that there are options.
Press ![]() to display a list of options.
to display a list of options.
5. Press the MENU button
The Wireless/Card menu appears.
*Displayed only in wireless/card input mode.
To Wireless/Card
![]() menu p.36 .
menu p.36 .
Operations
The figure shows displays given for operation instructions purposes. As the display | 6. End |
may differ depending on the item, use the following pages as a reference. | Press the MENU button |
|
The menu disappears.
4.Back
Press the RETURN button
![]() Note
Note
•Menu adjustments and settings are saved when the power is turned off via the ON/ STANDBY button. If the power cable is disconnected before this, or the power goes out, then the data will not be saved.
28 | 29 |