Page
Disclaimer
Copyright
Trademarks
FCC notice Declaration of Conformity Information
Macrovision License of Notice
FCC information
For DVD Manufacturing License Agreement
Contact
FCC conditions
VCCI Class B Information Canadian regulatory information Canada only
EU Conformity Statement
Network Compatibility Statement
Modem warning notice
Japan regulations
Conformity Statement
Redial
Pursuant to FCC CFR 47, Part
Disconnection
Type of service
Telephone company procedures
If problems arise
Instructions for IC CS-03 certified equipment
Modem warning notice for Australia
Notes for Users in Australia and New Zealand
Notes for use of this device in New Zealand
ATB0 CCITT operation AT&G2 1800Hz guard tone
General conditions
Disposal of products
Following information is only for EU-member states
Disposal of batteries and/or accumulators
Disposing of the computer and the computer’s batteries
ENERGY STAR Program
Optical disc drive standards
Optical disc drive safety instructions
HLDS GT20N/GT20F
Location of the required label
DVD Super Multi +-R DL drive
Panasonic UJ880AD/UJ880ED
Location of the required label
Toshiba Samsung TS-L633C/TS-L633Y
Location of the required label
International precautions
VAROITUS. Suojakoteloa si saa avata. Laite sisältää laserdiodin, joka lähetää näkymätöntä silmilie vaarallista lasersäteilyä
Chapter 1 Introduction
Table of Contents
General Precautions
Preface
Chapter 5 The Keyboard
Chapter 2 The Grand Tour
Chapter 3 Getting Started
Chapter 4 Operating Basics
Chapter 8 Optional Devices
Chapter 6 Power and Power-up Modes
Chapter 7 HW Setup and Passwords
Chapter 9 Troubleshooting
Appendix B Display Controller
Appendix A Specifications
Appendix D Wireless LAN
Appendix E AC Power Cord and Connectors
Preface
Manual contents
Keys
Conventions
Abbreviations
Icons
Start
Display
Messages
Terminology
Provide adequate ventilation
General Precautions
Creating a computer-friendly environment
ExpressCard overheating
Stress injury
Heat injury
Pressure or impact damage
Mobile phones
Instruction Manual for Safety and Comfort
Hardware
Equipment checklist
Chapter
Introduction
Documentation
Software
Memory
Features
Processor
Chipset
Video RAM
Disks
Optical disc drive
Ports
Power
Keyboard
Pointing Device
Bridge media
Slots
Multimedia
ExpressCard
Modem
Communications
BluetoothTM
Wireless LAN
Security
Special features
Software
Low battery automatic Hibernation Mode
System automatic Sleep/Hibernation Mode
Power on password
Intelligent power supply
Utilities and Applications
TOSHIBA Value Added Package
point to All Programs, click TOSHIBA, click
provides access to specific tools, utilities and
such as printers and mobile phones
of the computer easier
This utility has the function of Physical Format
TOSHIBA HDD/SSD
TOSHIBA DVD PLAYER
TOSHIBA Face
Recognition
Memory expansion
Options
Battery Pack
refer to Chapter 6, Power and Power-up Modes
Front with the display closed
The Grand Tour
Chapter
Left side
Do not connect any cable other than a LAN cable to the LAN jack. It could cause damage or malfunction
Right side
DC IN 19V jack
Underside
Security lock slot
module section in Chapter 8, Optional Devices
when the AC adaptor is not connected. For more
and Power-up Modes
and Power-up Modes
10. Web Camera 11. Web Camera LED 12. LCD Sensor switch
Front with the display open
1. Display screen 2. Power button 3. Stereo speakers 4. Touchpad
5. Touchpad control buttons 6. System Indicators
Display screen
indicators section
such as Windows Live Messenger. TOSHIBA
Please refer to the Using the web camera section
Microphone
Web Camera
Next button
Function buttons
Play/Pause button
Previous button
System indicators
CAPS LOCK
Keyboard indicators
NUM LOCK
Region codes for DVD drives and media
Optical disc drives
Writable discs
8 speed maximum
DVDs
DVD Super Multi drive
8 speed maximum
AC adaptor
Chapter
Getting Started
Connecting the AC adaptor
The supplied power cord conforms to safety rules and regulations in the region from which the product is purchased and should not be used outside this region. For use in other regions, please buy power cords that conform to safety rules and regulations in that particular region
1. Connect the power cord to the AC adaptor
User’s Manual
Opening the display
Getting Started
Figure 3-4 Opening the display
Do not press or push on the display panel
Starting up for the first time
Turning on the power
Shut Down Mode
Turning off the power
Hibernation Mode
Data save in Hibernation Mode
Benefits of Hibernation Mode
Starting Hibernation Mode
Automatic Hibernation Mode
Benefits of Sleep Mode
Sleep Mode
Sleep Mode limitations
Executing Sleep Mode
System Recovery Options
System Recovery Options
Restarting the computer
Creating Optical Recovery Discs
1. Turn off your computer
Restoring the pre-installed software from your created Recovery Discs
Figure 4-1 Touch Pad and Touch Pad control buttons
Using the Touch Pad
Operating Basics
Chapter
Loading discs
Using optical disk drives
Figure 4-3 Pulling the disc tray open
2. Grasp the disc tray gently and pull until it is fully opened
3. Lay the CD/DVD, label side up, in the disc tray
Operating Basics
Removing discs
Figure 4-5 Removing a CD/DVD
How to remove a CD/DVD when the disc tray will not open
Figure 4-6 Manual release with the eject hole
Function button
Writing CD/DVD on DVD Super Multi drives
Function buttons
Icon
CD-RW Multi-Speed and High-Speed
Important message
Before writing or rewriting
CD-R
DVD-RW
DVD+R
DVD+R Double Layer
DVD+R for Labelflash
You can use both DVD-RAM discs that can be removed from a cartridge and DVD-RAM discs designed without a cartridge
When writing or rewriting
TOSHIBA Disc Creator
Disclaimer
4. Select File Open or Full Compare mode
How to learn more about TOSHIBA Disc Creator
Data Verification
Select Setting for Each Mode → Data Disc in the Setting menu
How to make a DVD-Video
How to make a Labelflash DVD
This whole section need confirmwith new Corel DVD MovieFatory
Important information for use
How to learn more about Corel DVD MovieFactory
Notes on use
TOSHIBA DVD Player
TOSHIBA DVD PLAYER
Display Devices & Audio
Operating TOSHIBA DVD PLAYER
Media care
CD/DVDs
Starting TOSHIBA DVD PLAYER
Floppy diskettes
Realtek HD Audio Manager
Adjusting System Volume
Sound system
Changing System Sounds
Information
Using the web camera
Speaker Configuration
Default Format
Do not point the web camera directly at the sun
Using TOSHIBA Web Camera Application
How to register the Face Recognition Data
Using TOSHIBA Face Recognition
Disclaimer
How to Delete the Face Recognition Data
Windows Logon via TOSHIBA Face Recognition
How to launch the help file
1N Mode Login screen
11 Mode Login screen
Region selection
Modem
Open the Dialing Properties dialog box after selecting region
Setting
Properties menu
AutoRun Mode
Dialing Properties
Connecting the modular cable
Disconnecting the modular cable
Modem Selection
2. Click Set up a connection or network
Wireless communications
Wireless LAN
Setting
Worldwide operation
Bluetooth wireless technology
BluetoothTM Stack for Windows by TOSHIBA
Security
Product Support
Release Notes related to the Bluetooth Stack for Windows by TOSHIBA
Indicator status
Wireless communication indicator
Indication
LAN cable types
Connecting the LAN cable
Disconnecting the LAN cable
Using a cleaning cloth
Cleaning the computer
Moving the computer
Heat dispersal
Typewriter keys
The Keyboard
Chapter
Soft keys FN key combinations
Function keys F1 … F12
Emulating keys on an enhanced keyboard
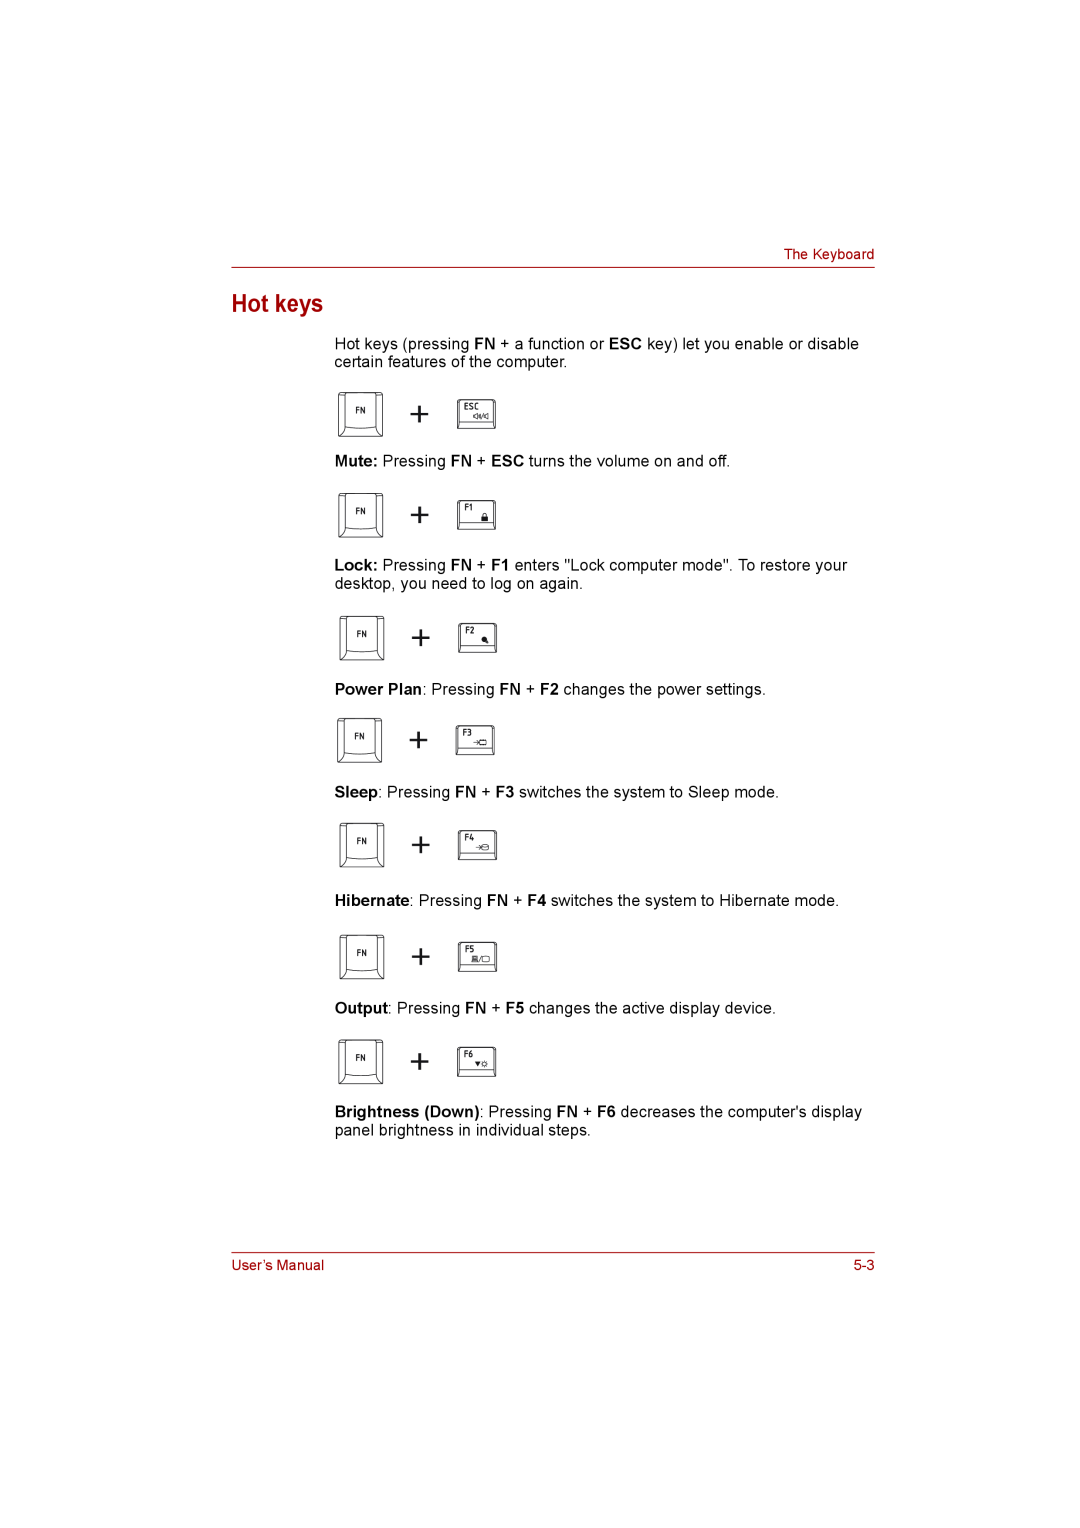
Hot keys
FN Sticky key
Generating ASCII characters
Windows special keys
Power conditions
Power and Power-up Modes
Chapter
Battery indicator
Power indicators
Battery pack
Battery types
DC IN indicator
Power indicator
Real Time Clock battery
Procedures
Care and use of the battery pack
Charging the batteries
Time
Battery charging notice
Charging time hours
Maximizing battery operating time
Monitoring battery capacity
Extending battery life
Retaining data with power off
Retention Time
Replacing the battery pack
To install a battery, follow the steps as detailed below
Starting the computer by password
TOSHIBA Password Utility
User Password
Supervisor password
Hot keys
Power-up modes
Panel power on/off
Windows utilities
6-13
System auto off
Power and Power-up Modes
User’s Manual
HW Setup Window
HW Setup and Passwords
HW Setup
Accessing HW Setup
Enter Password
Setup
Password
User Password
Display
Power On Display
Boot Priority
Boot Priority Options
Built-in LAN
Wireless Communication Switch
Legacy USB Support
LAN Wake-up on LAN
Peripheral devices
Power devices
Optional Devices
Cards/memory
Inserting an ExpressCard
ExpressCard
Removing an ExpressCard
Bridge media slot
Formatting an SD/SDHC memory card
Memory media
Points to note about the SD/SDHC memory card
Memory media format
Additional memory module
Point to note about memory module error
Installing a memory module
7. Turn your computer over
5. Seat the memory module cover in place and secure it with one screw
Removing a memory module
Battery Packs
Battery Charger
Universal AC Adaptor
ports of your computer
USB floppy diskette drive
USB connector
Insert this connector into one of the free USB
Connecting the USB floppy diskette drive
Using the USB floppy diskette drive
Disconnecting the USB floppy diskette drive
Connecting the eSATA device
eSATA External Serial ATA
External monitor
Disconnecting an eSATA device
3. Turn the external monitor’s power on
HDMI
Connecting the HDMI out port
Settings for Audio on HDMI
Settings for display video on HDMI
1. Click Start and click Control Panel
Select HD Format
4. Click Display Settings 5. Click Advanced Settings
Display mode at List All Modes
Security lock
Connecting the security lock
Problem solving process
Troubleshooting
Chapter
Analyzing the problem
Preliminary checklist
System start-up
Hardware and system checklist
Self test
Power
Procedure
Overheating power down
AC power
Problem
touch - if so, it will not charge properly and should
Battery
AC adaptor is connected is supplying power - this
can be tested by plugging another appliance into
Please refer to the TOSHIBA Password Utility
Password
Keyboard
Real Time Clock
Internal display panel
Chapter 7, HW Setup and Passwords for further
Solid State Drive
Hard disk drive
Chapter 7, HW Setup and Passwords for further
For further information, please refer to Chapter 4, Operating Basics
DVD Super Multi drive
single/multi-session, CD-ROM Mode
USB floppy diskette drive
configuration may be causing a problem. Ensure
that these configurations match the requirements
SD/SDHC memory card, miniSD/microSD Card
ExpressCard
Remove the ExpressCard from the computer and
Procedure
Memory Stick/Memory Stick PRO
MultiMediaCard
Problem
Touch Pad
Pointing device
the speed setting within the Mouse Control utility
Problem
Procedure
the Device Settings tab
USB mouse
USB device
are properly installed - to achieve this you should
eSATA device
disconnect the eSATA device and then reconnect
computer is turned on you should initially ensure
Additional memory module
Procedure
Volume control
Sound system
Problem
is on, you should check the connections to make
External monitor
connected to the monitor and to a working power
Try adjusting the contrast and brightness controls
CARRIER
Modem
simultaneously with another Bluetooth controller
Bluetooth
Wireless LAN
Wake-up on LAN function consumes power even
HDMI monitor output function
TOSHIBA support
Before you call
Where to write
Chapter
Disclaimers
64-Bit Computing
Memory Main System
HDD drive capacity
Battery Life
Graphics Processor Unit GPU”
Copy Protection
Wireless LAN
External HDD Capacity
Non-applicable Icons
Appendix E AC Power Cord and Connectors
Appendixes Table of Contents
Specifications
Wireless LAN
Environmental requirements
Specifications
Power Requirements
Appendix A
46666/48000/49333/50666/52000/53333/54666/ 56000 bps
Built-in Modem
300/1200/2400/4800/7200/9600/12000/14400/16
800/19200/21600/24000/26400/28800/31200/33
Display Controller
Appendix B
Display controller
Appendix C
V.90/V.92 mode
V.90/V.92
Result code
V.42 error control and V.42bis data compression
V.42 error control only
No error control protocol
maximum modem speeddefault
AT Command
V.90 disabled
V.90 enabled automatic speed selection
Card Specifications
Wireless LAN
Appendix D
Supported Frequency Sub-bands
Radio Characteristics
R-F Frequency
Frequency Range Channel ID
User’s Manual
Table Wireless IEEE 802.11 Channels Sets Revision A
Frequency Range Channel ID
5150-5850 MHz
User’s Manual
1 Factory-set default channels
3 These channels are available to A/B/G/N combo type only
4 Available Area US USA, CANADA only
Appendix E
AC Power Cord and Connectors
User’s Manual
Europe
Certification agencies
Outside of Europe
AustraliaEurope CanadaChina
United Kingdom
User’s Manual
TOSHIBA PC Health Monitor
Appendix F
Click Start → All Programs → TOSHIBA → Utilities → PC Health Monitor
Starting the TOSHIBA PC Health Monitor
Abbreviations
Glossary
Page
Page
Page
Glossary-5
disable To turn a computer option off. See also enable
Page
Page
Page
Glossary-10
Glossary-11
Page
Page
Index
Page
Page
Index-4
Web Camera Wireless communication, 4-29 Wireless LAN, 1-9 problems
Video RAM
User’s Manual