Manuals
/
TP-Link
/
Home Audio
/
Speaker
TP-Link
TL-R402M
manual
Quick Installation Guide, 4.1 TCP/IP configuration
Models:
TL-R402M
1
13
56
56
Download
56 pages
18.5 Kb
10
11
12
13
14
15
16
17
Specs
Install
FAQ
Password
Login
Connecting the Router
Appendix B Configuring the PCs
9Quick Setup - Finish
DHCP Settings
Factory Defaults
Page 13
Image 13
Page 12
Page 14
Page 13
Image 13
Page 12
Page 14
Contents
Page
COPYRIGHT & TRADEMARKS
FCC STATEMENT
SAFETY NOTICES
EC DECLARATION OF CONFORMITY EUROPE
COMMENT
Appendix A
TL-R402M Cable/DSL Router User Guide
Package contents
1.1 Purposes
Chapter 1. About this Guide
1.2 Conventions
1.3 Overview of this User Guide
Chapter 2. Introduction
2.2 Features
2.1 Overview of the Router
TL-R402M Cable/DSL Router User Guide
TL-R402M Cable/DSL Router User Guide
2.3 Panel Layout
Name
Action
Figure 2-2Rear Panel sketch
TL-R402M Cable/DSL Router User Guide
3.2 Installation Environment Requirements
Chapter 3. Connecting the Router
3.3 Connecting the Router
3.1 System Requirements
TL-R402M Cable/DSL Router User Guide
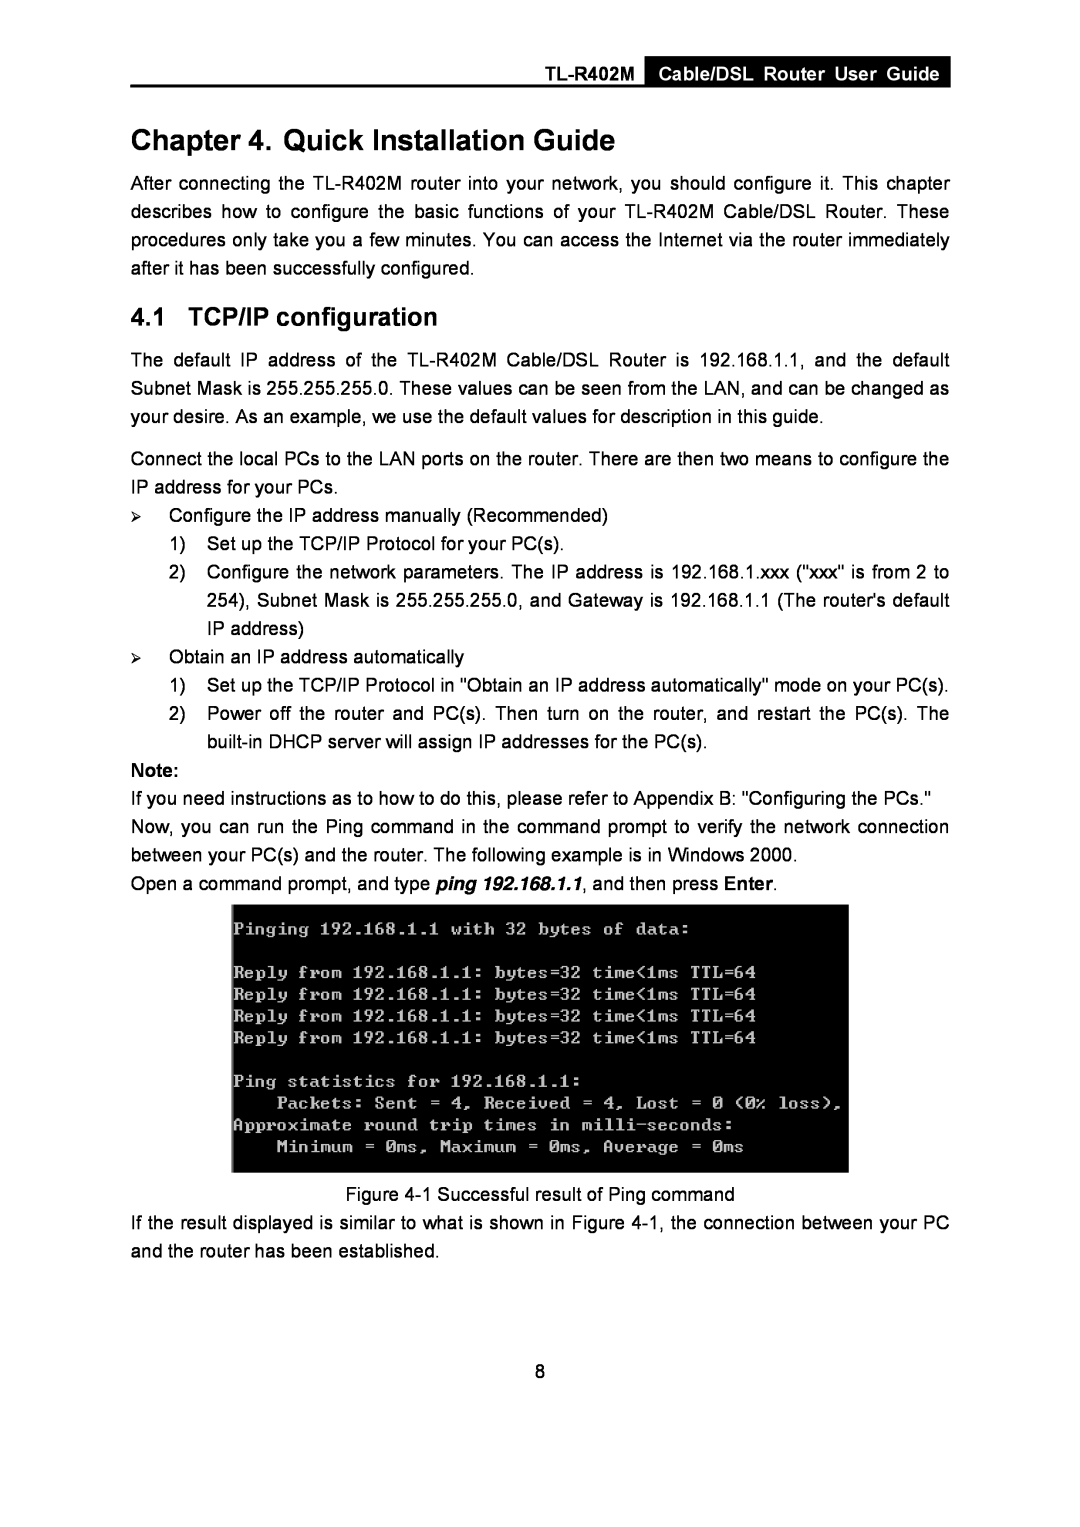
4.1 TCP/IP configuration
Chapter 4. Quick Installation Guide
TL-R402M Cable/DSL Router User Guide
TL-R402M Cable/DSL Router User Guide
4.2 Quick Installation Guide
TL-R402M Cable/DSL Router User Guide
Figure 4-4Login Windows
Figure 4-6Choose WAN Connection Type
TL-R402M Cable/DSL Router User Guide
TL-R402M Cable/DSL Router User Guide
Figure 4-9Quick Setup - Finish
5.1 Login
Chapter 5. Configuring the Router
5.2 Status
TL-R402M Cable/DSL Router User Guide
5.4Network
5.3 Quick Setup
5.4.1 LAN
TL-R402M Cable/DSL Router User Guide
TL-R402M Cable/DSL Router User Guide
5.4.2 WAN
Figure 5-4WAN - Dynamic IP
TL-R402M Cable/DSL Router User Guide
Figure 5-5WAN - Static IP
TL-R402M Cable/DSL Router User Guide
TL-R402M Cable/DSL Router User Guide
¾Connect on Demand - You can configure the router to disconnect your Internet connection after a specified period of inactivity Max Idle Time. If your Internet connection has been terminated due to inactivity, Connect on Demand enables the router to automatically re-establishyour connection as soon as you attempt to access the Internet again. If you wish to activate Connect on Demand, click the radio button. If you want your Internet connection to remain active at all times, enter 0 in the Max Idle Time field. Otherwise, enter the number of minutes you want to have elapsed before your Internet connection terminates
TL-R402M Cable/DSL Router User Guide
Figure 5-7PPPoE Advanced Settings
Figure 5-8WAN - L2TP
TL-R402M Cable/DSL Router User Guide
TL-R402M Cable/DSL Router User Guide
5.4.3 MAC Clone
5.5.1 DHCP Settings
5.5DHCP
DHCP yDHCP settings yDHCP Clients List
TL-R402M Cable/DSL Router User Guide
5.5.3 Address Reservation
5.5.2 DHCP Clients List
TL-R402M Cable/DSL Router User Guide
Figure 5-13Address Reservation
TL-R402M Cable/DSL Router User Guide
5.6.1 Virtual Servers
5.6Forwarding
TL-R402M Cable/DSL Router User Guide
Forwarding yVirtual Servers yPort Triggering yDMZ
TL-R402M Cable/DSL Router User Guide
5.6.2 Port Triggering
Figure 5-16Port Triggering
TL-R402M Cable/DSL Router User Guide
TL-R402M Cable/DSL Router User Guide
5.6.3 DMZ
5.6.4 UPnP
5.7Security
TL-R402M Cable/DSL Router User Guide
Security yFirewall yIP Filter yDomain Filter yMAC
5.7.2 IP Address Filtering
5.7.1 Firewall
TL-R402M Cable/DSL Router User Guide
Figure 5-21IP Address Filtering
TL-R402M Cable/DSL Router User Guide
TL-R402M Cable/DSL Router User Guide
5.7.3 Domain Filtering
For example
Figure 5-23Domain Filtering
TL-R402M Cable/DSL Router User Guide
For example
TL-R402M Cable/DSL Router User Guide
5.7.4 MAC Filtering
TL-R402M Cable/DSL Router User Guide
5.7.5 Remote Management
Fox example
5.7.6 Ping from WAN
5.8 Static Routing
TL-R402M Cable/DSL Router User Guide
To add static routing entries
5.9.1 Firmware
5.9System Tools
TL-R402M Cable/DSL Router User Guide
To modify an existing entry
TL-R402M Cable/DSL Router User Guide
5.9.2 Factory Defaults
5.9.4 Password
5.9.3 Reboot
TL-R402M Cable/DSL Router User Guide
TL-R402M Cable/DSL Router User Guide
5.9.5 Log
TL-R402M Cable/DSL Router User Guide
Appendix A FAQ
3.I want to use Netmeeting, what do I need to do?
TL-R402M Cable/DSL Router User Guide
Figure 5 DMZ
TL-R402M Cable/DSL Router User Guide
1.Install TCP/IP component
Appendix B Configuring the PCs
2.Configure TCP/IP for your computer
TL-R402M Cable/DSL Router User Guide
Assigned by DHCP Sever
TL-R402M Cable/DSL Router User Guide
Setting IP address manually
Figure 13 DNS Configuration tab
TL-R402M Cable/DSL Router User Guide
Figure 12 Gateway tab
Figure 14 IP Address tab
TL-R402M Cable/DSL Router User Guide
TL-R402M Cable/DSL Router User Guide
Figure 16 DNS Configuration tab
TL-R402M
Appendix C Specifications
Cable/DSL Router User Guide
General
TL-R402M Cable/DSL Router User Guide
Appendix D Glossary
TL-R402M Cable/DSL Router User Guide
Appendix E Contact Information
Top
Page
Image
Contents