E

Assembly

_Read entire operator'smanual before you attempt to assemble or operateyour new pressurewasher.

Your pressure washer requires some assembly and is ready for use after it has been properly serviced with the recommended oil and fuel.

If you haveany problems with the assembly of your pressure washer, pleasecall the pressure washer helplineat

(888) 611-6708. If calling for assistance, please havethe model, revision, and serial number from the data tag available.

UnpackPressureWasher

1.Remove the parts bag, accessories,and inserts included with pressurewasher.

2.Opencarton completely by cutting each corner from top to bottom.

3.Ensureyou have all included items prior to assembly. Items in the cartoninclude:

=Main Unit

Handle

High PressureHose

Spray Gun

Nozzle Extensionwith Quick Connect Fitting

Plastic Accessory Tray

Oil Bottle

Parts Bag(which includesthe following):

Safety Goggles

Operator'sManual

EngineOperator'sManual

Owner'sRegistration Card

Bagcontaining 3 Multi-Colored Spray Tips

Spray Gun Holder Wireform

HandleFasteningHardwareKit (which includes):

Carriage Bolts (2)

Plastic Knobs (3)

Tree Clips (4)

To prepare your pressurewasher for operation, you will need to perform these tasks:

1.Fill out and send in registration card.

2.Attach handleto main unit.

3.Add oil to engine crankcase.

4.Add fuel to fuel tank.

5.Connect high pressure hose to spray gun and pump.

6.Connect water supply to pump.

7.Attach nozzleextension to spray gun.

8.Select!attachquick connect spray tip to nozzle extension.

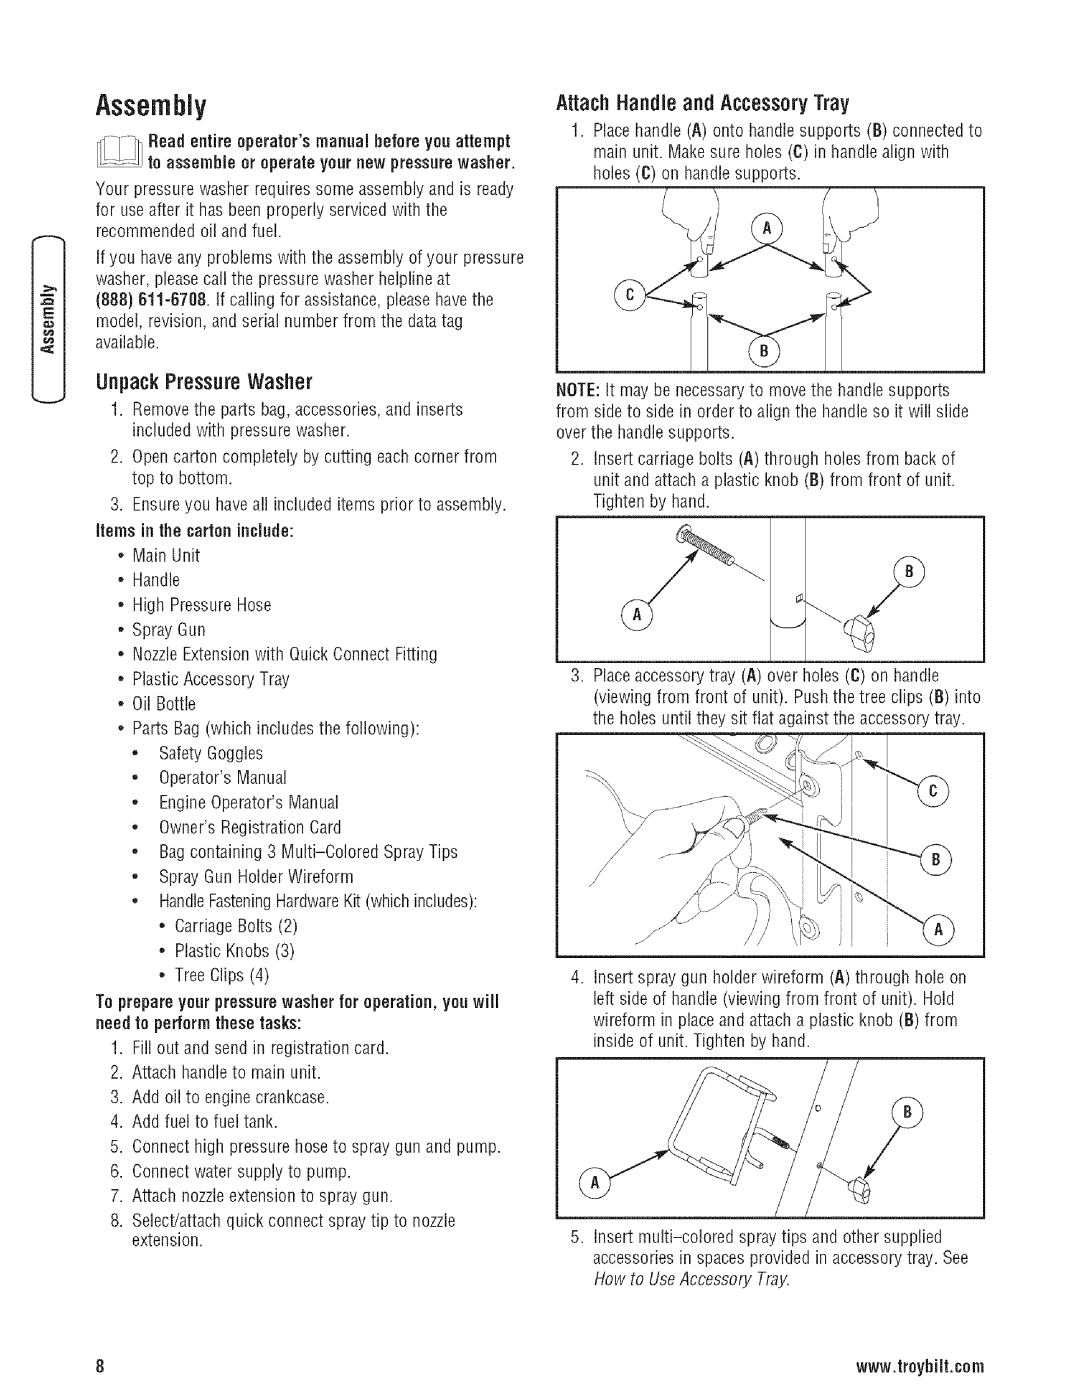
Attach Handle and AccessoryTray

1.Place handle (A) onto handle supports (B) connectedto main unit. Makesure holes (C) in handle align with holes (C) on handlesupports.

NOTE:It may be necessaryto movethe handlesupports from side to side in order to align the handleso it will slide over the handle supports.

2.Insert carriage bolts (A) through holes from back of unit and attach a plastic knob (B) from front of unit. Tighten by hand.

3.Place accessory tray (A) over holes (C) on handle (viewing from front of unit). Push the tree clips (B) into the holes until they sit flat against the accessory tray.

J

J

4.Insert spray gun holder wireform (A) through hole on left side of handle (viewing from front of unit). Hold wireform in place and attach a plastic knob (B) from inside of unit. Tighten by hand.

5.Insert multi-colored spraytips and other supplied accessories in spaces provided in accessory tray. See How to Use Accessory Tray.

8

www.troybilt.cem

Page 8
Image 8
Troy-Bilt 203779GS manual Assembly, UnpackPressureWasher, Attach Handle and AccessoryTray

203779GS specifications

The Troy-Bilt 203779GS is a versatile and efficient garden tiller designed to make soil preparation easy and effective. Built with durability and performance in mind, this tiller is perfect for both amateur gardeners and experienced horticulturists.

One of the key features of the Troy-Bilt 203779GS is its powerful engine. It comes equipped with a reliable 205cc engine, providing ample power to tackle tough soil conditions. This engine ensures that users can till through compacted or rocky soil without worrying about stalling or overheating. The tiller's ability to churn through various soil types makes it an ideal choice for home gardens, landscaping projects, and larger agricultural tasks.

Another significant characteristic of the 203779GS is its tilling width and depth. This model features a generous tilling width of 18 inches, allowing for efficient coverage of larger areas in fewer passes. Additionally, it offers a tilling depth of up to 6 inches, which is sufficient for most gardening needs, including seedbed preparation and mixing in compost or fertilizers.

The Troy-Bilt 203779GS utilizes a unique rear-tine design. This configuration provides better control and maneuverability while tilling, making it easier to navigate around established plants or garden beds. The rear-tine setup also enables more efficient tilling, as the tines pull the machine forward, reducing operator effort.

For enhanced durability and ease of use, the tiller is equipped with harden steel tines. These tines are designed to break up soil effectively and withstand the wear and tear of regular use. The Troy-Bilt 203779GS also features adjustable tines, allowing users to customize the tilling depth according to their specific gardening needs.

User comfort is a priority with this model. It includes ergonomic handles that provide a comfortable grip, reducing strain on the hands and arms during extended use. The adjustable handle height further ensures that users of various heights can operate the tiller comfortably.

In conclusion, the Troy-Bilt 203779GS is a robust and efficient garden tiller, characterized by its powerful engine, wide tilling capabilities, and user-friendly features. Whether you are preparing a small home garden or managing a larger landscape, this tiller is equipped to meet the demands of any gardening enthusiast. With its reliable performance and thoughtful design, it stands out as a worthy investment.