154 Series 164 Series 265 Series
MODELS
Downloaded From TV-Manual.com Manuals
OWNER’S GUIDE
FCC Declaration of Conformity
TV Features
Contents
Basic Setup and Operation
5 NetCommand IR Control
TV Software
Installation and Operating Notes
Important Information About Your TV
Children and TV Viewing
Outdoor Antenna Grounding
Replacement Parts
Important Safety Instructions
DO support the TV
Stand Installation
CAUTION. Place the
under the corners
Wall-Mounting
Stand Removal Prior to Wall-Mounting
Easy Connect Auto Input Sensing
Special Features of Your TV
1080p High-Definition LCD Display System
True120Hz and True240Hz
Installing the Remote Control Batteries
1 Basic Setup and Operation
Package Contents
Remote Control
See the stand-installation or wall-mounting
First-Time Power-On
10 1. Basic Setup and Operation
TV power connection
TV Controls
Remote Control
1. Basic Setup and Operation
Number/letter keys
The TOOLS Key and Menu
12 1. Basic Setup and Operation
TV Controls, continued
TOOLS
System Reset
POWER Indicator
POWER
TV is powered off. Normal operation
Setting Up Inputs with Auto Input Sensing
Setting Up TV Inputs
Using the ANT Antenna Input
14 1. Basic Setup and Operation
About Auto Input Sensing
Setting Up TV Inputs, continued
When You First Connect a Device
Auto Input Sensing for Most Devices
CANCEL
16 1. Basic Setup and Operation
TV Connected to an Antenna or Direct Cable Service no cable box
Basic TV Operation
Changing Audio Settings TV Speakers Only
Picture Settings
When to Use
Basic TV Operation, continued
Feature
More TV Features
18 1. Basic Setup and Operation
The FORMAT Key and Picture Shape
video signals only. This TV is not
Using the TV with a Personal Computer
Connecting a Computer to the TV
HDMI Connection
Image Resolution
Using the TV with a Personal Computer
Computer Video Adjustments
20 1. Basic Setup and Operation
Auto Input Sensing
2 TV Connections
Connection Types and Audio/Video Quality
Connection Types
Installing the cable tie
265 Series NetCommand/ IR external controller jack. See page LAN
Install the supplied cable ties in any of four mounting holes
Inputs and Outputs
1. ANT Antenna
9. USB Power Only
Inputs and Outputs, continued
2. HDMI Inputs High-Definition Multimedia Interface
13. SUBWOOFER OUTPUT
HDMI Device
12. AVR/SURROUND OUTPUT
14. CENTER CH INPUT
DVI Video Device
Incoming from cable service or satellite dish
Y Pb Pr Component Video Device
Commonly used with a Cable Box, Satellite Receiver, or DVD Player
Composite Video Device
Antenna or Cable TV Service
VCR or DVD Recorder to an Antenna or Wall Outlet Cable
VCR or other device with composite video output
A/V receiver back panel
A/V Receiver
A/V Receiver with HDMI Output
DVD player
Power-only USB port USB/USB mini-plug power cable RCA/RCA audio cable
Using the TV Speakers as a Center Channel
Wireless Subwoofer
Supplemental Audio Connections
Setting the Sleep Timer
3 TV Features
Sleep Timer
Viewing or Changing the Sleep Timer
30 3. TV Features
Using ChannelView Listings
Using Custom Channel Banks
Press CANCEL
Status Display
Signal Definitions
3. TV Features
INFO
32 3. TV Features
Using an External Sound System
Controlling A/V Receiver Sound Volume
Disconnecting an A/V Receiver
Picture Shape and Display Formats
480i/480p and SD 43 signals Eliminates top and
720p, 1080i, SD 169, and HD signals Eliminates
Format Definitions
Notes on Using the USB Port
34 3. TV Features
Setup
Camera Images and Music Files
Camera Images and Music Files, continued
Using the Photos and Audio Menus
USB Media Setup Menu
For Photos or Audio Tracks
Camera connection using a composite video cable
Using an Audio-Only Device
36 3. TV Features
Photos and Motion Video as Composite Video
Bluetooth icon in Input Selection Menu
Wireless Audio Playback
Pairing the TV with an Audio Playback Device
Resetting Bluetooth Pairing or Connection
Connecting the TV
Basic Manual Setup
38 3. TV Features
Sound Projector
5. Adjusting an External Subwoofer
3. Adjusting Beam Angles
4. Adjusting Levels
How to Make Adjustments in the Custom Menu
40 3. TV Features
Auto Setup
Microphone Placement
Start Auto Setup
External Rear Speakers
Connecting the transmitter to the TV
Sound Projector adjustments when using external rear speakers
Transmitter
Router or modem providing high-speed internet service
Home Network Setup
42 3. TV Features
Setup Network, DHCP connection
Setup Network menu, manual connection
Wireless Connection
USB wireless adapter
StreamTV Internet Media, continued
Using VUDU Apps and VUDU Movies
Using StreamTV Internet Media
Troubleshooting
44 3. TV Features
265 Series. NetCommand IR Control Any Connection Type
Remote Control Programming Any Connection Type
CEC-Enabled HDMI Device HDMI Connection Only
CEC-Enabled HDMI A/V Receiver
Picture
46 4 TV Menus
Main Menu
Picture
4. TV Menus
Picture, continued
Picture+
Brightness
Using PerfectColor
Picture Reset
to make adjustments
Using PerfecTint
Sound
To return to the default values for Advanced
adjustment
Sound Audio
Auto SP
Sound, continued
Sound Global
Sound SoundPro
analog when audio from the TV speakers is muted. While watching TV
Services
Service
Caption signals sent by the broadcaster
Setup Clock
Setup
Setup Language
Setup Timer
Adding/Deleting Channels Using the Channel Edit Menu
Setup, continued
Setup Channel
Ant Air Ant Cable
Wireless Connection Network ID
Setup Energy
Setup Network
54 4. TV Menus
Inputs Name
If case of CEC conflicts Turn off CEC signals in one of these ways
Inputs
Inputs
Inputs Demo
Inputs, continued
Inputs Order
56 4. TV Menus
Lock
Setting a Pass Code
Resetting a Pass Code
TV Locks
Lock Parental
Content
Lock, continued
58 4. TV Menus
Lock Panel
Lock Time
Lock Channel
Lock Other
NetCommand IR home-theater control is avail- able on 265 series TVs
60 5 NetCommand IR Control
About NetCommand IR Control
Important Note on NetCommand
highlight IR-NetCommand Output
Placement
5. NetCommand IR Control 265 Series
The New Device Found screen displays when you connect the IR emitter
NetCommand and Device-Specific Keys
NetCommand Setup
Initial NetCommand Setup
62 5. NetCommand IR Control 265 Series
Adding or Removing Device Keys from NetCommand Control
NetCommand Setup, continued
Operating NetCommand-Controlled Devices
Controlling Most Device Types
Special Operation Description and Setup
Operating NetCommand-Controlled Devices, continued
64 5. NetCommand IR Control 265 Series
How to Use
Enter digits
Cancel
CANCEL as the Cancel or Exit Function
separator
Power On or Power ON/OFF toggle
NetCommand Specialized Device Keys
66 5. NetCommand IR Control 265 Series
Cancel or erase menus
Controlling A/V Receiver Power
Controlling an A/V Receiver after NetCommand Setup
Switching Audio to and from the A/V Receiver
Power and volume. See the next page
68 6. NetCommand Control of an A/V Receiver 265 Series
Setting Up A/V Receiver Control
Power and Volume
Setup to Control A/V Receiver Power and Volume
6. NetCommand Control of an A/V Receiver 265 Series
Setting Up A/V Receiver Control, continued
Automatic Audio/Video Switching Over an HDMI Connection
More About Using an HDMI Connection
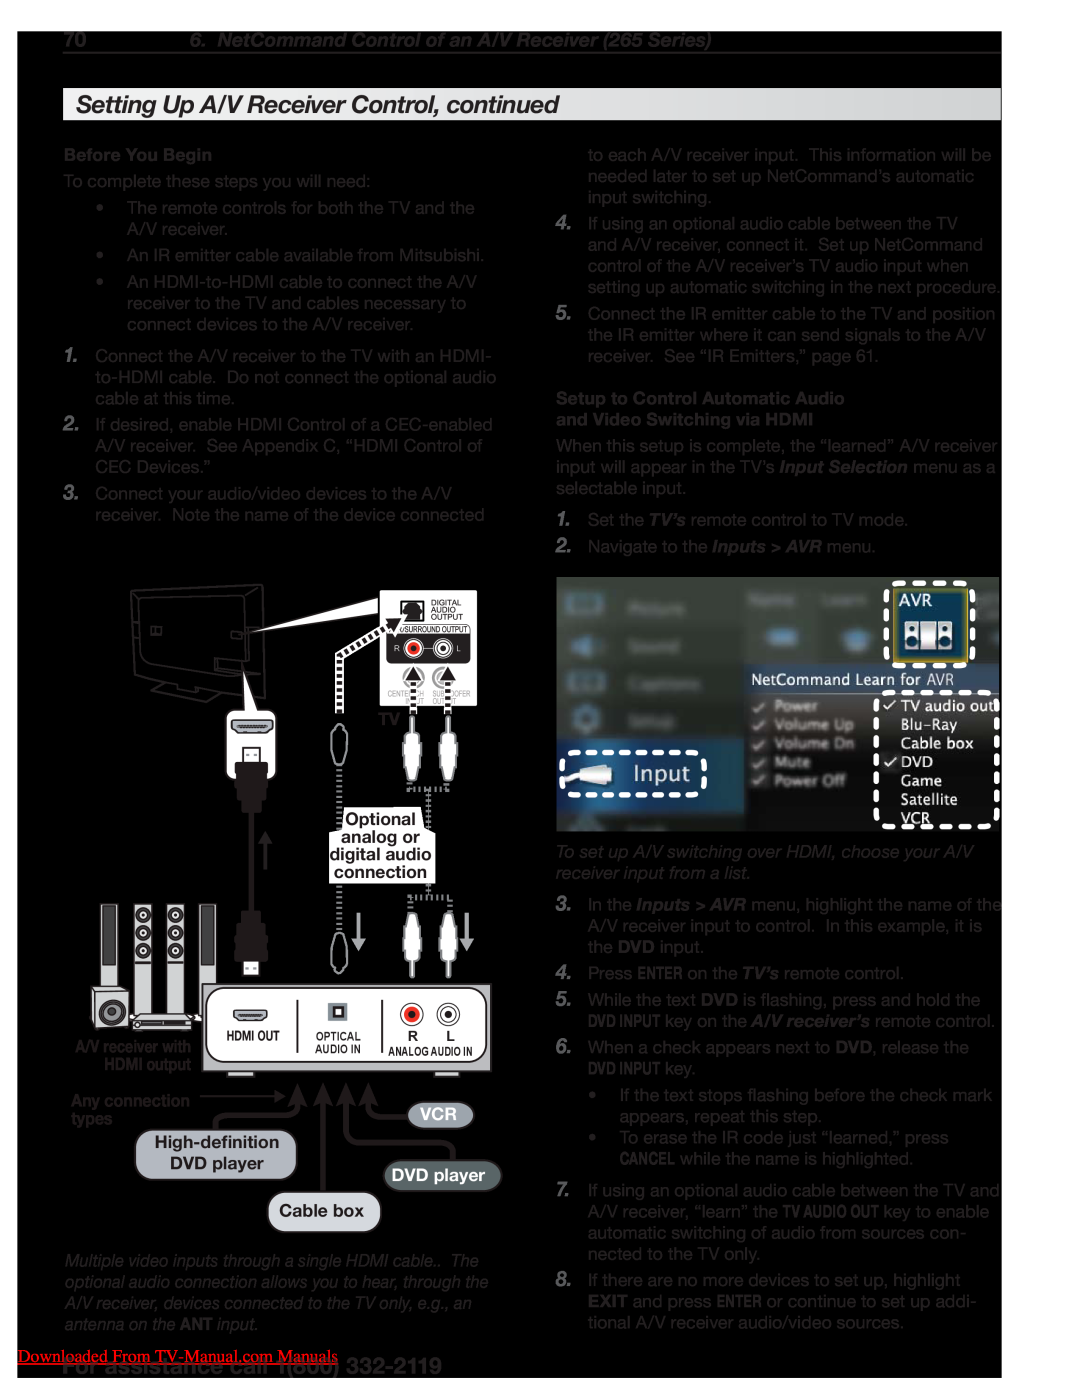
Setup to Control Automatic Audio and Video Switching via HDMI
70 6. NetCommand Control of an A/V Receiver 265 Series
Before You Begin
NetCommand Control of a Device Con- nected to an HDMI A/V Receiver
6. Open the Inputs Learn menu
Appendix B Bypassing the Parental Lock
Appendix A Programming the Remote Control
Appendix E Troubleshooting
Appendix C HDMI Control of CEC Devices Appendix D TV Care
VOLUME
Appendix A Programming the Remote Control
POWER
CANCEL on some models CHANNEL UP/DN for track skip on some models
Stop, VOLUME UP, or MUTE
Appendix A Programming the Remote Control, continued
Programming the Remote Control
2. Press keys 9 9 3 VOLUME UP
Appendices75
Audio Accessories
Video Accessories
Audio Amplifiers
Satellite Receivers
76 Appendices
VCRs
Appendices77
78 Appendices
Blu-ray and HD-DVD
Bypassing the Parental Lock
Appendix B Bypassing the Parental Lock
Mitsubishi Home Theater TV
Appendices79
This page intentionally left blank
80 Appendices
Enabling HDMI Control of CEC Devices
To use HDMI Control, you must enable it in both the TV and the device
Appendix C HDMI Control of CEC Devices
Has No HDMI Control Option
82 Appendices
Appendix C HDMI Control of CEC Devices, continued
HDMI Control of an HDMI A/V Receiver and Connected Devices
HDMI output
CEC-enabled A/V receiver functions that may be available
Using HDMI Control
CEC-enabled VCR, DVD, and DVR functions that may be available
Resolving CEC Conflicts
General Cleaning Precautions
Cleaning Recommendations
Care of the Remote Control
Remote Control Tips
Service and Customer Support
Appendix E Troubleshooting
TV Reset Comparison Guide
Reset Name
see the Setup Channel Edit
Appendix E Troubleshooting, continued
A/V Reset
System Reset
VUDU
Symptom
Appendices87
General TV Operation
88 Appendices
TV Power On/Off
TV Channels
Appendices89
Picture
Sound
90 Appendices
Check that DIGITAL AUDIO OUTPUT and/or AVR/SURROUND
NetCommand IR Control NetCommand-equipped models only
Appendices91
Trademark and License Information
92 Trademark and License Information
END-USER LICENSE AGREEMENT FOR EMBEDDED SOFTWARE
Mitsubishi TV Software
Trademark and License Information
2. RIGHTS AND LIMITATIONS
800 332-2119. A nominal handling and mailing charge may apply
GNU GENERAL PUBLIC LICENSE
94 Trademark and License Information
Version 3, 29 June
6. Conveying Non-Source Forms
4. Conveying Verbatim Copies
5. Conveying Modified Source Versions
7. Additional Terms
9. Acceptance Not Required for Having Copies
96 Trademark and License Information
15. Disclaimer of Warranty
10. Automatic Licensing of Downstream Recipients
GNU GENERAL PUBLIC LICENSE
GNU General Public License
Version 2, June
TERMS AND CONDITIONS FOR COPYING, DISTRIBUTION AND MODIFICATION
98 Trademark and License Information
NO WARRANTY
1. TO OBTAIN WARRANTY SERVICE
Mitsubishi LCD Flat Panel HDTV Limited Warranty
Warranty99
2. THIS LIMITED WARRANTY DOES NOT COVER
Network Service Disclaimer
100 Warranty
Index
102 Index
Downloaded From TV-Manual.com Manuals
SYSTEM RESET
To order replacement or additional remote controls
MDEAservice@mdea.com
Website