INSTALLATION

Installation of the Projector and Screen

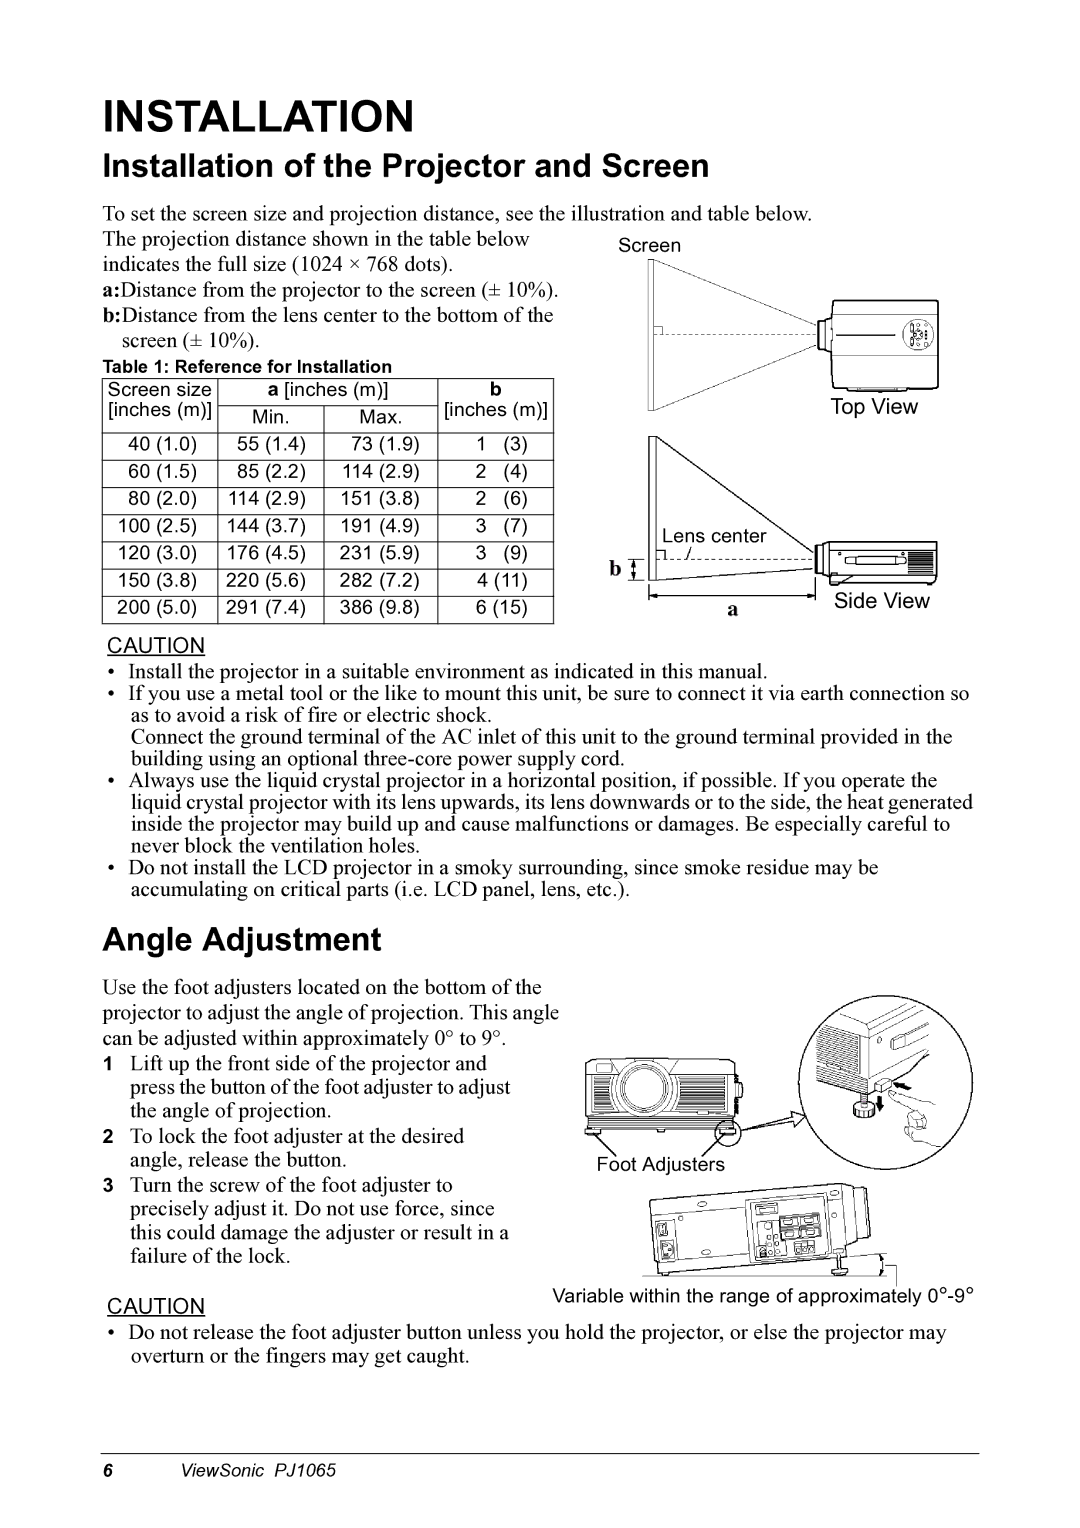
To set the screen size and projection distance, see the illustration and table below.

The projection distance shown in the table below Screen indicates the full size (1024 × 768 dots).

a:Distance from the projector to the screen (± 10%).

b:Distance from the lens center to the bottom of the screen (± 10%).

Table 1: Reference for Installation


Screen size


a [inches (m)]


b

Top View

[inches (m)]


[inches (m)]

Min.

Max.


40

(1.0)

55

(1.4)

73

(1.9)

1

(3)


60

(1.5)

85

(2.2)

114

(2.9)

2

(4)


80

(2.0)

114

(2.9)

151

(3.8)

2

(6)


100

(2.5)

144

(3.7)

191

(4.9)

3

(7)

Lens center

120

(3.0)

176

(4.5)

231

(5.9)

3

(9)


150

(3.8)

220

(5.6)

282

(7.2)

4 (11)

Side View

200

(5.0)

291

(7.4)

386

(9.8)

6 (15)

CAUTION

Install the projector in a suitable environment as indicated in this manual.

If you use a metal tool or the like to mount this unit, be sure to connect it via earth connection so as to avoid a risk of fire or electric shock.

Connect the ground terminal of the AC inlet of this unit to the ground terminal provided in the building using an optional three-core power supply cord.

Always use the liquid crystal projector in a horizontal position, if possible. If you operate the liquid crystal projector with its lens upwards, its lens downwards or to the side, the heat generated inside the projector may build up and cause malfunctions or damages. Be especially careful to never block the ventilation holes.

Do not install the LCD projector in a smoky surrounding, since smoke residue may be accumulating on critical parts (i.e. LCD panel, lens, etc.).

Angle Adjustment

Use the foot adjusters located on the bottom of the projector to adjust the angle of projection. This angle can be adjusted within approximately 0° to 9°.

1Lift up the front side of the projector and press the button of the foot adjuster to adjust the angle of projection.

2To lock the foot adjuster at the desired

angle, release the button.

Foot Adjusters

3Turn the screw of the foot adjuster to precisely adjust it. Do not use force, since this could damage the adjuster or result in a failure of the lock.

CAUTION

Variable within the range of approximately 0° -9°


Do not release the foot adjuster button unless you hold the projector, or else the projector may overturn or the fingers may get caught.

6ViewSonic PJ1065

Page 8
Image 8
ViewSonic PJ1065 manual Installation of the Projector and Screen, Angle Adjustment

PJ1065 specifications

The ViewSonic PJ1065 is a robust multimedia projector that has gained recognition for its impressive performance and versatility, making it an ideal choice for both professional settings and educational environments. With its cutting-edge technologies and user-friendly features, the PJ1065 serves as a reliable tool for presentations, lectures, and multimedia consumption.

One of the standout features of the PJ1065 is its native resolution of 1920 x 1080 pixels (Full HD), which delivers sharp and clear images. This high resolution ensures that text is legible, and visuals are detailed, enhancing the overall viewing experience. Additionally, it boasts a brightness level of 6,500 lumens, making it suitable for various lighting conditions, from dimly lit conference rooms to brightly lit classrooms. This high lumen output guarantees that images remain vivid and colorful, regardless of the ambient light.

Another significant characteristic of the PJ1065 is its contrast ratio of 3000:1, which provides deep blacks and vibrant colors. This flexibility enhances the projector's ability to display a wide range of content types, from PowerPoint presentations to videos, ensuring that the nuances of every image are captured effectively.

The PJ1065 incorporates advanced lamp technology, featuring a long-lasting lamp life of up to 20,000 hours in Eco mode. This longevity reduces the need for frequent replacements, lowering the total cost of ownership and making it economical for long-term use.

Connectively, the projector offers a variety of input options, including HDMI, VGA, and USB Type-A, allowing users to connect various devices effortlessly. Moreover, the PJ1065 supports wireless connectivity, enabling users to present content directly from laptops or mobile devices without the need for cumbersome cables.

The projector is designed with user convenience in mind, featuring an intuitive interface and remote control that simplifies navigation. Its compact design ensures easy transport and setup, making it a versatile solution for business professionals and educators on the go.

In summary, the ViewSonic PJ1065 combines high brightness, excellent resolution, and multiple connectivity options in a compact and efficient design, making it an outstanding choice for anyone seeking a reliable and high-performing multimedia projector for various applications.