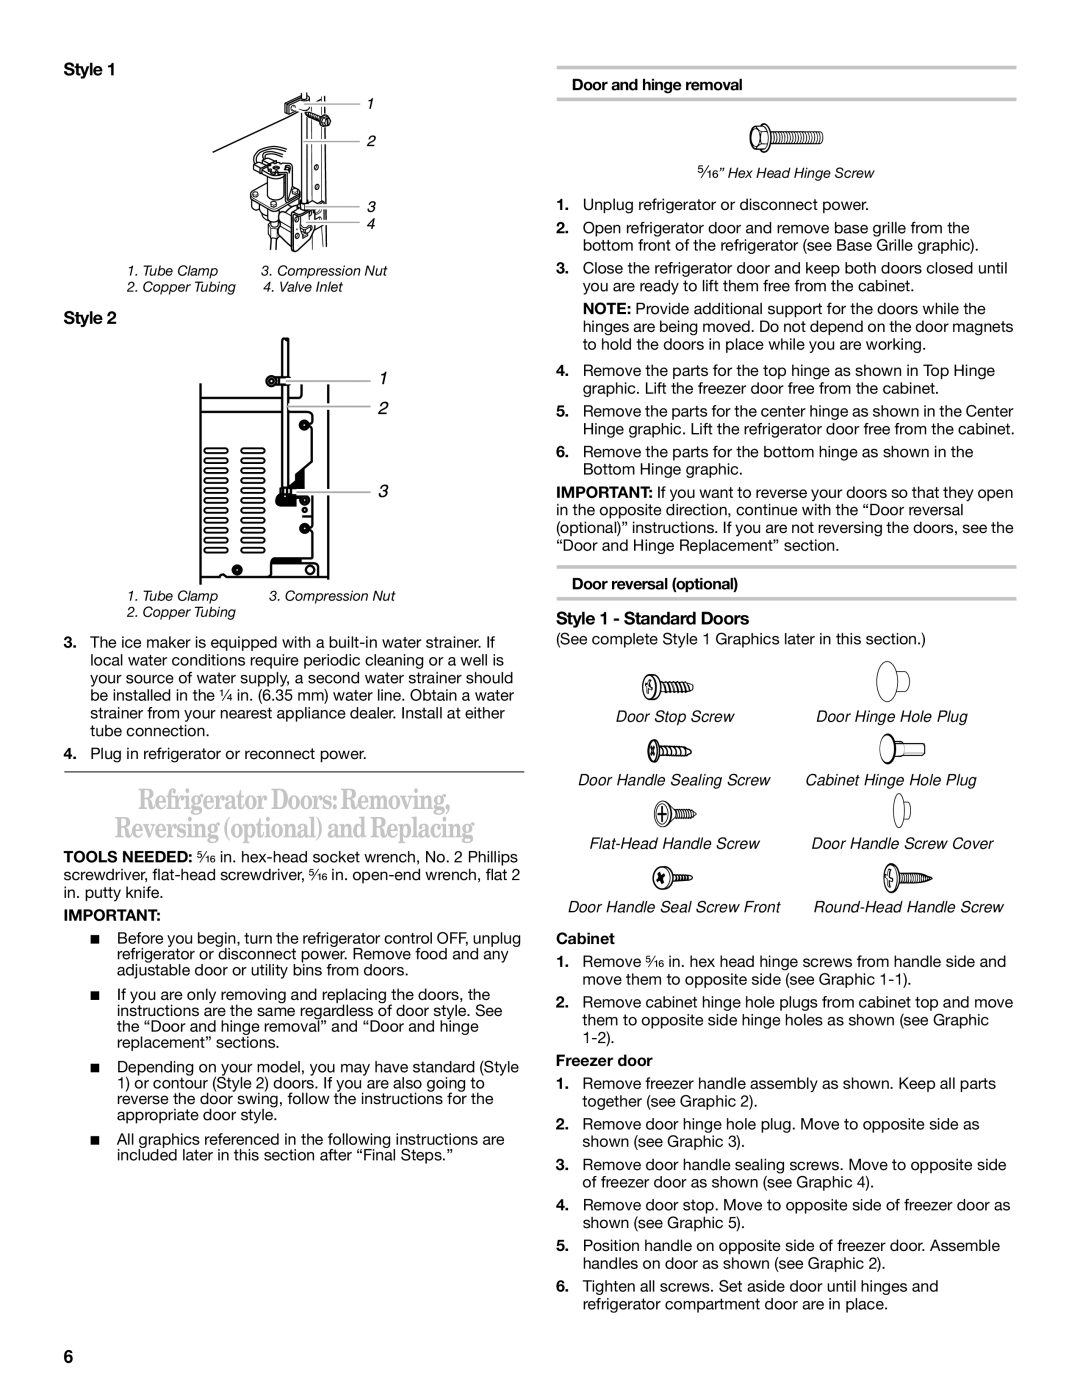
Style 1

1.

Tube Clamp

3. Compression Nut

2.

Copper Tubing

4. Valve Inlet

Style 2

1. Tube Clamp

3. Compression Nut

2.Copper Tubing

3.The ice maker is equipped with a built-in water strainer. If local water conditions require periodic cleaning or a well is your source of water supply, a second water strainer should be installed in the ¹⁄₄ in. (6.35 mm) water line. Obtain a water strainer from your nearest appliance dealer. Install at either tube connection.

4.Plug in refrigerator or reconnect power.

Refrigerator Doors:Removing,

Reversing (optional) and Replacing

TOOLS NEEDED: ⁵⁄₁₆ in. hex-head socket wrench, No. 2 Phillips screwdriver, flat-head screwdriver, ⁵⁄₁₆ in. open-end wrench, flat 2 in. putty knife.

IMPORTANT:

Before you begin, turn the refrigerator control OFF, unplug refrigerator or disconnect power. Remove food and any adjustable door or utility bins from doors.

If you are only removing and replacing the doors, the instructions are the same regardless of door style. See the “Door and hinge removal” and “Door and hinge replacement” sections.

Depending on your model, you may have standard (Style 1) or contour (Style 2) doors. If you are also going to reverse the door swing, follow the instructions for the appropriate door style.

All graphics referenced in the following instructions are included later in this section after “Final Steps.”

Door and hinge removal

⁵⁄₁₆” Hex Head Hinge Screw

1.Unplug refrigerator or disconnect power.

2.Open refrigerator door and remove base grille from the bottom front of the refrigerator (see Base Grille graphic).

3.Close the refrigerator door and keep both doors closed until you are ready to lift them free from the cabinet.

NOTE: Provide additional support for the doors while the hinges are being moved. Do not depend on the door magnets to hold the doors in place while you are working.

4.Remove the parts for the top hinge as shown in Top Hinge graphic. Lift the freezer door free from the cabinet.

5.Remove the parts for the center hinge as shown in the Center Hinge graphic. Lift the refrigerator door free from the cabinet.

6.Remove the parts for the bottom hinge as shown in the Bottom Hinge graphic.

IMPORTANT: If you want to reverse your doors so that they open in the opposite direction, continue with the “Door reversal (optional)” instructions. If you are not reversing the doors, see the “Door and Hinge Replacement” section.

Door reversal (optional)

Style 1 - Standard Doors

(See complete Style 1 Graphics later in this section.)

Door Stop Screw

Door Hinge Hole Plug

Door Handle Sealing Screw

Cabinet Hinge Hole Plug

Flat-Head Handle Screw

Door Handle Screw Cover

Door Handle Seal Screw Front

Round-Head Handle Screw

Cabinet

1.Remove ⁵⁄₁₆ in. hex head hinge screws from handle side and move them to opposite side (see Graphic 1-1).

2.Remove cabinet hinge hole plugs from cabinet top and move them to opposite side hinge holes as shown (see Graphic 1-2).

Freezer door

1.Remove freezer handle assembly as shown. Keep all parts together (see Graphic 2).

2.Remove door hinge hole plug. Move to opposite side as shown (see Graphic 3).

3.Remove door handle sealing screws. Move to opposite side of freezer door as shown (see Graphic 4).

4.Remove door stop. Move to opposite side of freezer door as shown (see Graphic 5).

5.Position handle on opposite side of freezer door. Assemble handles on door as shown (see Graphic 2).

6.Tighten all screws. Set aside door until hinges and refrigerator compartment door are in place.

6

Page 6
Image 6
Whirlpool 2218585 manual Refrigerator DoorsRemoving Reversing optional and Replacing, Style 1 Standard Doors

2218585 specifications

The Whirlpool 2218585 is a notable appliance that combines advanced technology with user-friendly features, designed to enhance the efficiency of home laundry tasks. This washing machine is particularly known for its innovative functionality, reliability, and modern design. One of the standout features of the Whirlpool 2218585 is its capacity. With ample space to accommodate large loads, it ensures that users can wash more laundry in a single cycle, saving both time and energy.

Equipped with a range of washing programs, this machine caters to various fabric types and soil levels. Whether handling delicate items or heavily soiled garments, the Whirlpool 2218585 provides specialized settings that optimize the wash for each load. The intuitive control panel allows for easy selection of washing modes, including options like Quick Wash, Heavy Duty, and Delicate, ensuring versatility in laundry care.

Incorporating advanced technology, this washing machine boasts an Energy Star rating, promoting energy efficiency and reduced water consumption. This not only contributes to lower utility bills but also aligns with environmentally friendly practices. The Whirlpool 2218585 utilizes a high-efficiency Agitator, which enhances wash action while being gentle on clothes, ensuring longevity and maintaining fabric integrity.

Moreover, the machine's noise-reduction features make it suitable for open living spaces, as it operates quietly even during high-speed spins. Another remarkable aspect is its Time Delay Feature, which allows users to pre-set the washing schedule according to their convenience. This is particularly beneficial for busy households, providing additional flexibility in managing daily chores.

The design of the Whirlpool 2218585 is also worth mentioning. It features a sleek and modern aesthetic that fits seamlessly into various laundry room decors. The solid build quality ensures durability, while the stainless steel drum helps prevent odors and stains, promoting a cleaner washing environment.

Overall, the Whirlpool 2218585 stands out for its combination of efficiency, technology, and user-centric features, making it a valuable addition to any household seeking reliable washing solutions.