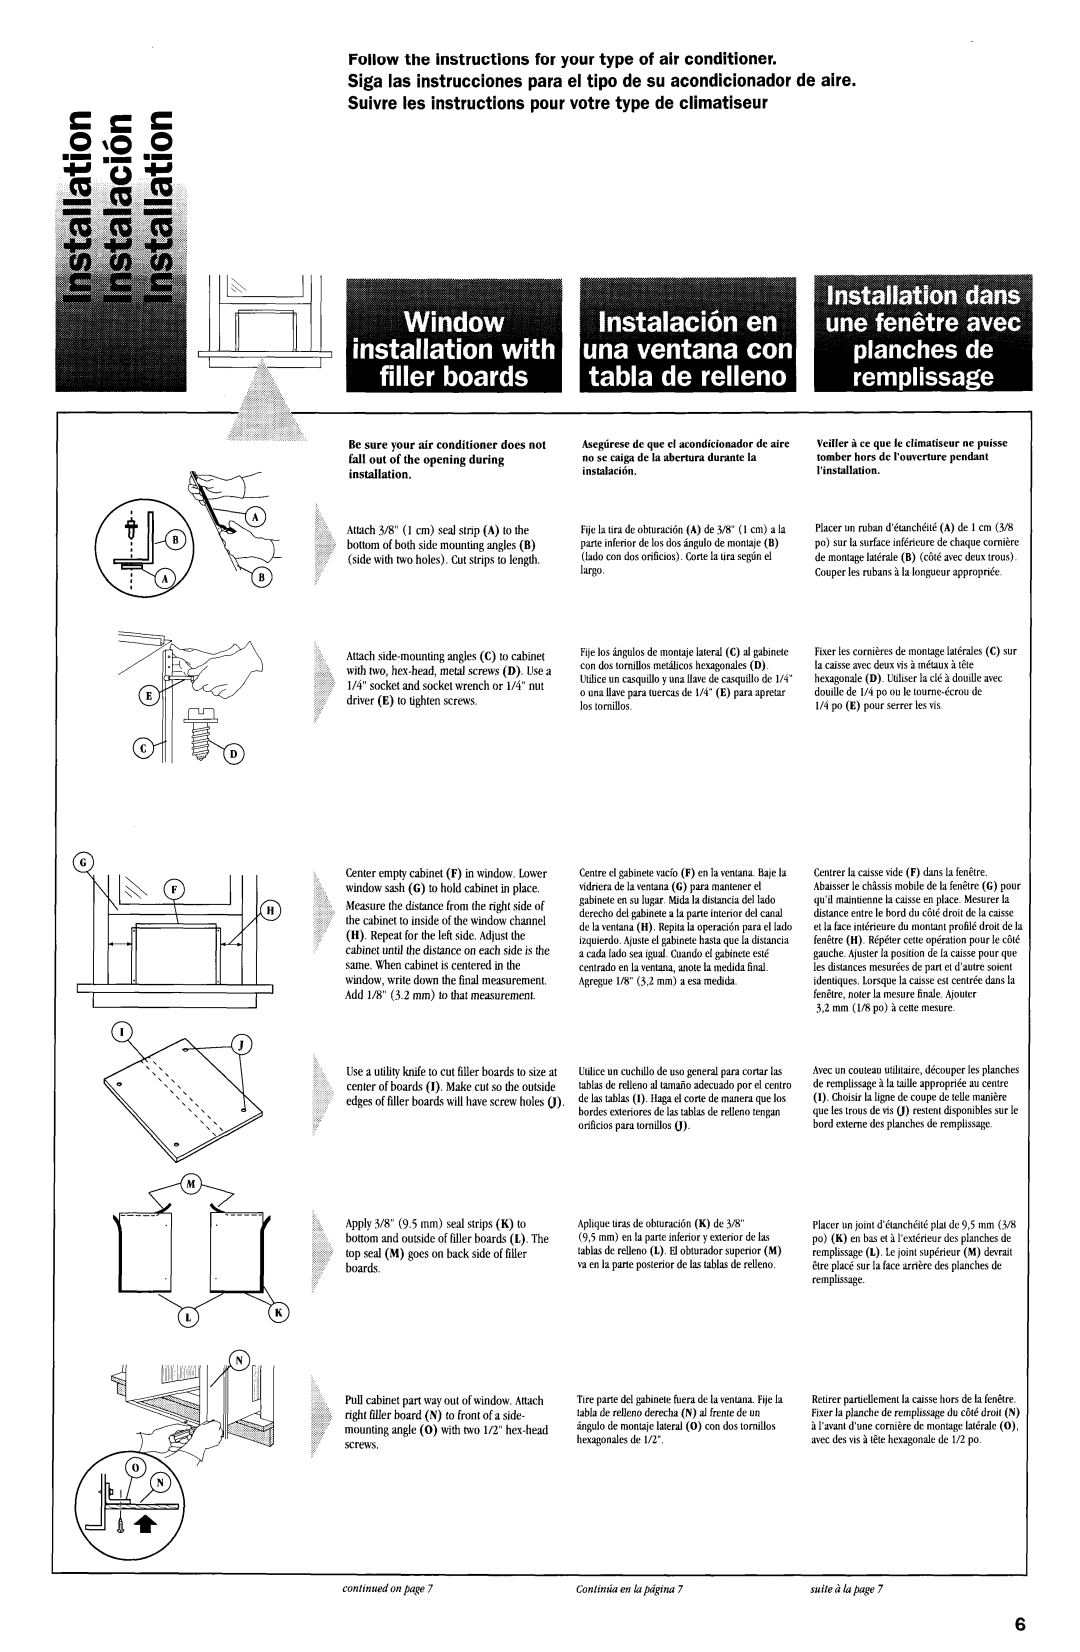
Follow the instructions for your type of air conditioner.
Siga las instrucciones para el tipo de su acondicionador de aire. Suivre les instructions pour votre type de climatiseur
Be sure your air conditioner does not fall out of the opening during installation.
Attachj/8” (I cm) sealstrip (A) to the bottom of both side mounting angles (B) (side with two holes). Cut strips to length.
.c Attach side-mounting angles (C) to cabinet
..:....:i:::....:...:.: with two,
.i:;:. | driver (E) to tightenscrews. |
:..:. | |
:.: |
|
Center empty cabinet (F) in window.Lower
|
| .:! |
|
|
| :., window sash (C) to hold cabinet in place. | |
\ | H | ,.,g;,;::,Measure the distance front the tight side of | |
..:...:: |
| ||
| P | i :,. thecabinetto inside of the window channel | |
| . | (H). Repeat for the left side. Adjust the | |
- |
| <j:,.’ | |
|
| cabinetuntil thedistanceon eachsideis the | |
|
|
| |
Asegbrese de que el acondicionador de aire no se caiga deja abertura durante la instalaci6n.
Fijela tira deobturacion(A) de s/8” (1 cm) a la parteinferior de10sdos;ingulode montaje(B) (lado con dosorificios). Cartela tira segtinel
Fije10szk~gulosde montajelateral (C) al gabinete con dostornillos metahcoshexagonales(D). Utiliceun casquilloy unaRavedecasquiflode l/4” o unaRavepara tuercasde l/4” (E) paraapretar 10stomillos.
Centreel gabinetevacfo(F) en la ventana Bajela vidriera dela ventana(C) para mantenerel gabineteensulugar Midala distanciade1lado derechode1gabinetea la parteinterior de1canal dela ventana(H). Repitala operation para el lado izquierdo.Ajusteel gabinetehastaquela distancia a cadalado seaiguaf Cuandoel gabineteeste’
Veiller B ce que le climatiseur ne puisse tomber hors de I’ouverture pendant l’installation.
Placerun ruban d’etancheite(A) de 1cm (318 po) sur la surfaceinferieure de chaquecomiere de montagelaterale (B) (cot6avecdeuxtrous). Couperles rubansa la longueurappropriee.
Fixer lescornieresde montagelaterales(C) sur la caisseavecdeuxvis a metauxa t@te hexagonale(D). Wiser la cl6 a douille avec douille de l/4 po ou le
l/4 po (E) pour serrer lesvis
Centrerla caissevide (F) dansla fenetre. Abaisserle chassismobile de la fenetre(C) pour qu’il maintiennela caisseenplace. Mesurerla distanceentrele bord du cot6droit dela caisse et la faceinterieure du montantprofile droit dela fenetre(H). RepCtercetteoperationpour le cot6 gauche.Ajusterla position dela caissepour que
I
same.Whencabinetis centeredin the
window, write down thefinal measurement,
centradoenla ventana,anotela medidafinal. Agreguel/8” ($2 mm) a esamedida.
les distancesmesureesde part et d’autre soient identiques.Lorsquela caisseestcentreedartsla
Add l/8” (3.2 mm) to that measurement.
Use a utility knile to cut filler boards to size at
centerof boards(I). Makecut sotheoutside edgesof fdler boardswill havescrewholes(J).
Apply 318” (9.5 mm) seal strips (K) to bottomand outside of filler boards (I,). The top seal(M) goeson backsideof filler boards.
Pull cabinet part way out of window. Attach right filler board (N) to front of a side- mounting angle (0) with two l/2”
Utiliceun cuchillo de usogeneralpara cortar las tablesde relleno al tamaftoadecuadopor el centro delastables(I). Hagael torte de maneraque10s bordesexterioresde lastablasde relleno tengan orificios paratomillos 0).
Apliquetiras de obturacidn(K) de 3/8”
(9,5 mm) enla parteinferior y exterior delas tablesde relleno (L). El obturadorsuperior (M) vaenla parteposteriordelas tablasde relleno.
Ttre partedel gabinetefueradela ventana.Fijela tabladerelleno derecha(N) al frentede un Pngulodemontajelateral (0) con dostomillos hexagonalesde l/2”.
fen&tre,noter la mesurefinak Ajouter 3,2 mm (l/8 po) a cettemesure.
Avecun couteauutilitaire, decouperlesplanches de remplissagea la taille appropriee aucentre
(I). Choisirla ligne de coupede telle maniere que les trousdevis 0) restentdisponiblessur le bord extemedesplanchesde remplissage.
Placerun joint d’etancheiteplat de 9,5 mm (S/8 po) (K) en haset a I’exterieur desplanchesde remplissage(L). Lejoint superieur (M) devrait ctre place sur la facearriere desplanchesde remplissage.
Retirerpartiellementla caissehors dela fenstre. Fixerla planchede remplissagedu cbtCdroit (N) a I’avantdune comiere de montagelaterale (0) avecdesvis a tCtehexagonalede l/2 po.
continued on page 7 | Continti en bpdgina 7 | suite B lapage 7 |
6