USING YOUR RANGE
THE ELECTRONIC OVEN CONTROL
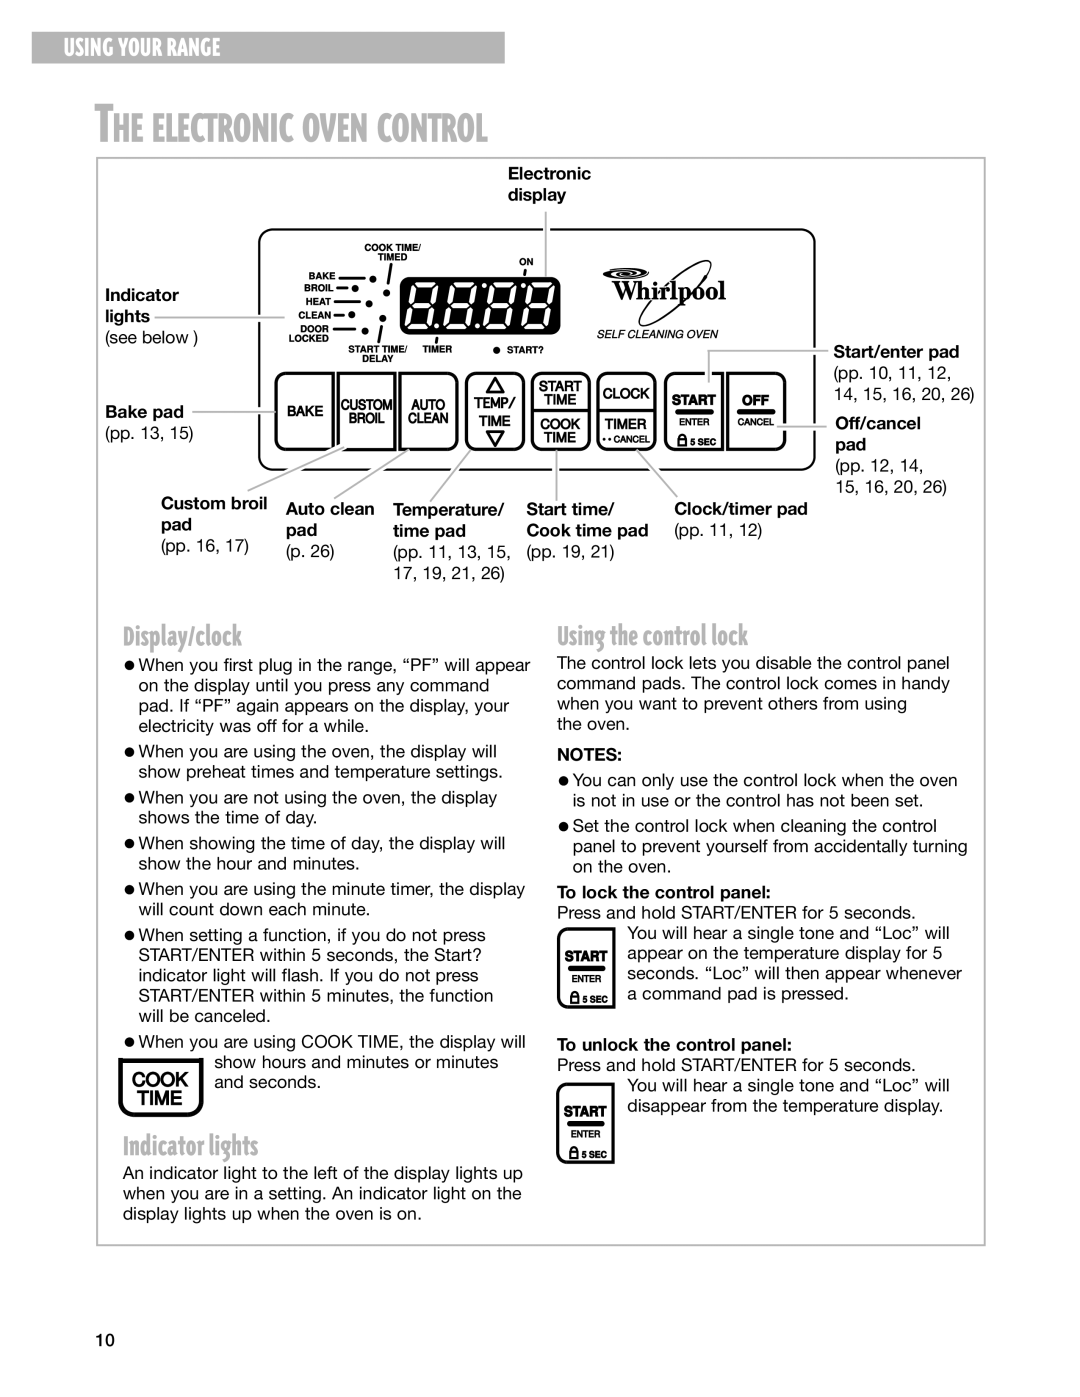
Electronic display
Indicator lights
(see below )
|
|
|
|
|
|
|
|
|
| COOK TIME/ |
|
|
|
|
|
|
|
|
|
|
|
|
| TIMED | ON |
|
|
|
|
|
|
|
|
|
|
|
|
|
|
| |
BAKE |
|
|
|
|
|
|
|
|
| ||||
BROIL |
|
|
|
|
|
|
| ||||||
|
|
|
|
| |||||||||
HEAT |
|
|
|
|
|
|
|
|
| ||||
|
|
|
|
|
|
|
| ||||||
CLEAN |
|
|
|
|
|
| |||||||
|
|
|
| ||||||||||
DOOR |
|
|
| SELF CLEANING OVEN | |||||||||
LOCKED |
| ||||||||||||
|
|
| |||||||||||
|
|
|
|
|
|
| START TIME/ TIMER | START? |
| ||||
|
|
|
|
|
|
|
|
| DELAY |
|
|
| |
Start/enter pad
|
|
|
|
| START |
|
|
| (pp. 10, 11, 12, | |
|
|
|
|
| CLOCK |
|
| 14, 15, 16, 20, 26) | ||
Bake pad | BAKE | CUSTOM | AUTO |
| TIME | START | OFF | |||
|
|
| ||||||||
|
|
|
|
|
| |||||
BROIL | CLEAN | TIME | COOK | TIMER | ENTER | CANCEL | Off/cancel | |||
(pp. 13, 15) |
| |||||||||
|
|
|
| TIME | • • CANCEL | 5 SEC |
| pad | ||
|
|
|
|
|
| |||||
|
|
|
|
|
|
|
|
| ||
|
|
|
|
|
|
|
|
| (pp. 12, 14, | |
|
|
|
|
|
|
|
|
| 15, 16, 20, 26) |
Custom broil Auto clean | Temperature/ | Start time/ | Clock/timer pad | ||
pad | pad | time pad | Cook time pad | (pp. 11, 12) | |
(pp. 16, 17) | |||||
(p. 26) | (pp. 11, 13, 15, | (pp. 19, 21) |
| ||
|
| ||||
|
| 17, 19, 21, 26) |
|
| |
Display/clock
•When you first plug in the range, “PF” will appear on the display until you press any command pad. If “PF” again appears on the display, your electricity was off for a while.
•When you are using the oven, the display will show preheat times and temperature settings.
•When you are not using the oven, the display shows the time of day.
•When showing the time of day, the display will show the hour and minutes.
•When you are using the minute timer, the display will count down each minute.
•When setting a function, if you do not press START/ENTER within 5 seconds, the Start? indicator light will flash. If you do not press START/ENTER within 5 minutes, the function will be canceled.
•When you are using COOK TIME, the display will
show hours and minutes or minutes and seconds.
Indicator lights
An indicator light to the left of the display lights up when you are in a setting. An indicator light on the display lights up when the oven is on.
Using the control lock
The control lock lets you disable the control panel command pads. The control lock comes in handy when you want to prevent others from using
the oven.
NOTES:
•You can only use the control lock when the oven is not in use or the control has not been set.
•Set the control lock when cleaning the control panel to prevent yourself from accidentally turning on the oven.
To lock the control panel:
Press and hold START/ENTER for 5 seconds.
|
|
| You will hear a single tone and “Loc” will |
START | appear on the temperature display for 5 | ||
|
|
| seconds. “Loc” will then appear whenever |
| ENTER | ||
| 5 SEC | a command pad is pressed. | |
To unlock the control panel:
Press and hold START/ENTER for 5 seconds. You will hear a single tone and “Loc” will
START disappear from the temperature display.
ENTER
![]() 5 SEC
5 SEC
10
