Manuals
/
Whirlpool
/
Kitchen Appliance
/
Dishwasher
Whirlpool
W10300929B
warranty
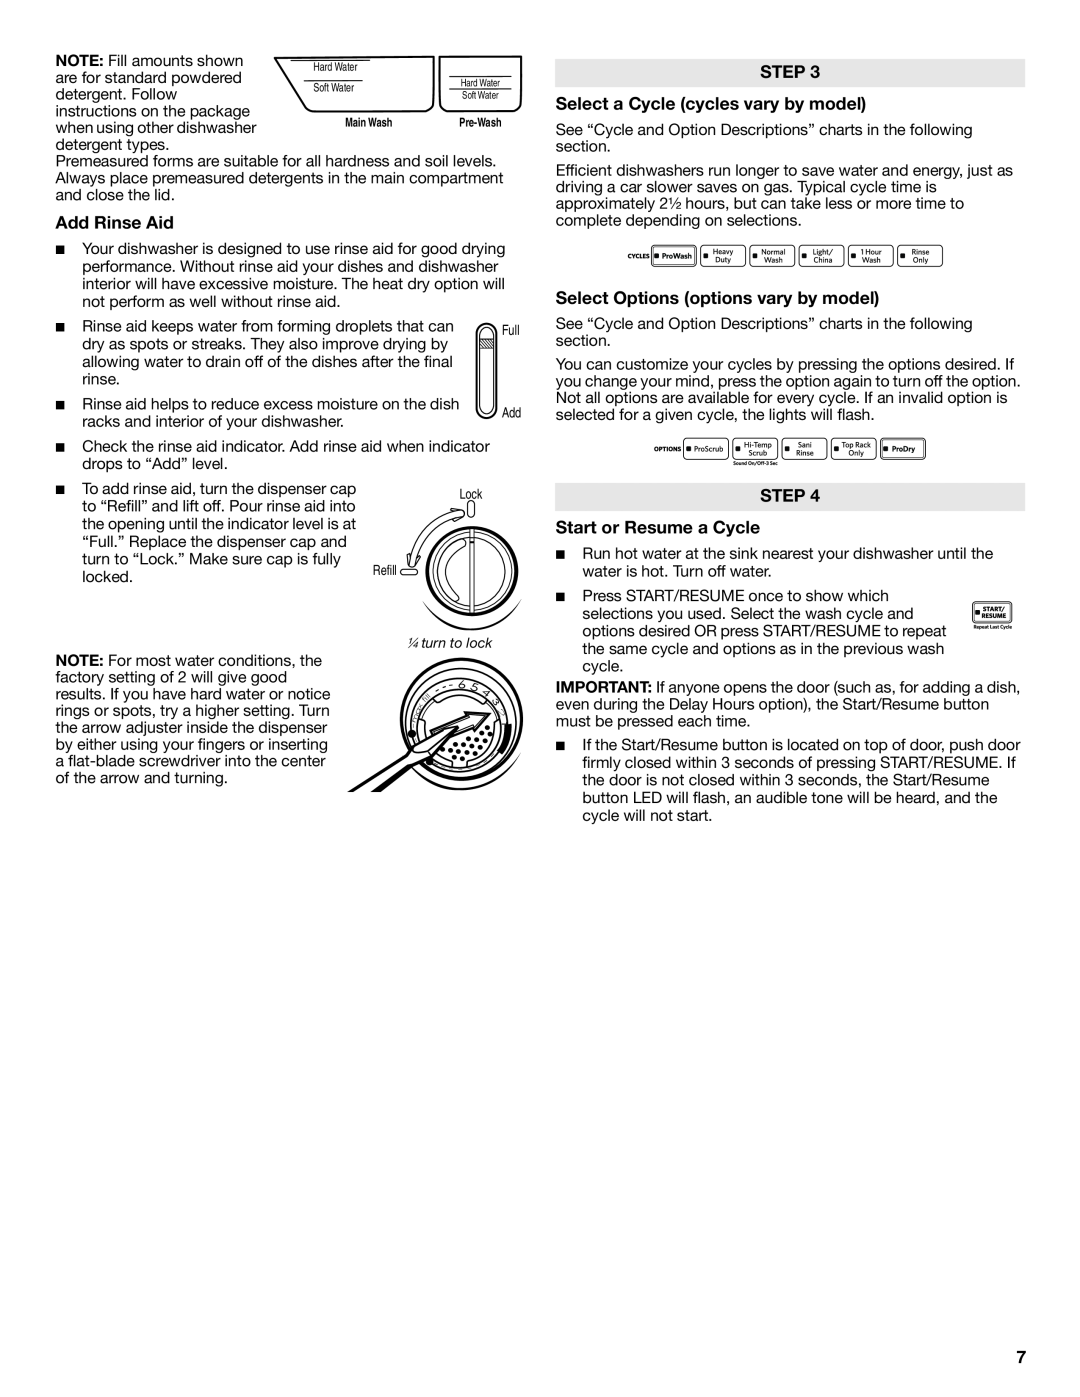
Add Rinse Aid, STEP Select a Cycle cycles vary by model
Models:
W10300929B
1
7
40
40
Download
40 pages
31.72 Kb
4
5
6
7
8
9
10
11
Troubleshooting
Install
Warranty
Problem
Commande
Cleaning Instructions
Safety
Parts and Features
Canceling A Cycle
Page 7
Image 7
Page 6
Page 8
Page 7
Image 7
Page 6
Page 8
Contents
DISHWASHER USER INSTRUCTIONS
Table of Contents
W10300929B
SAVE THESE INSTRUCTIONS
Dishwasher Safety
IMPORTANT SAFETY INSTRUCTIONS
DANGER
For a permanently connected dishwasher
GROUNDING INSTRUCTIONS
SAVE THESE INSTRUCTIONS
For a grounded, cord-connecteddishwasher
TOP RACK
Parts and Features
BOTTOM RACK
IMPORTANT Do not block detergent dispenser
ProWash cycle for optimal cleaning
or 1 Hour Wash - When you need fast results
Start-Up /Quick Reference varies by model
3 Select a cycle and option 4 Start dishwasher
Quick Steps
Dishwasher Use
1 Prepare and load dishwasher
STEP Start or Resume a Cycle
Add Rinse Aid
STEP Select a Cycle cycles vary by model
Select Options options vary by model
Cycle and Option Descriptions
Sanitizes dishes and
Dishwasher Feedback Section
Adding A Dish After Dishwasher Is Started
Dishwasher Features
Canceling A Cycle
Changing A Cycle After Dishwasher Is Started
Removable Top Rack for SatinGlide Max rails
Premium Adjustable 2-PositionTop Rack
FLEXI-FOLDDOWN Flexible Tines
SURE-HOLD Light Item Clips
Culinary Tool Rack 3rd level rack
Filtration System
Very Hard Water
RECOMMENDED TIME INTERVAL TO CLEAN YOUR FILTER
Filter Reinstallation Instructions
Cleaning Instructions
Dishwasher Care
Cleaning Cleaning the exterior
Cleaning the interior
To clean the drain air gap
Troubleshooting
PROBLEM
KITCHENAID DISHWASHER WARRANTY
SP PN W10300597B
W10300929B
Table des matières
INSTRUCTIONS DUTILISATION DU LAVE-VAISSELLE
W10300929B
CONSERVEZ CES INSTRUCTIONS
DANGER AVERTISSEMENT
Sécurité du lave-vaisselle
IMPORTANTES INSTRUCTIONS DE SÉCURITÉ
INSTRUCTIONS DE MISE À LA TERRE
AVERTISSEMENT
CONSERVEZ CES INSTRUCTIONS
PANIER SUPÉRIEUR
Pièces et caractéristiques
PANIER INFÉRIEUR
Dosage correct du détergent
Démarrage / guide rapide varie selon le modèle
Programme ProWashpour un nettoyage optimal
Lavage en 1 heure - Pour des résultats rapides
3 Choisir un programme et une option
Étapes rapides
Utilisation du lave-vaisselle
1 Préparer et charger le lave- vaisselle
ÉTAPE
Verser lagent de rinçage
ÉTAPE Démarrer ou reprendre un programme
2,4 9,0
Description des programmes et options
SÉLECTION DOPTIONS
SÉLECTION DOPTIONS
COMMANDE
STATUT DES COMMANDES ET PROGRAMMES
COMMANDE
STATUT DES COMMANDES ET PROGRAMMES
Panier à couverts
Caractéristiques du lave-vaisselle
Annulation d’un programme
Zone de lavage ProScrub
Panier supérieur de luxe réglable à 2 positions
Panier à ustensiles CULINARY CADDY
Tiges flexibles FLEXI-FOLDDOWN
Attaches SURE-HOLD pour articles légers
Pour enlever le panier pour ustensiles de cuisson
Pour réinstaller le panier
Pour réinstaller le panier
Pour enlever le panier
Eau très dure
INTERVALLES DE NETTOYAGE RECOMMANDÉES POUR LE
Système de filtration
NETTOYAGE DU FILTRE
Nettoyage de l’intérieur
Instructions de réinstallation du filtre
Entretien du lave-vaisselle
Nettoyage Nettoyage de l’extérieur
Remisage
Dépannage
Dispositif de brise-siphon
Nettoyage du dispositif de brise- siphon
PROBLÈME
PROBLÈME
GARANTIE DU LAVE-VAISSELLEKITCHENAID
Top
Page
Image
Contents