Installation

Setting Options

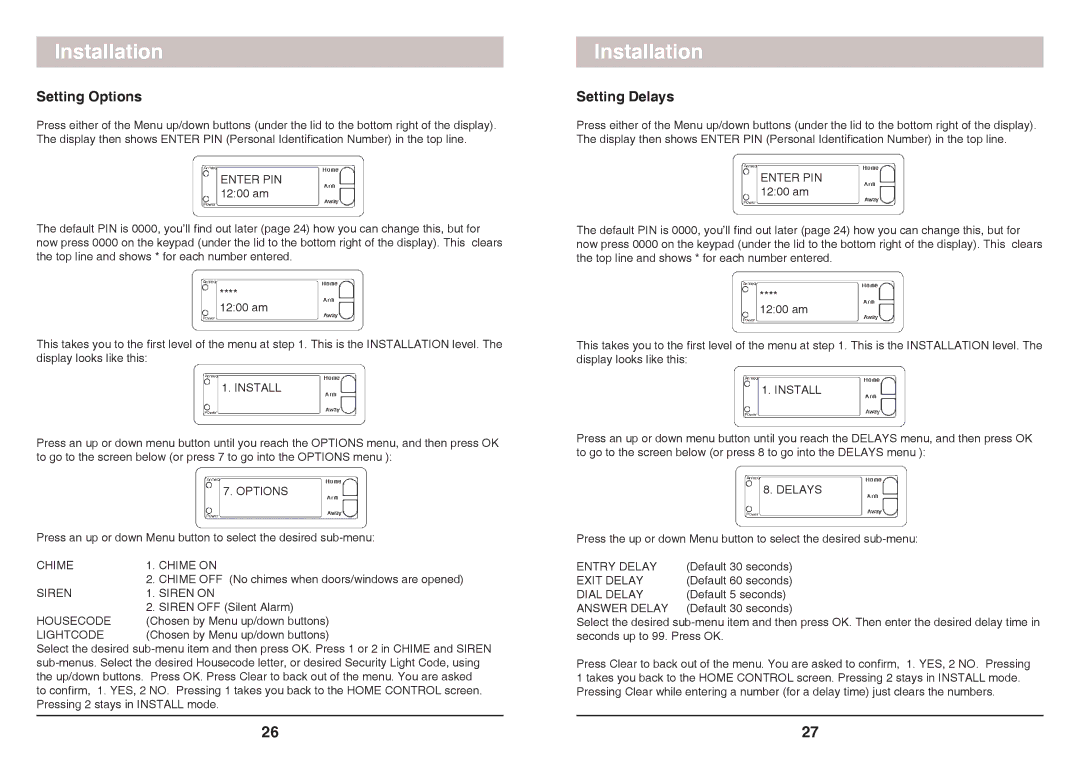
Press either of the Menu up/down buttons (under the lid to the bottom right of the display). The display then shows ENTER PIN (Personal Identification Number) in the top line.

ENTER PIN 12:00 am

The default PIN is 0000, you’ll find out later (page 24) how you can change this, but for now press 0000 on the keypad (under the lid to the bottom right of the display). This clears the top line and shows * for each number entered.

****

12:00 am

This takes you to the first level of the menu at step 1. This is the INSTALLATION level. The display looks like this:

1. INSTALL

Press an up or down menu button until you reach the OPTIONS menu, and then press OK to go to the screen below (or press 7 to go into the OPTIONS menu ):

7. OPTIONS

Press an up or down Menu button to select the desired sub-menu:

CHIME

1. CHIME ON


2. CHIME OFF (No chimes when doors/windows are opened)

SIREN

1. SIREN ON


2. SIREN OFF (Silent Alarm)

HOUSECODE

(Chosen by Menu up/down buttons)

LIGHTCODE

(Chosen by Menu up/down buttons)

Select the desired sub-menu item and then press OK. Press 1 or 2 in CHIME and SIREN sub-menus. Select the desired Housecode letter, or desired Security Light Code, using the up/down buttons. Press OK. Press Clear to back out of the menu. You are asked to confirm, 1. YES, 2 NO. Pressing 1 takes you back to the HOME CONTROL screen. Pressing 2 stays in INSTALL mode.

26

Installation

Setting Delays

Press either of the Menu up/down buttons (under the lid to the bottom right of the display). The display then shows ENTER PIN (Personal Identification Number) in the top line.

ENTER PIN 12:00 am

The default PIN is 0000, you’ll find out later (page 24) how you can change this, but for now press 0000 on the keypad (under the lid to the bottom right of the display). This clears the top line and shows * for each number entered.

****

12:00 am

This takes you to the first level of the menu at step 1. This is the INSTALLATION level. The display looks like this:

1. INSTALL

Press an up or down menu button until you reach the DELAYS menu, and then press OK to go to the screen below (or press 8 to go into the DELAYS menu ):

8. DELAYS

Press the up or down Menu button to select the desired sub-menu:

ENTRY DELAY

(Default 30 seconds)

EXIT DELAY

(Default 60 seconds)

DIAL DELAY

(Default 5 seconds)

ANSWER DELAY

(Default 30 seconds)

Select the desired sub-menu item and then press OK. Then enter the desired delay time in seconds up to 99. Press OK.

Press Clear to back out of the menu. You are asked to confirm, 1. YES, 2 NO. Pressing 1 takes you back to the HOME CONTROL screen. Pressing 2 stays in INSTALL mode. Pressing Clear while entering a number (for a delay time) just clears the numbers.

27

Page 14
Image 14
X10 Wireless Technology SC1200 owner manual Setting Options, Setting Delays, Entry Delay

SC1200 specifications

The X10 Wireless Technology SC1200 is an innovative wireless home security solution that combines advanced features with user-friendly operation. Designed for homeowners seeking to enhance their security while maintaining convenience, the SC1200 reflects X10's commitment to providing reliable and cutting-edge technology.

One of the key features of the SC1200 is its wireless functionality. Operating on a 310 MHz frequency, the system effectively eliminates the need for complex wiring, making installation straightforward and hassle-free. This wireless capability also allows the user to place sensors and cameras in locations that may be difficult to reach with traditional wired systems, providing more flexibility in designing a tailored security setup.

The SC1200 is equipped with a powerful motion detection system, which uses passive infrared sensors to detect movement within its field of view. This feature ensures that any motion is promptly captured, allowing for immediate alerts sent to the user's smartphone or dedicated receiver. Moreover, the system supports multiple zones, enabling users to customize which areas are monitored and the sensitivity of each sensor, thereby minimizing false alarms.

Another significant characteristic of the SC1200 is its compatibility with X10's extensive range of wireless devices and accessories. Users can enhance their systems with additional motion sensors, door/window sensors, remote controls, and even smart home devices, creating a comprehensive security network tailored to their unique needs. The modularity of the system means that homeowners can easily scale their security measures as desired.

The SC1200 also offers a backup power feature. In case of power failure, the system can continue to operate, ensuring uninterrupted service. This reliability is crucial for any security system, as it guarantees continuous surveillance and peace of mind, even during unforeseen circumstances.

User-friendliness is a priority for X10, and the SC1200 reflects this philosophy with its intuitive interface. The setup process is simplified with clear instructions, making it accessible for users of all technical backgrounds. Additionally, remote access capabilities allow homeowners to monitor their property in real time from anywhere using their smartphones or tablets.

In summary, the X10 Wireless Technology SC1200 presents an effective and versatile solution for home security. With its wireless installation, sophisticated motion detection, compatibility with various devices, reliable backup power, and user-friendly interface, the SC1200 is well-equipped to meet the security demands of modern homeowners, providing both ease of use and peace of mind.