Page
Special Message Section
Precautions
Yamaha Education Suite
Main Features
Other powerful features include
Contents
Front Panel
Panel Controls and Terminals
Rear Panel
Using an AC Power Adaptor
Setting UP
Using Batteries
When the Batteries Run Down
Connecting a Keyboard Amplifier or Stereo System
Using Headphones
Using a Footswitch
Voice 002BritePno
Quick Guide How to Use Your New PSR-270 PortaTone
Playing along with the Metronome
Voices
Style 0028BtPop2
Auto Accompaniment
Auto Accompaniment
Step
Chord Guide
Playing chord progressions songs with just one finger
Chord Guide
Song 100SongVol
Song ALLTakeOff
Song 002PF-Grand
STYLE2UserBank
Style 1OTS User
Style F41UserBank
Songs
STYLE1M.Octave
Function Parameters
Function Parameters List
Function Parameters
Midi
GM System Level
Midi
Overall functions bar indicator
Mode indicators
Panel Display Indications
Notation D Keyboard
Accompaniment On indicator
Beat indicators
Song track indicators
Measure and Tempo
Portable Grand
Using the Metronome
Playing the Portable Grand
Press the Portable Grand button
Turn on the Metronome
Setting the Metronome Time Signature
Change the value
Select the Metronome Volume function in the Overall menu
Adjusting the Metronome Volume
Playing a Voice Main Voice
Playing Voices the Voice Mode
Select the Voice mode
Select the desired voice number
Using the numeric keypad
Voice 042Aco.Bass
Play the selected voice
Using the +/- keys
Using the Voice button
Drum Kit Voice Chart voices 101
Select the Function mode
Select the desired Function parameter number
Function Parameters Main Voice
Exit the Function mode
Change the parameter setting or value
Set other parameters as needed
Function Parameters
Voice 00Transpos
Transpose and Tuning
Transpose
Select the Transpose function in the Overall menu
Select the Tuning function in the Overall menu
Tuning
Playing TWO Voices Dual Voice
Turn on the Dual Voice mode
Function Parameters Dual Voice
Style 050Strings
Make other settings for the Split voice if desired
Call up the Function mode
Playing TWO Voices Split Voice
Select the Split On/Off parameter number
Function Parameters Split Voice
Additional Voice Functions Voice SET and Touch Sensitivity
Style F72VoiceSet Style F73TouchSns
Style onVoiceSet
Function Parameters Voice Set and Touch Sensitivity
Reverb
Effects
Style F32RevType
Set the Chorus Send Level for the desired voices
Style F34ChoType
Chorus
Set the DSP Send Level for the desired voices
Style F36DspType
DSP
Turn on the Harmony effect
Style F37Harmony
Harmony
Function Parameters Effects
Reverb Types
Effect Types
Chorus Types
DSP Types
Trill effect Types 6 12 create two-note trills alternating
Harmony Types
Select the Style mode
Auto Accompaniment Style Mode
Selecting a Style and Playing the Accompaniment
Select the desired style number
Pressing the START/STOP button
Using Sync-Start
Start the accompaniment
Starting with an Intro section
Using Sync-Start with an Intro section
To start with an Intro section
To use Sync-Start with an Intro section
About Auto Accompaniment
Stop the accompaniment
Using an Ending section
Pressing the SYNC-START button
About the Beat Display
Accompaniment Controls
Using the Auto Accompaniment Features
Turn on the auto accompaniment
Select a style and play the accompaniment
Changing the Tempo
Change chords using the auto ac- companiment feature
Accompaniment Sections Main A, Main B and FILL-INS
Select the Accompaniment Volume function in the Overall menu
Adjusting the Accompaniment Volume
Fingered Chords
Using Auto Accompaniment Multi Fingering
Single Finger Chords
Chord Name/Abbreviation Normal Voicing
Select the Accompaniment Split Point parameter
Setting the Accompaniment Split Point
Function Parameter Accompaniment Split Point
Style 054AcmpSPnt
What is a CHORD?
Other Chords
Intervals of the Scale
Chord Guide
Dict
Dictionary
Specify the root of the chord
Play the chord
Specify the type of the chord major, minor, seventh, etc
Select a style
Smart
Select the Smart Chord Guide
Set the desired key
Smart Chord List
EZ Chord Playback
EZ Chord
Select the EZ Chord function
Bank Chain
Select the desired EZ Chord bank
Play the chords
EZ Chord Recording
Enable recording
Start recording
Playing the Accompaniment During EZ Chord Recording
Stop recording and exit from the record mode
Recording a Space
To record a space
Hint Using Spaces
Some advantages to using spaces
Continue recording, or exit the Record mode
Enable the EZ Chord Record mode
Select the desired point from which chords will be cleared
Call up the EZ Chord Clear function
Style 1OTS User
ONE Touch Setting OTS
ONE Touch Setting User
Call up the Style mode
Exit from the Record mode
Press the appropriate ONE Touch Setting User button
Recalling a User One Touch Setting
Press the appropriate ONE Touch Setting Preset button
ONE Touch Setting Preset
Selecting a Preset One Touch Setting
Play the accompaniment
Select the Song mode
Selecting and Playing Songs the Song Mode
Song 003Rockin’
Selecting and Playing a Song
Select the Tempo function in the Overall menu
Select the desired song number
Start the selected song
About the Beat Display
Song 003Rockin’
Song 100SongVol
Adjusting the Song Volume
Select the Song Volume function in the Overall menu
1OTS User
Song Recording
Recording a User Song Realtime Recording
Make all desired PortaTone settings
Using the Metronome
Select the Realtime Record mode
Style 004RealTime
Select a User song for recording
Recording to the Chord Track
When recording the Chord track
Stop recording
Additional Operations
Listen to your new recording
Record to other tracks as desired
Recording a User Song Step Recording
Select the Step Record mode
Recording Notes
Song 004C3
Recording Rests
Recording Chords and Sections to the Chord Track
Recording Triplets and Dotted Notes
Replacing a Note or Rest
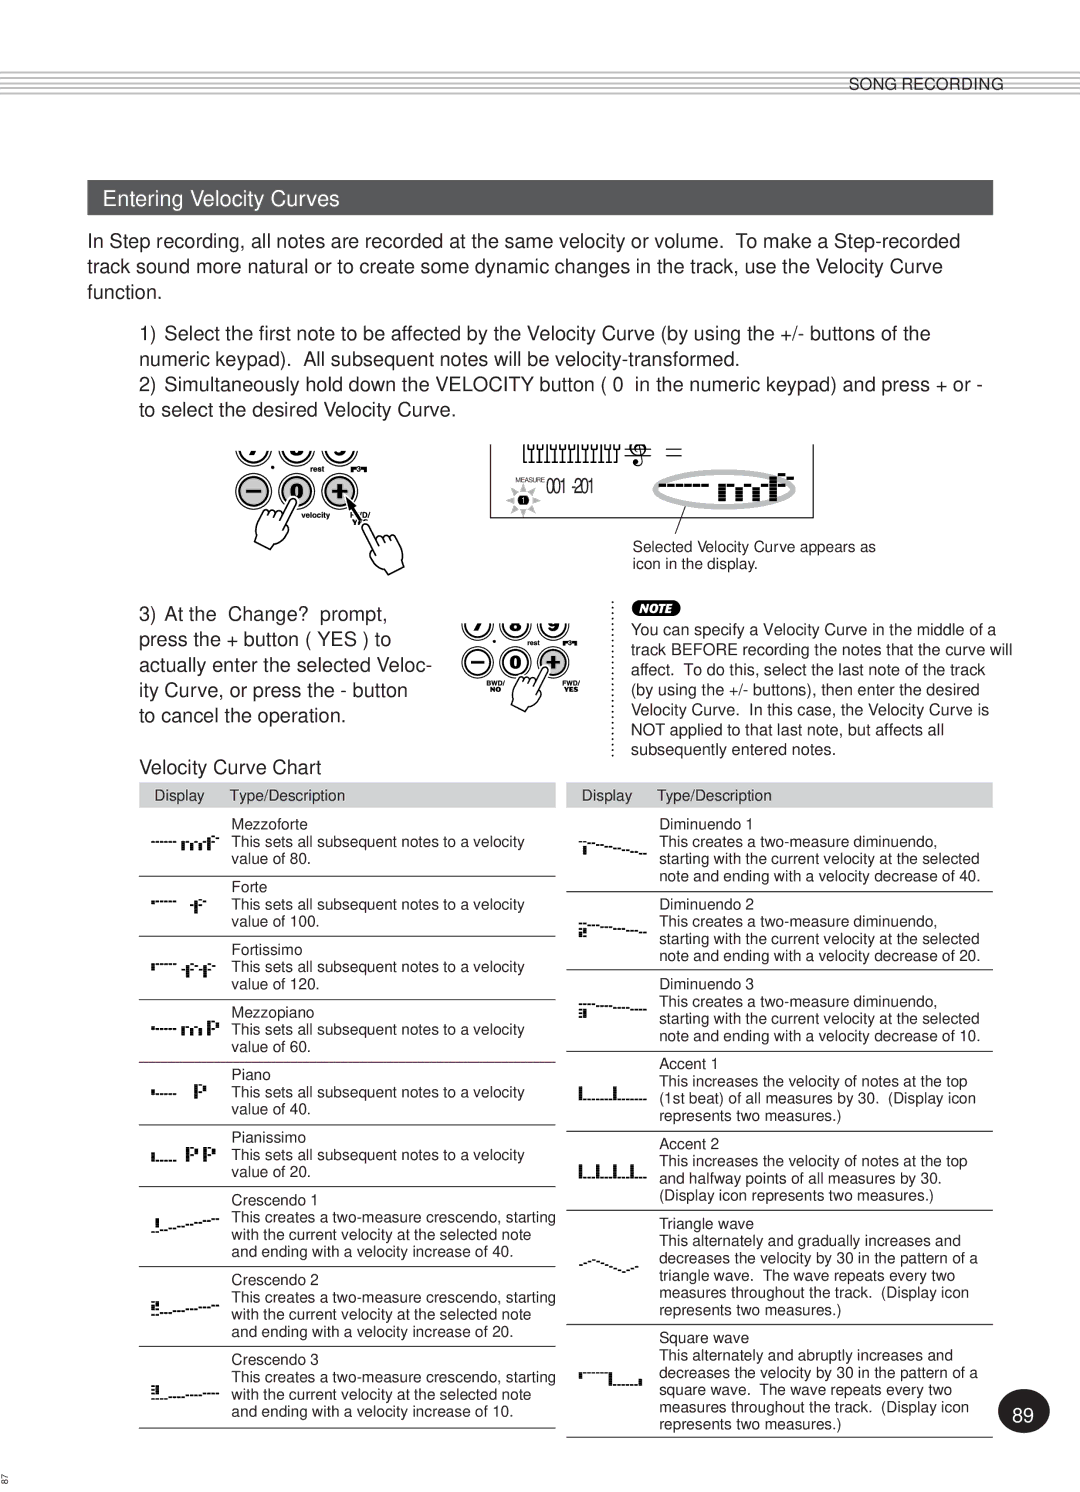
Entering Velocity Curves
Velocity Curve Chart
Clearing a Song
Style F61USng1Clr
Start the Song Clear operation
At the Sure? prompt, clear the selected song
Select the Footswitch Assign parameter
Footswitch
Select the desired footswitch function
Style 01Sustain
Function Name Display Name Description
Footswitch Assign Functions
Example of Keyboard Information
What is MIDI?
Midi Functions
Midi Terminals
Channel Messages
System Messages
Use only special Midi cables when connecting Midi devices
Connecting to a Personal Computer
Select the desired Function parameter
Style F81RemoteCh
Function Parameters Midi
Parameter Name Display Name Range/Settings
External Clock ExtClock On/off
Style F86BulkSend
Using Bulk Dump Send to Save Data
Style YESBulkSnd?
On the PortaTone, select the Bulk Dump Send function
Exit from the Bulk Dump Send operation
At the Sure? prompt, start sending the data
RcvSng
Make sure that the PortaTone is set to the Style mode
Start sending the data from the connected Midi device
Loading Bulk Data
First, set up the sequencer for recording
Using Initial Setup Send with a Sequencer
On the PortaTone, select the Initial Setup Send function
Sending Initial Setup Data
Stop recording on the sequencer
Exit from the Initial Setup Send operation
Problem Possible Cause and Solution
Troubleshooting
Data Initialization
Data Backup & Initialization
Specifications
EZ Chord Bank
Maximum Polyphony
Voice List
109
Ethnic
GM Voice List
Style List
Drum KIT List
113
Midi Implementation Chart
115
Reverb
Effect map
Index
Limited Warranty
North America
G., EMI Division 1999 Yamaha Corporation