External Equipment Connection and Viewing Setup
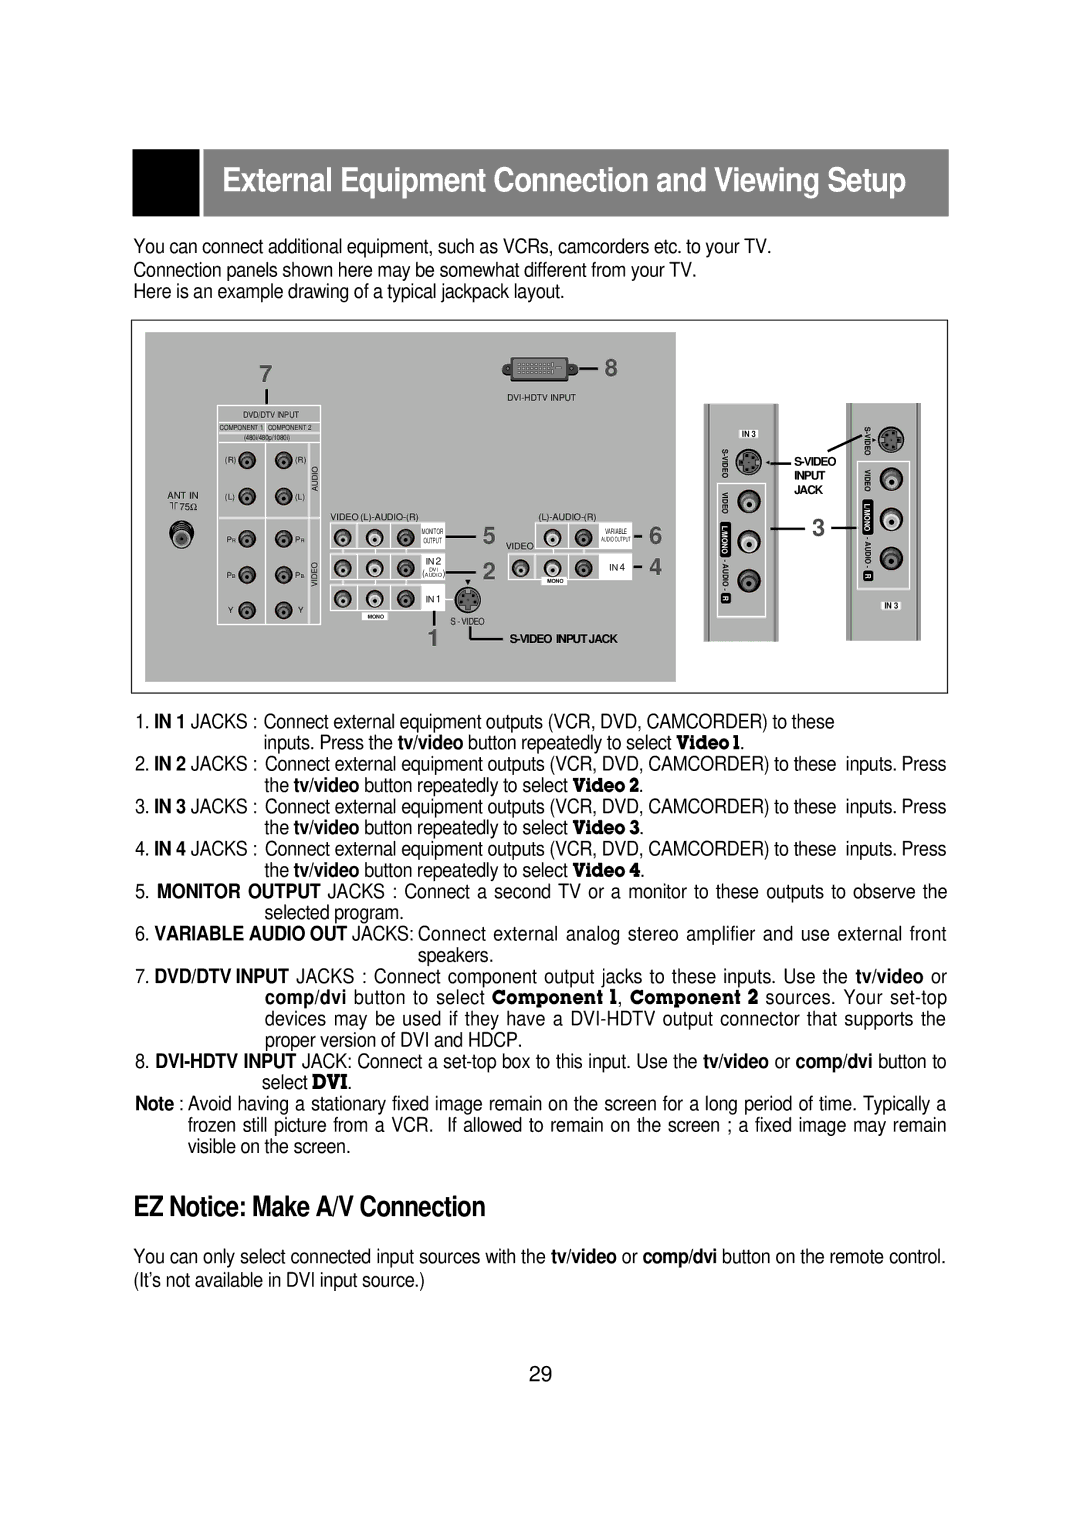
You can connect additional equipment, such as VCRs, camcorders etc. to your TV. Connection panels shown here may be somewhat different from your TV.
Here is an example drawing of a typical jackpack layout.
ANT IN
LL 75Ω
| 7 | 8 |
|
| |
| DVD/DTV INPUT |
|
COMPONENT 1 COMPONENT 2 | IN 3 | |
| (480i/480p/1080i) | |
|
| |
| AUDIO | S- |
(R) | VIDEO | |
(R) |
| |
(L) | (L) | VIDEO |
| VIDEO | |
PR | PR |
| MONITOR | 5 VIDEO |
| VARIABLE | 6 | L/MONO | |
| OUTPUT |
|
| AUDIO OUTPUT | |||||
|
|
| IN 2 |
|
|
|
| 4 | |
|
| VIDEO |
| 2 |
| IN 4 | - | ||
|
|
|
| AUDIO | |||||
PB | PB | (AUDIODVI | ) | MONO | |||||
|
|
|
|
|
|
|
|
| - |
|
|
| IN 1 |
|
|
|
|
| R |
|
|
|
|
|
|
|
|
| |
Y | Y |
|
|
|
|
|
|
|
|
MONO
S - VIDEO
1 |
| |
|
![]()
![]()
3
![]()
![]()
IN 3
1.IN 1 JACKS : Connect external equipment outputs (VCR, DVD, CAMCORDER) to these inputs. Press the tv/video button repeatedly to select Video 1.
2.IN 2 JACKS : Connect external equipment outputs (VCR, DVD, CAMCORDER) to these inputs. Press the tv/video button repeatedly to select Video 2.
3.IN 3 JACKS : Connect external equipment outputs (VCR, DVD, CAMCORDER) to these inputs. Press the tv/video button repeatedly to select Video 3.
4.IN 4 JACKS : Connect external equipment outputs (VCR, DVD, CAMCORDER) to these inputs. Press the tv/video button repeatedly to select Video 4.
5.MONITOR OUTPUT JACKS : Connect a second TV or a monitor to these outputs to observe the selected program.
6.VARIABLE AUDIO OUT JACKS: Connect external analog stereo amplifier and use external front speakers.
7.DVD/DTV INPUT JACKS : Connect component output jacks to these inputs. Use the tv/video or comp/dvi button to select Component 1, Component 2 sources. Your
8.
select DVI.
Note : Avoid having a stationary fixed image remain on the screen for a long period of time. Typically a frozen still picture from a VCR. If allowed to remain on the screen ; a fixed image may remain visible on the screen.
EZ Notice: Make A/V Connection
You can only select connected input sources with the tv/video or comp/dvi button on the remote control. (It’s not available in DVI input source.)
29
