Radware VOYA-GRAND-MBK Voyageur Grand Wood Insert Building a Fire, Fuel Reloading Instructions

Page 12

VOYAGEUR GRAND Wood Insert

R

K. Building A Fire

WARNING

Fire Risk.

Keep combustible materials, gasoline and other flammable vapors and liquids clear of appliance.

Do NOT store flammable materials in the appliance’s vicinity.

DO NOT USE GASOLINE, LANTERN FUEL, KEROSENE, CHARCOAL LIGHTER FLUID OR SIMILAR LIQUIDS TO START OR “FRESHEN UP” A FIRE IN THIS HEATER.

Keep all such liquids well away from the heater while it is in use.

Combustible materials may ignite.

Before lighting your first fire in the appliance:

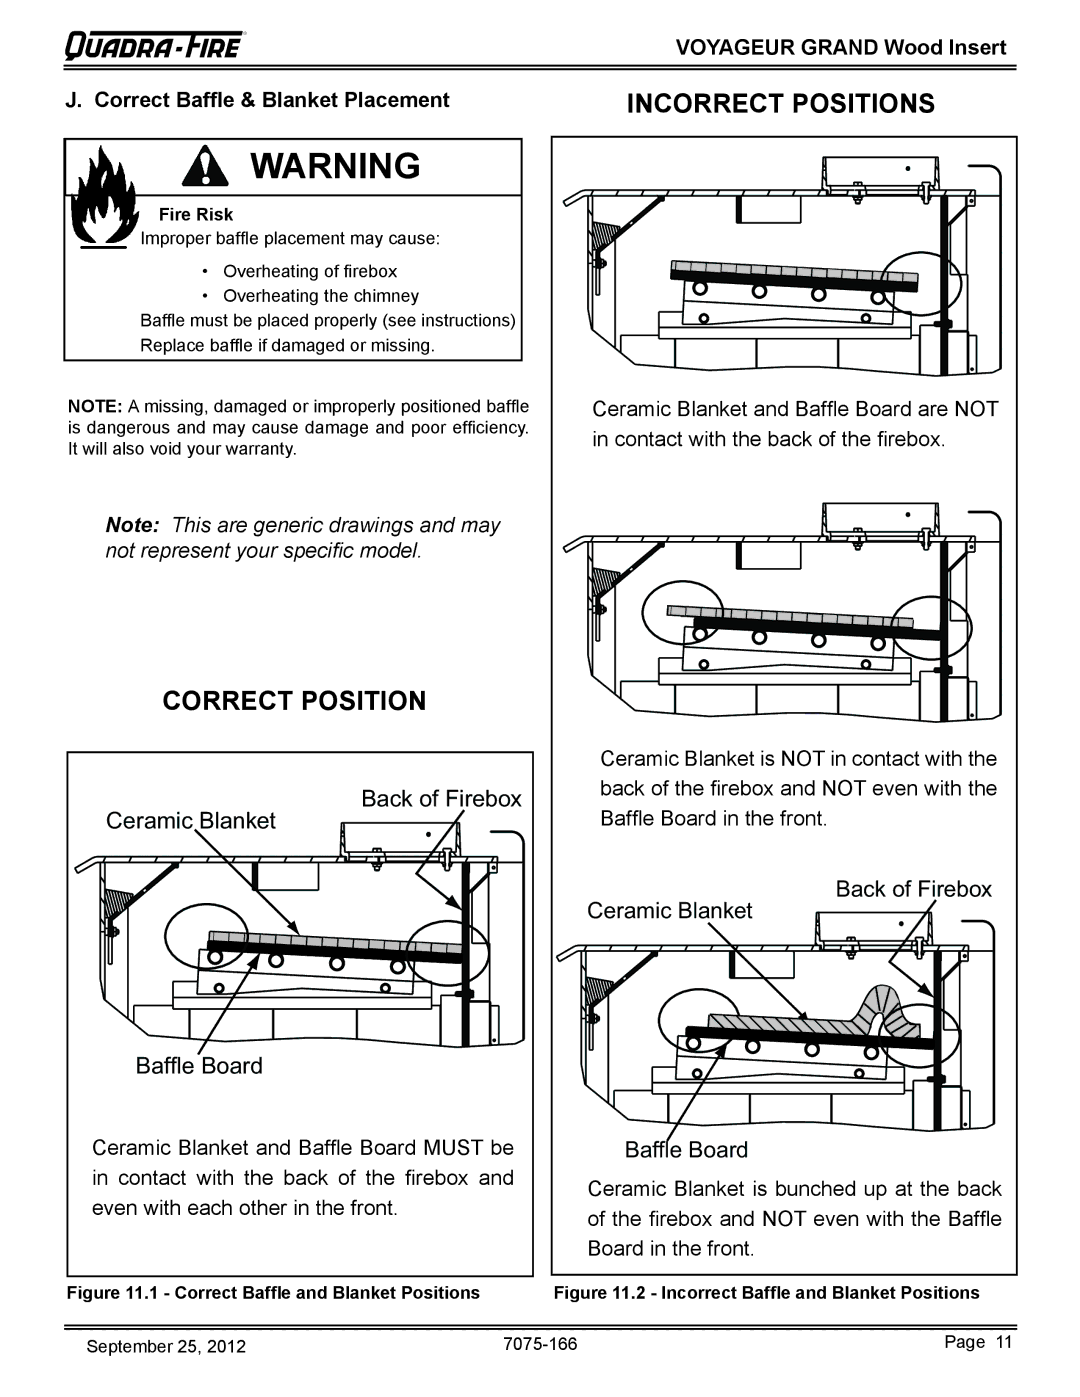
1.Confirm the baffle and ceramic blanket are correctly positioned. They should be even with the front tube and resting on all tubes. See page 11.

2.Remove all labels from glass.

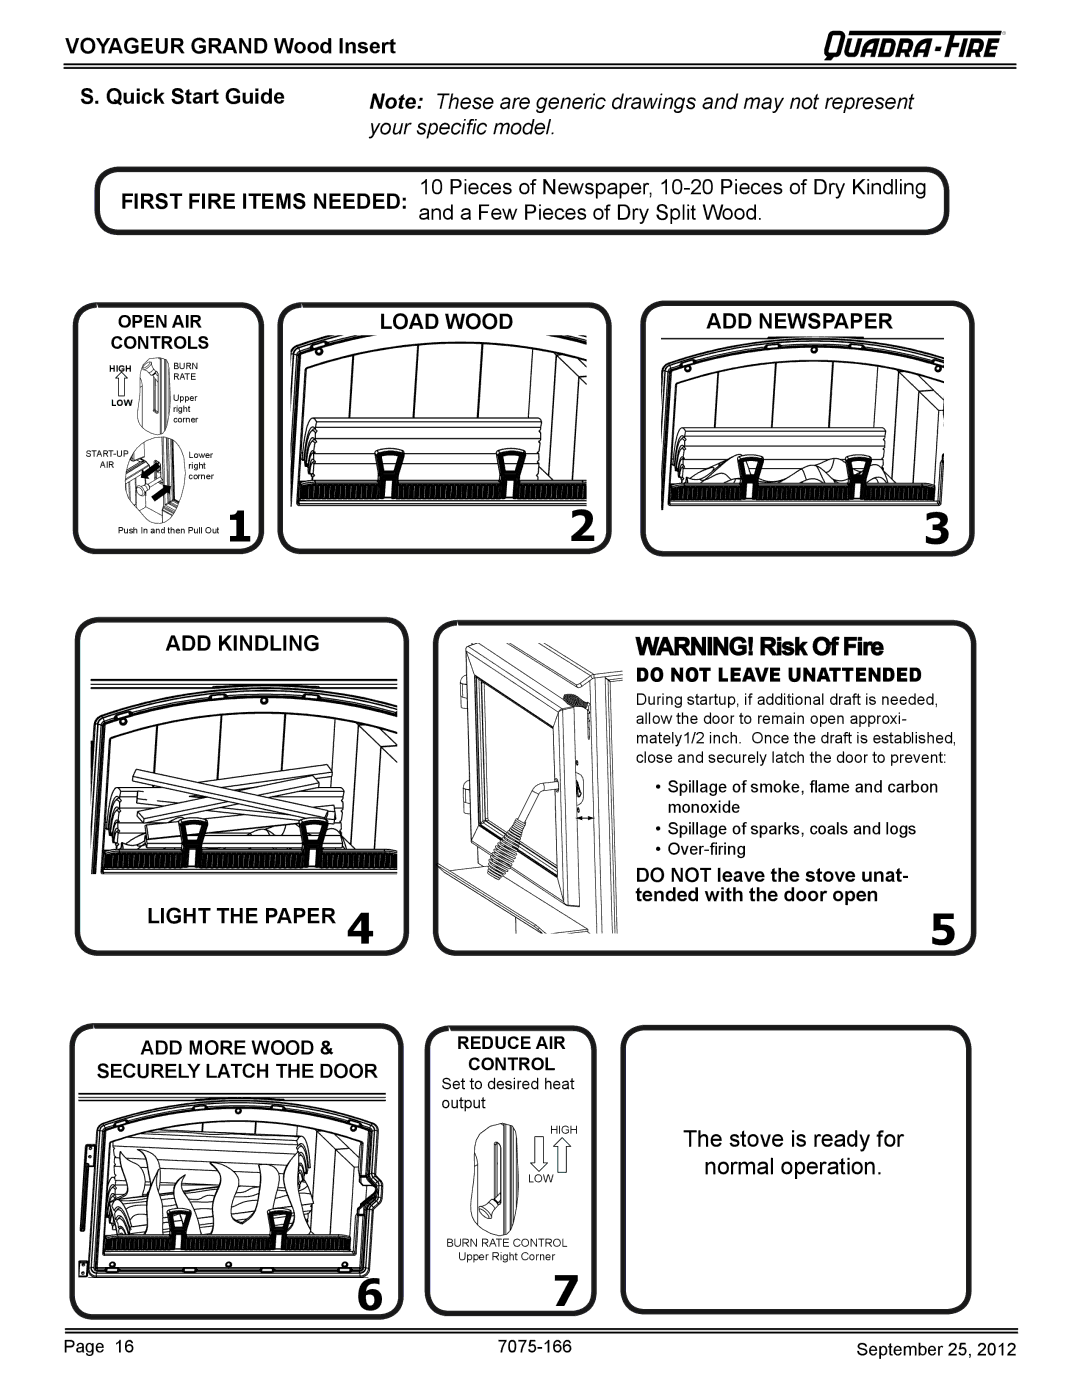
There are many ways to build a fire. The basic principle is to light easily-ignitable tinder or paper, which ignites the fast burning kindling, which in turn ignites the slow-burning fire- wood. Here is one method that works well:

1.Open the Burn Rate Air and Start-Up Air Controls fully.

2.Place several wads of crushed paper on the firebox floor. Heating the flue with slightly crumpled newspaper before adding kindling keeps smoke to a minimum.

3.Lay small dry sticks of kindling on top of the paper.

4.Make sure that no matches or other combustibles are in the immediate area of the appliance. Be sure the room is ventilated and the flue unobstructed.

5.Light the paper in the appliance. NEVER light or rekindle fire with kerosene, gasoline, or charcoal lighter fluid; the results can be fatal.

6.Once the kindling is burning quickly, add several full-length logs 3 to 4 inches (76 - 102mm) in diameter. Be careful not to smother the fire. Stack the pieces of wood 1/2 to 1 inch apart (13-25mm); near enough to keep each other hot, but far enough away from each other to allow air flow between them.

7.Set the Burn Rate Air Control and activate the timer sys- tem (ACC).

8.When ready to reload, it is best to fully open both the Burn

Rate Air and Start-up Air Controls before reloading.

L. Fuel Reloading Instructions

1.This appliance has a large door with an exceptional view of the fire.

Opens to about 90 degrees and has a built-in stop.

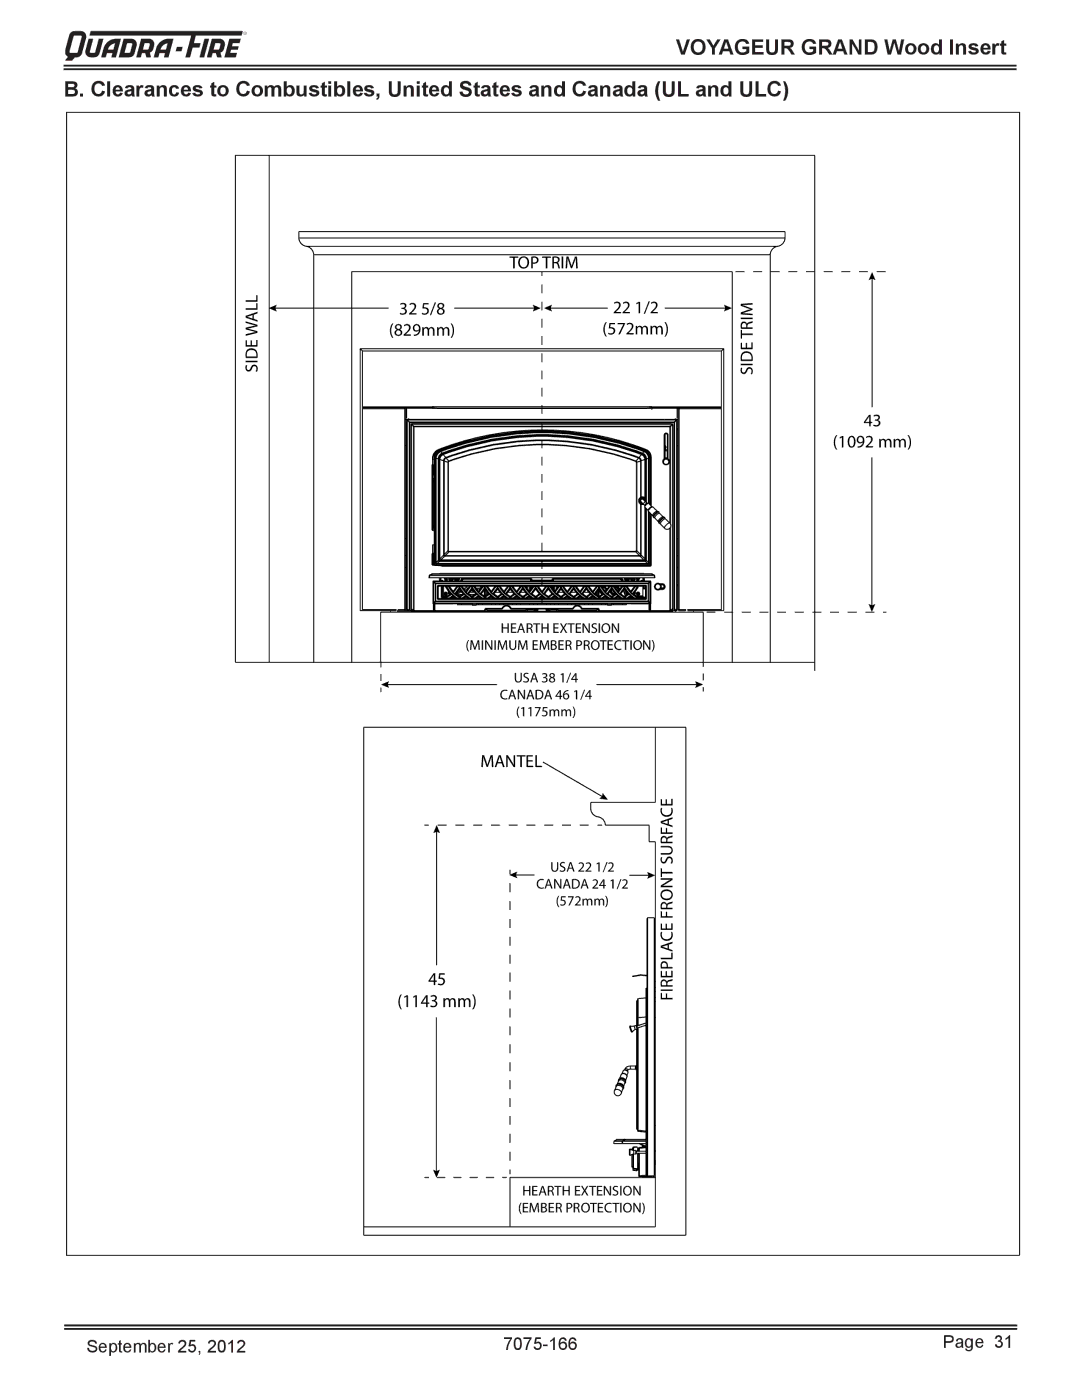
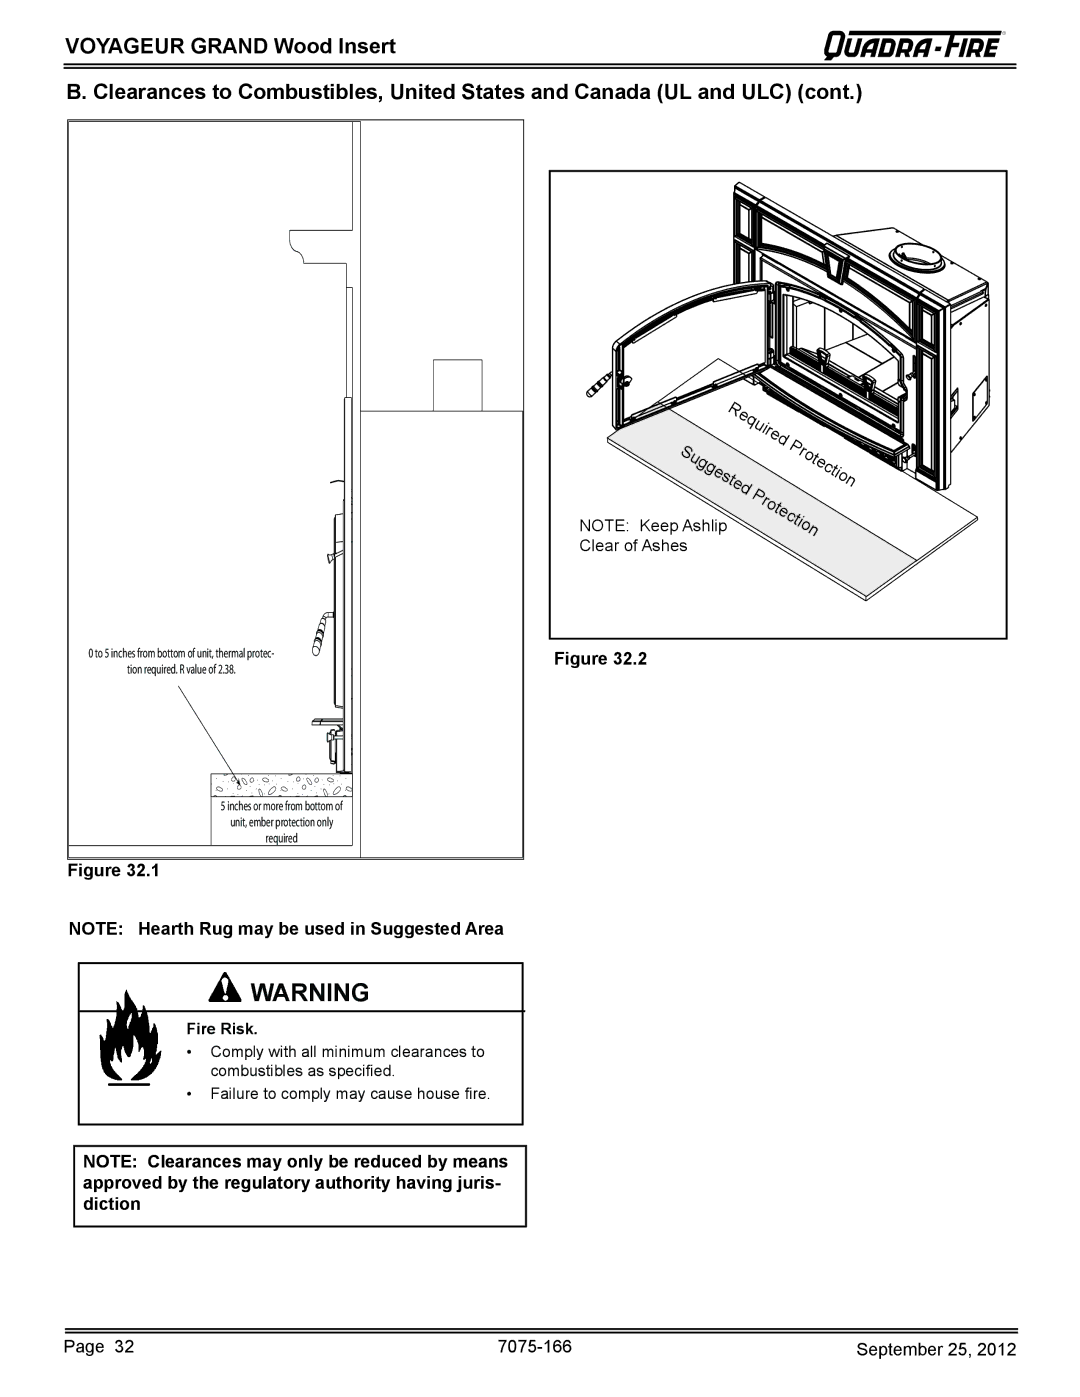
Door opens 26 inches (660mm) which goes beyond the standard size hearth pad covering the floor in front of the appliance.

May want to use a hearth rug in front of the hearth pad to protect the flooring from ash spillage and continuous cleaning of carpet, etc. See drawing on page 32.

2. Open door slowly so that ash or smoke does not exit appliance through opening.

Check the level of the ash build-up. Remove ash if it reaches the top of the brick covers. Ash should not be spilling over the brick covers onto the ashlip.

Any ash on the ashlip can be pressed into the door gasket and shorten the life of the gasket.

If the ash is left to accumulate on the ashlip it can interfere with the door closing and/or falling out onto the hearth pad or beyond.

Check the ash level each time you reload.

NOTE:

Build fire on brick firebox floor only.

Do NOT use grates or other methods to support fuel.

It will adversely affect emissions.

CAUTION

Odors and vapors released during initial operation.

Curing of high temperature paint.

Open windows for air circulation.

Odors may be irritating to sensitive individuals.

This livens up the coal bed and reduces excessive emis- sions (opacity/smoke).

Large logs burn slowly, holding a fire longer.

Small logs burn fast and hot, giving quick heat.

Page 12

7075-166

September 25, 2012

Image 12
Contents Voyageur Grand Wood Insert Hot glass will cause burnsVoyageur Grand Wood Insert Welcome to the Quadra-Fire FamilyTable of Contents Limited Lifetime Warranty Warranty Conditions BTU & Efficiency Specifications Glass SpecificationsListing and Code Approvals Appliance CertificationOperating Instructions Your Wood ApplianceGeneral Operating Parts Voyageur Grand Wood Insert Fire Safety Combustible/Non-combustible MaterialsOverfiring Seasoned WoodVoyageur Grand Wood Insert Burning Process Kindling or First StageSecond Stage Final StageVoyageur Grand Wood Insert Automatic Combustion Control ACC Air ControlsBurn Rates and Operating Efficiency Incorrect Positions Voyageur Grand Wood Insert Building a Fire Fuel Reloading InstructionsWood Fuel MoistureBlower Operating Instructions Frequently Asked Questions Voyageur Grand Wood Insert Clear SpaceOpacity Smoke Voyageur Grand Wood Insert Quick Start Guide Your specific modelMaintenance and Service Chimney and Chimney Connector Inspection/CleaningCleaning Plated Surfaces Disposal of AshesVoyageur Grand Wood Insert Glass Cleaning Inspect Firebrick & Replacement InstructionsVoyageur Grand Wood Insert Quick Reference Maintenance Guide Troubleshooting Guide Start Fire Problems Possible Cause SolutionService Parts Replacement Glass ReplacementSnap Disc Replacement Contd Snap Disc ReplacementVoyageur Grand Wood Insert Blower Replacement Shock RiskVoyageur Grand Wood Insert Door Handle Assembly Baffle & Ceramic Blanket Removal51mm. Figure Voyageur Grand Wood Insert Tube Channel Assembly Replacement Design and Installation Considerations Getting StartedDraft Voyageur Grand Wood Insert Negative Pressure Voyageur Grand Wood Insert Locating Your Stove & Chimney Chimney Termination RequirementsVoyageur Grand Wood Insert Rule Voyageur Grand Wood Insert Tools And Supplies Needed Inspect Appliance and ComponentsPre-Burn Check List Dimensions and Clearances Appliance DimensionsWall Clear of Ashes Thermal Conductivity k value Thermal Resistance R valueConverting k to R Converting R to kChimney Systems Venting SystemsInspections Larger ChimneysVoyageur Grand Wood Insert Masonry Chimney Cont’d Voyageur Grand Wood Insert Metal Heat Circulating Masonry Prefabricated Metal ChimneyVoyageur Grand Wood Insert Securing Chimney Components Altering the FireplaceFactory-Built Sold Fuel Fireplace Chimney Height / Rise and Run Outside Air Kit Installation Items Needed for Installation not suppliedOption One Outside Air Installation Instructions Option Two Outside Air Installation InstructionsLeveling Legs Flue Adapter VerticalDegree Standard Surround & Trim Kit Installation Voyageur Grand Wood Insert Standard Surround & Cast Trim Kit 42.1Blower Cord Installation on Left Side Voyageur Grand Wood Insert All Cast Surround KitPlacement Slot Blower Access Assembly White Wire Mobile Home Installation Service Parts Part number list on followingCast Iron Wood Insert Large #10 Brick Assembly StockedAt Depot #7 Baffle Protection Channel#13 Door Assembly Description Comments Part Number#14 Access Assembly #17 Control Asembly #25 & 26 Surround AssembliesVoyageur Grand Wood Insert Service And Maintenance Log Date of Service Performed By Description of ServiceVoyageur Grand Wood Insert Service And Maintenance Log Voyageur Grand Wood Insert Homeowner’s Notes Contact Information