Radware VOYA-GRAND-MBK, VOYA-GRAND-PMH owner manual Leveling Legs, Flue Adapter Vertical, Degree

Page 40

VOYAGEUR GRAND Wood Insert

R

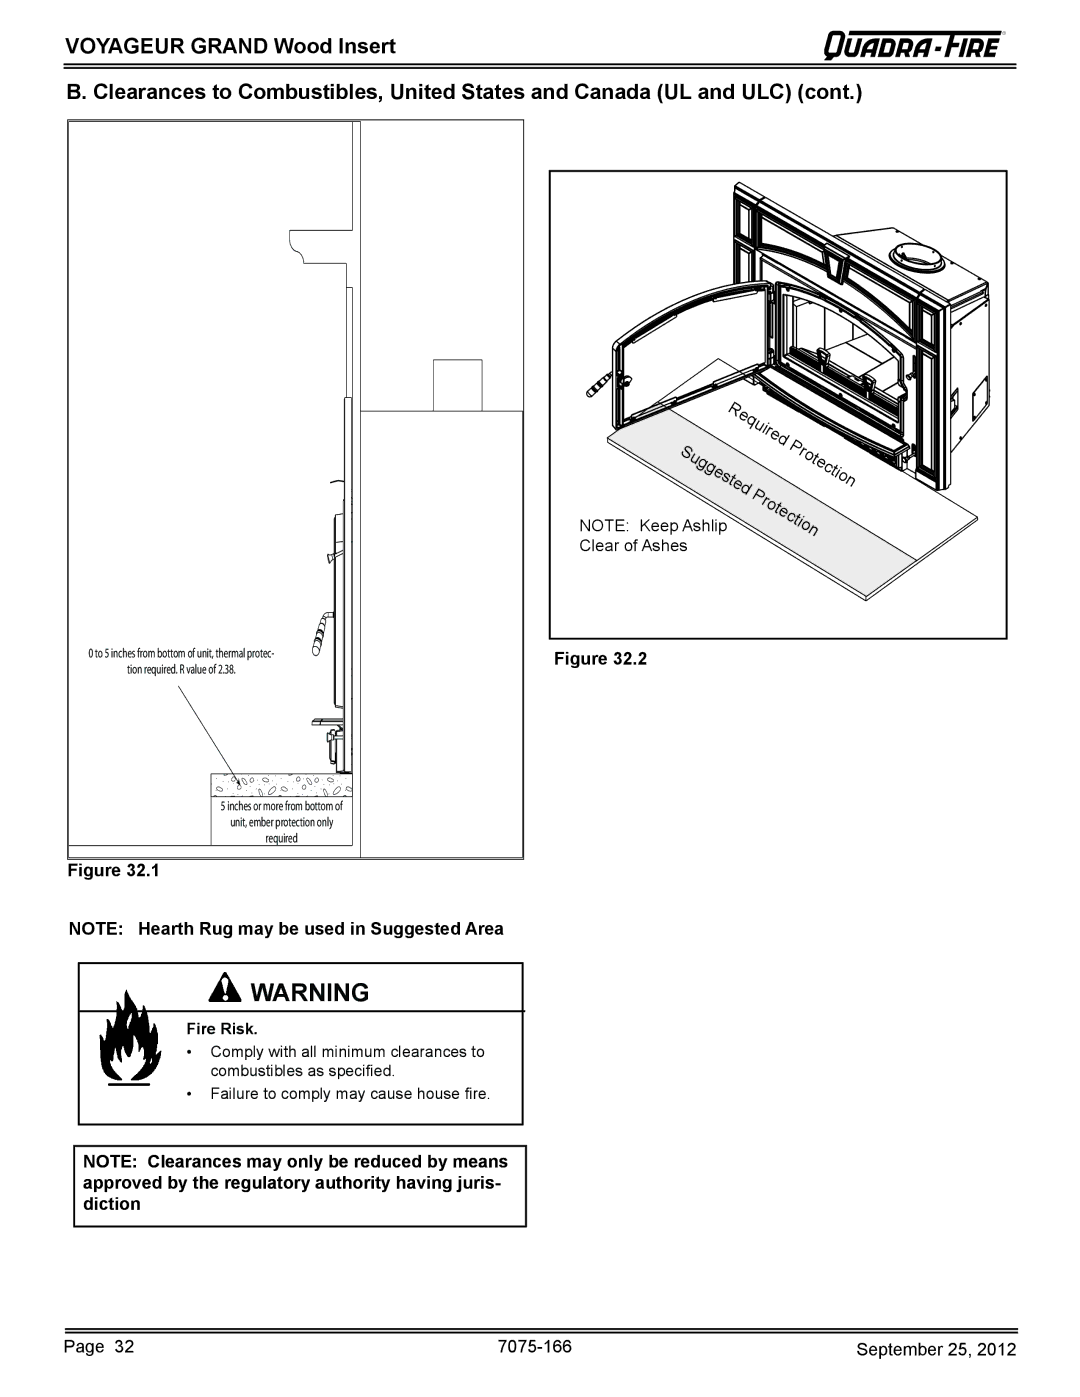
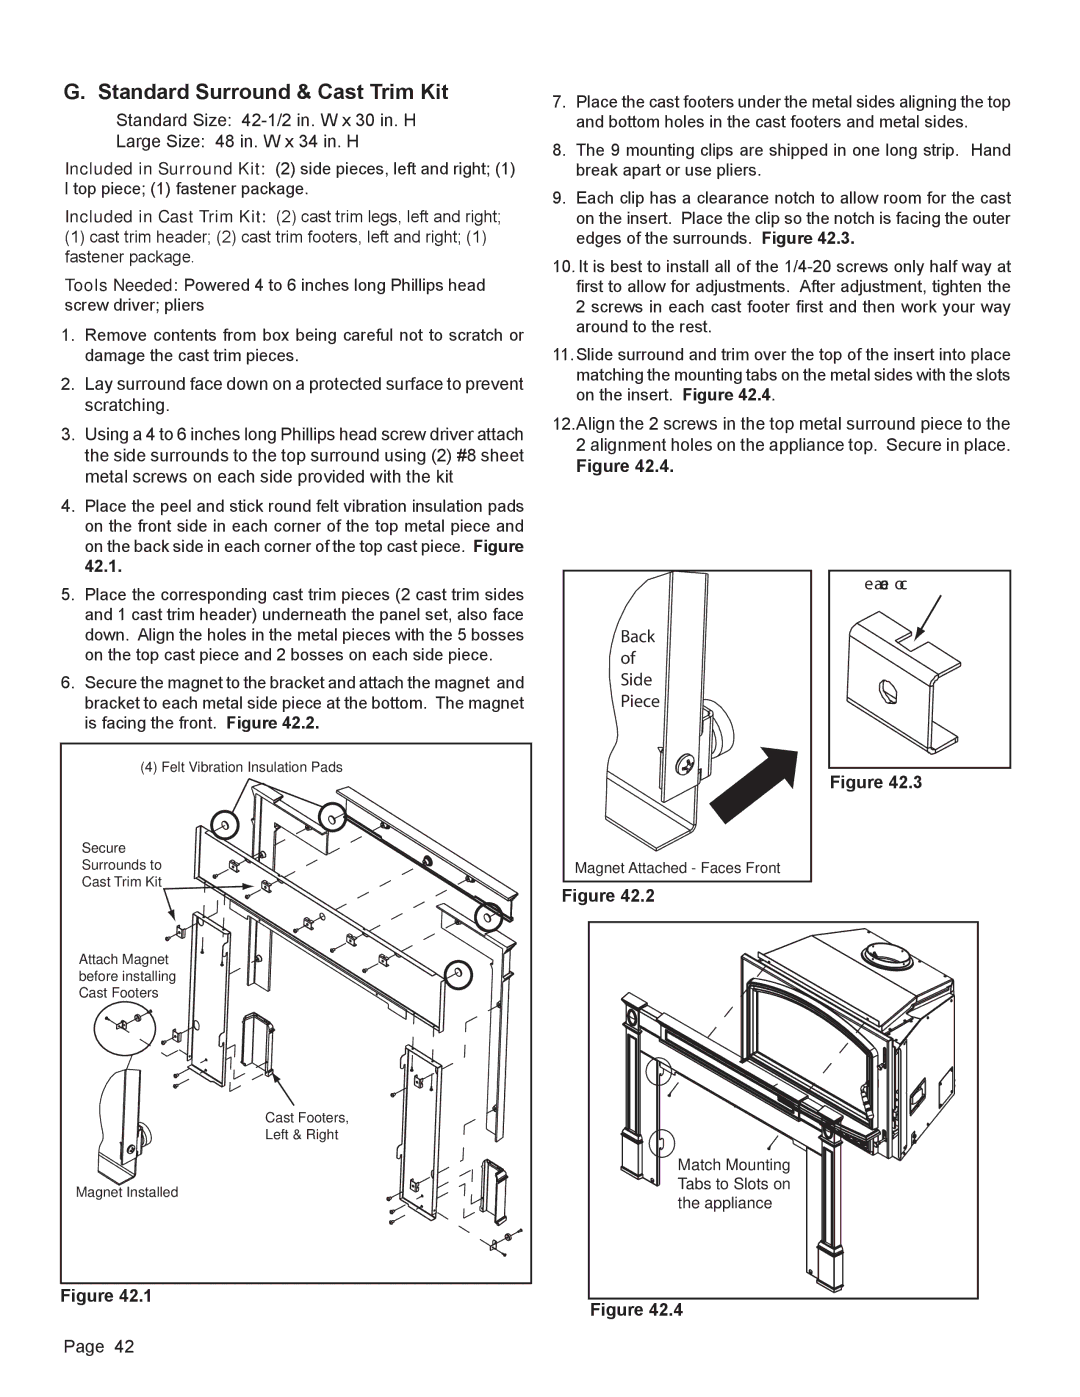
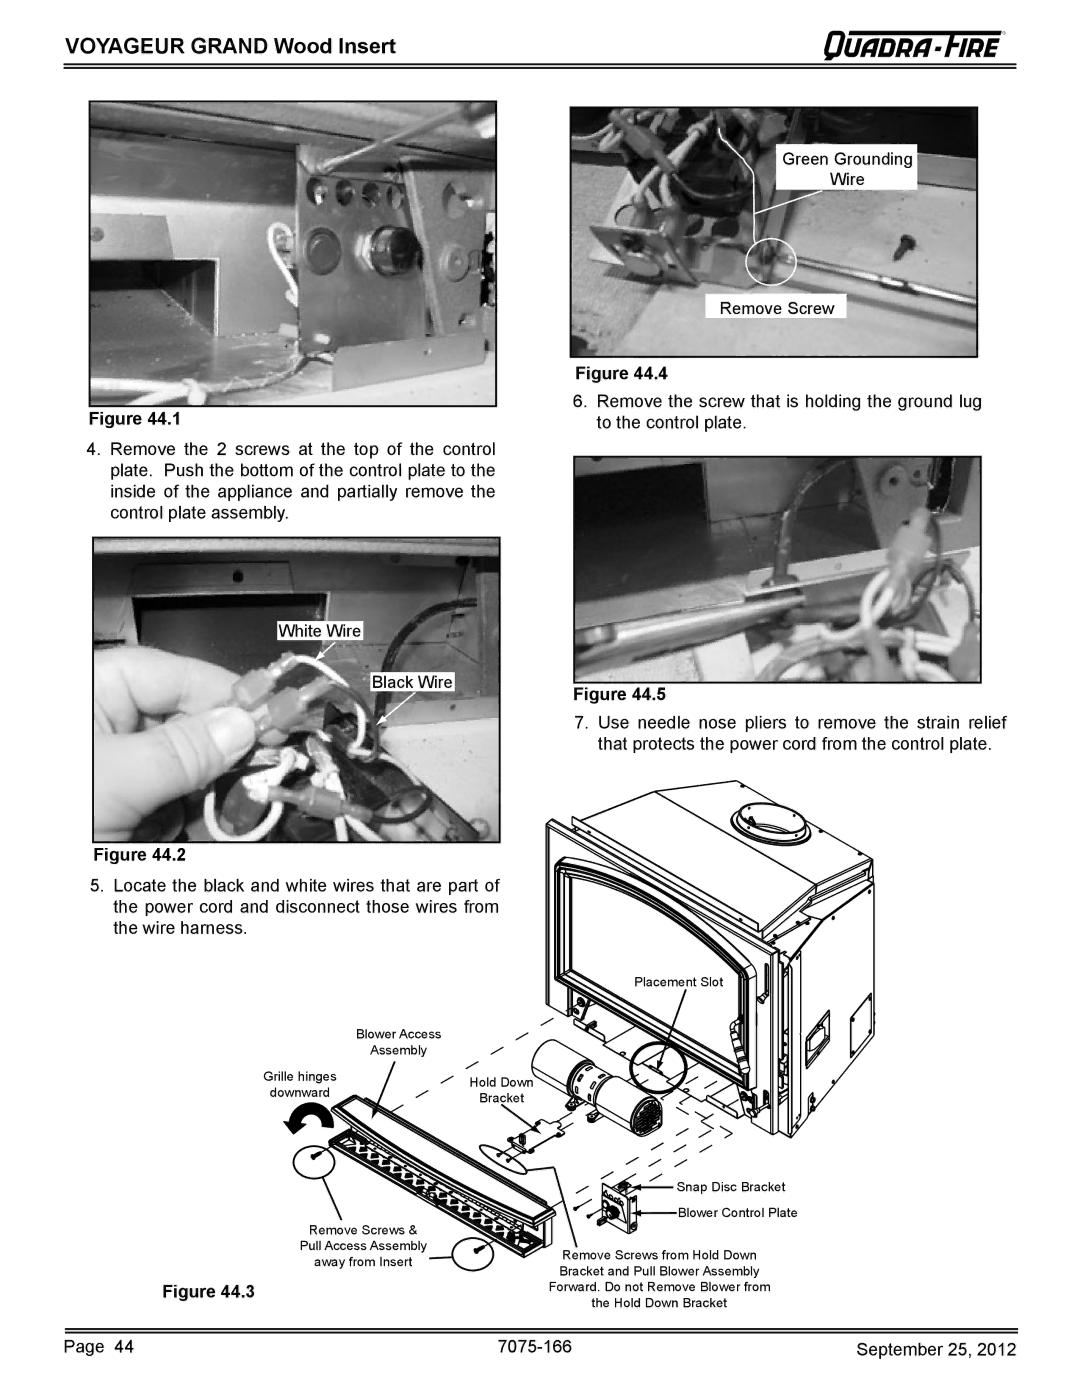
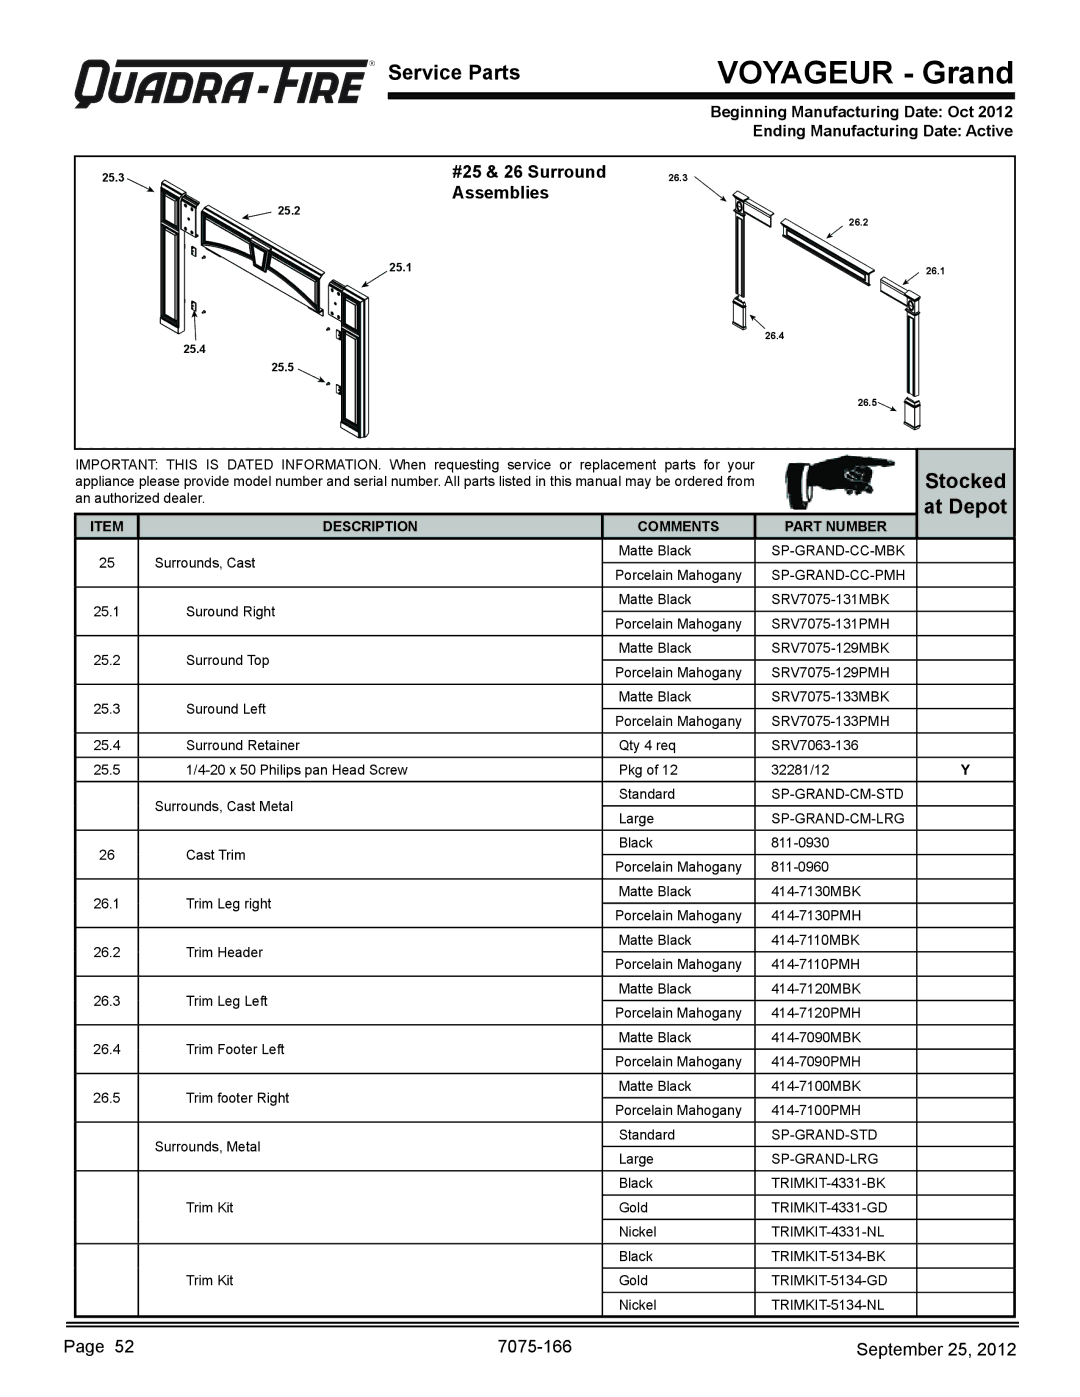
B. Optional Elbow Flue Adapter Installation

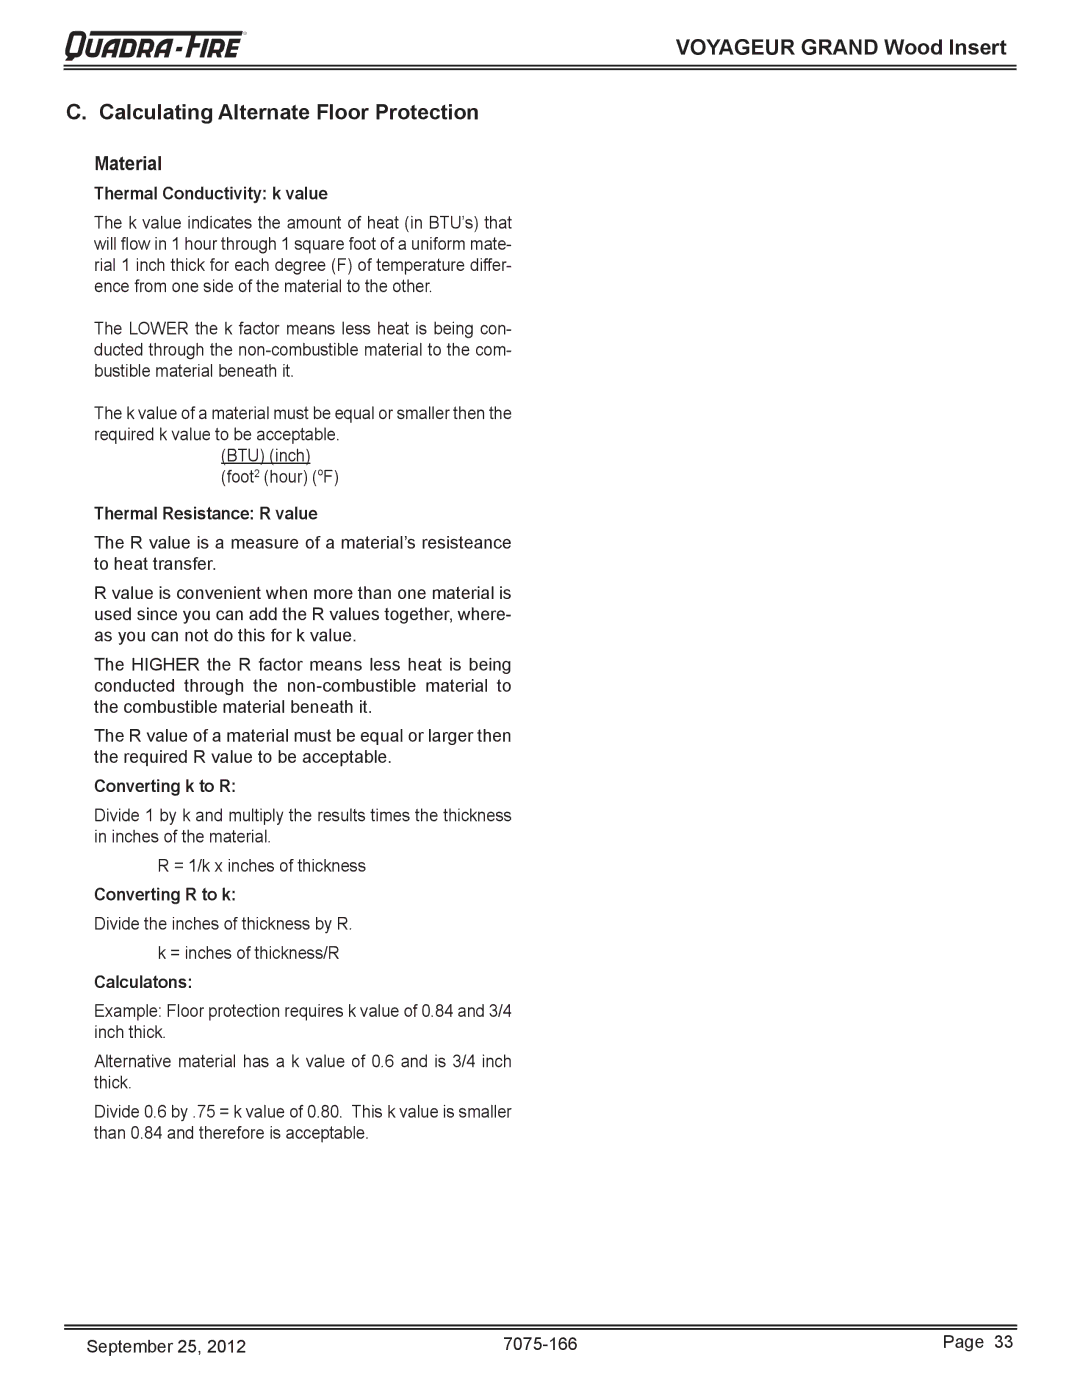
C. Securing Stove Pipe/Liner to Flue Collar

Optional use of a Simpson Duravent 15° Universal Elbow Part Number 4615 may be purchased directly through your local Simpson Durvent Pipe Distributor or from your local Quadra-Fire dealer, Part Number DV-4615.

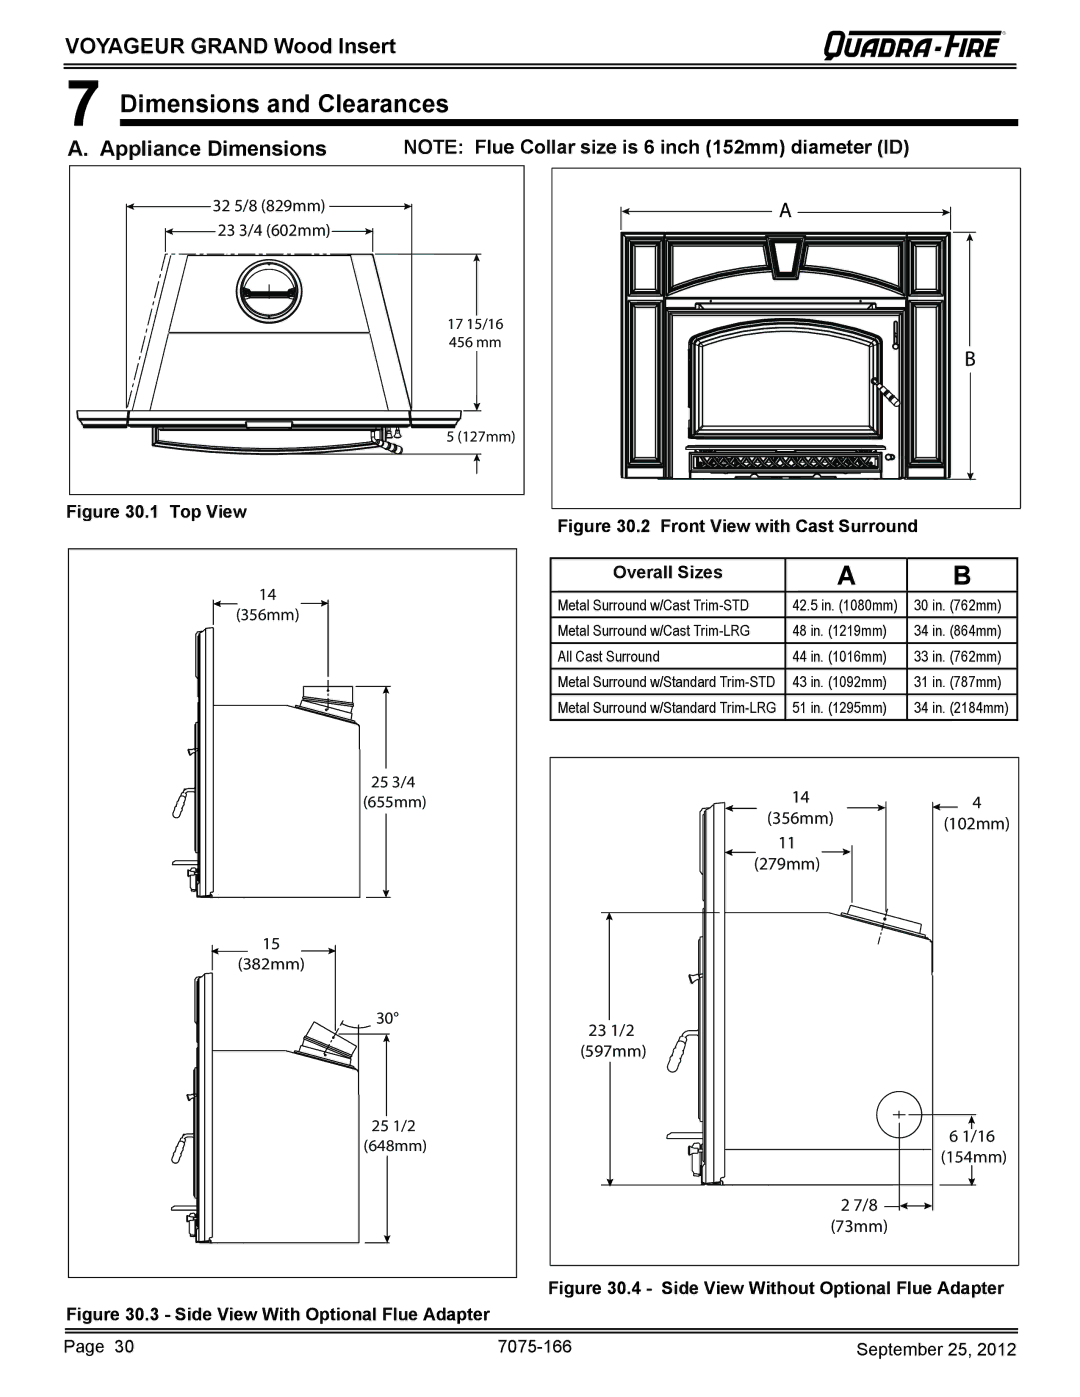
Figure 40.1 shows a vertical installation and also how to create an optional 30° elbow installation.

The 15° elbow may be secured directly to the flue collar. Follow the pipe manufacturer’s instructions for using screws or rivets for attachment. Most pipe manufacturer’s 6 inch (152mm) diameter flue liners may be attached directly to the top of the 15° elbow.

1.There are 4 pre-drilled holes in the flue collar 90 degrees apart. Attach the flue collar to the stove pipe/liner. If the seal is questionable use stove mastic Figure 40.2.

2.Attach gasket to bottom side of flue collar with a thin coat of silicone.

A


Vertical

B

A


30o

30 degree

B


Gasket

Flue Collar

Stove Pipe/Liner

Figure 40.2


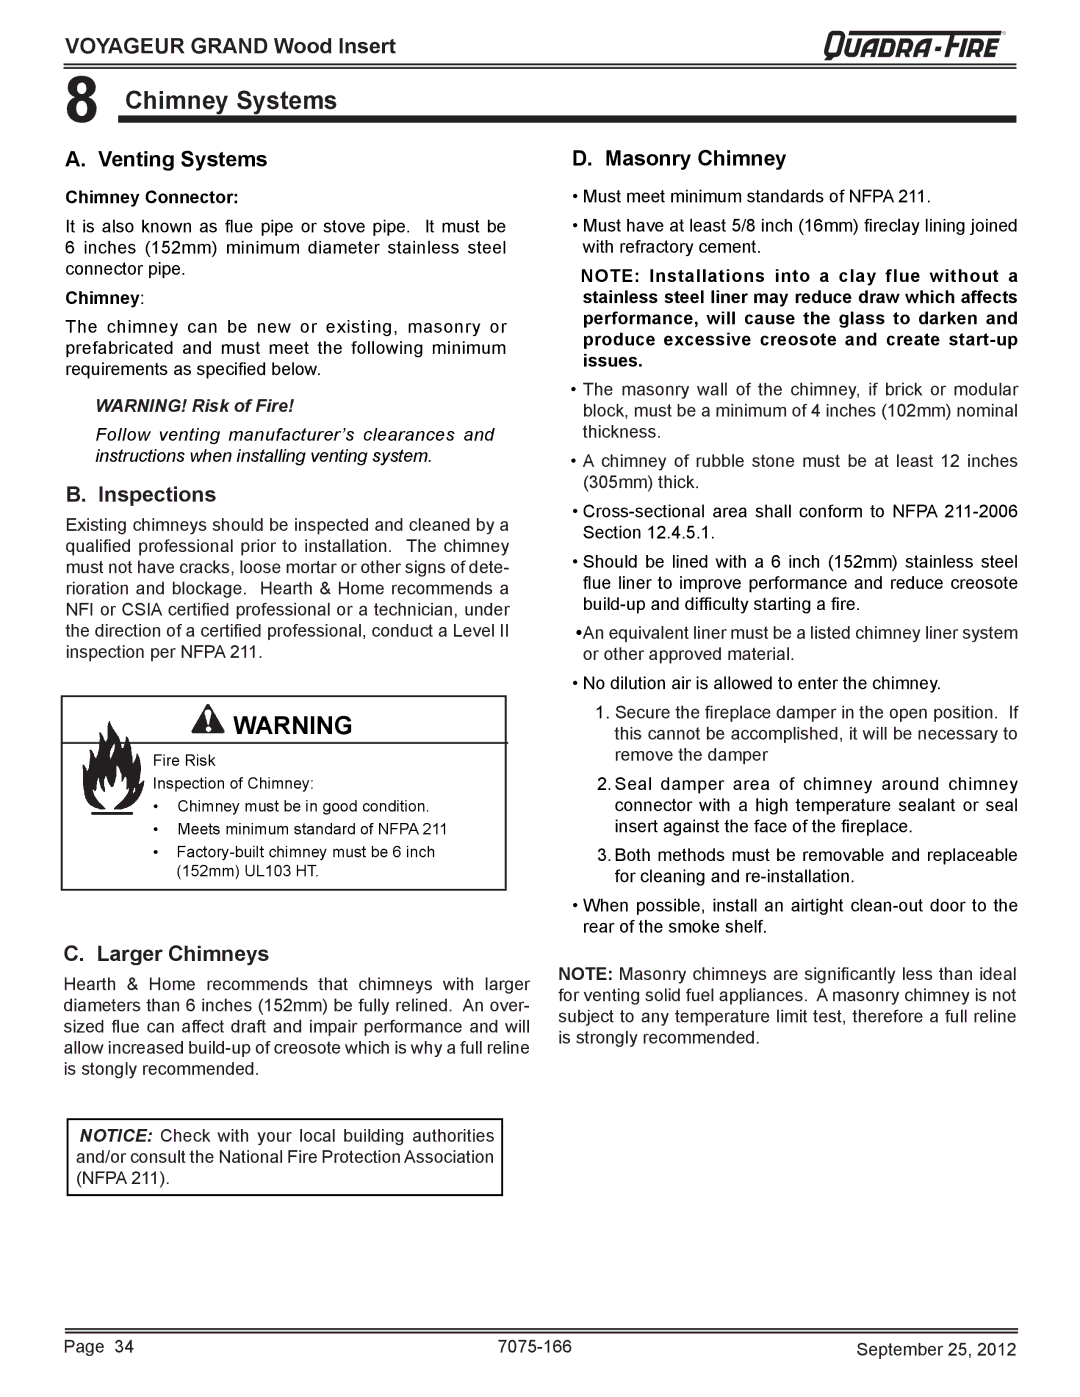
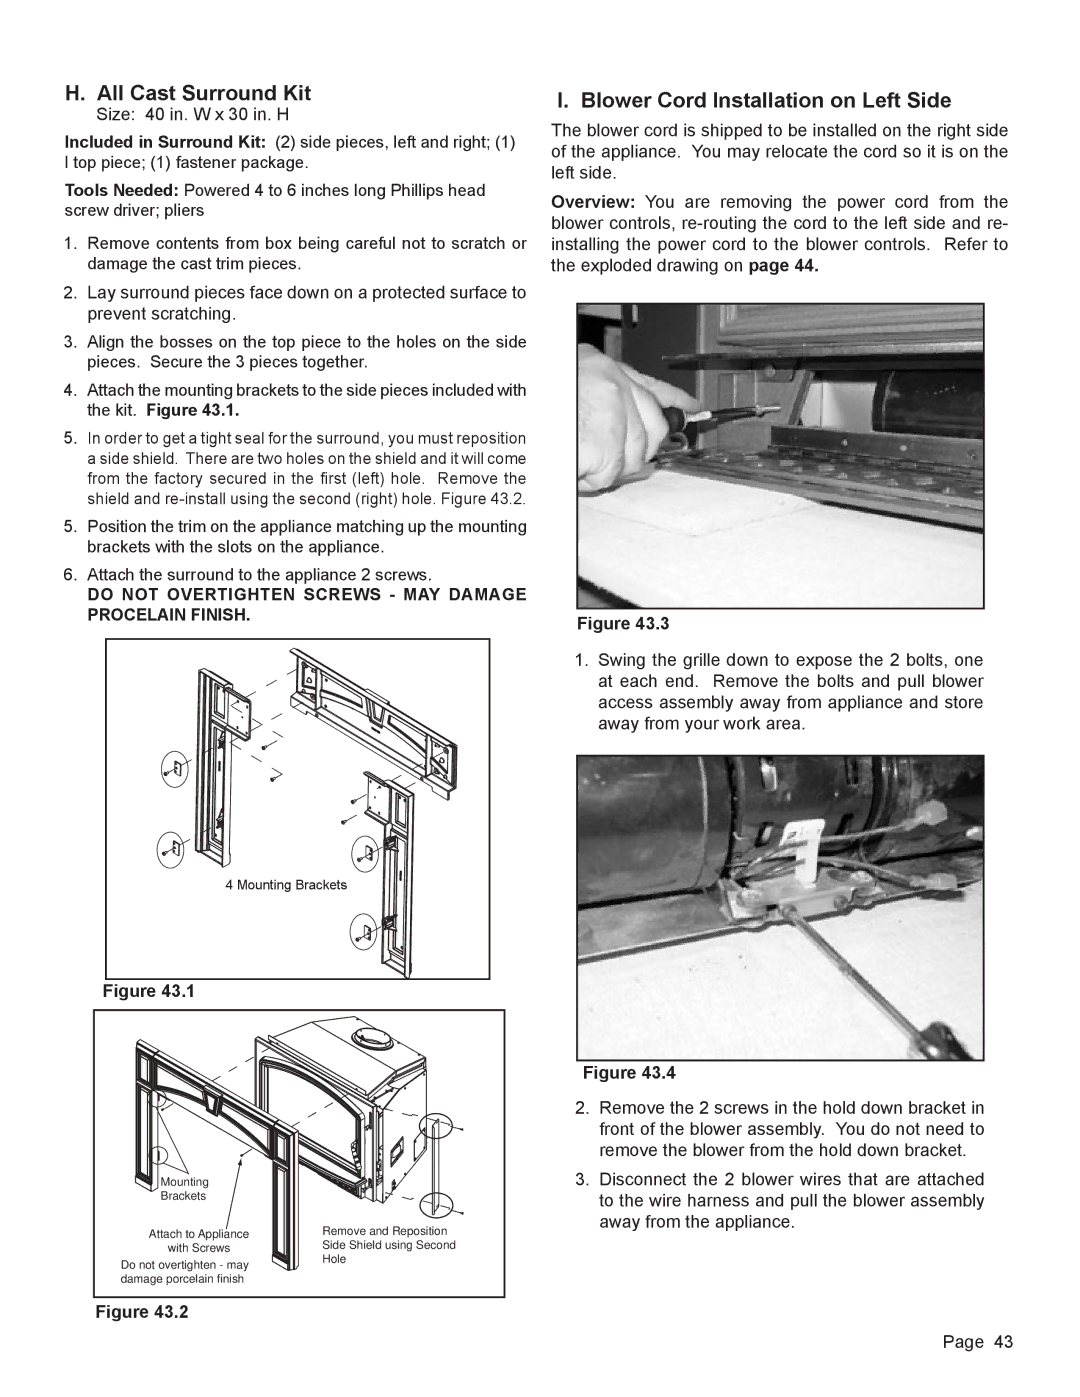
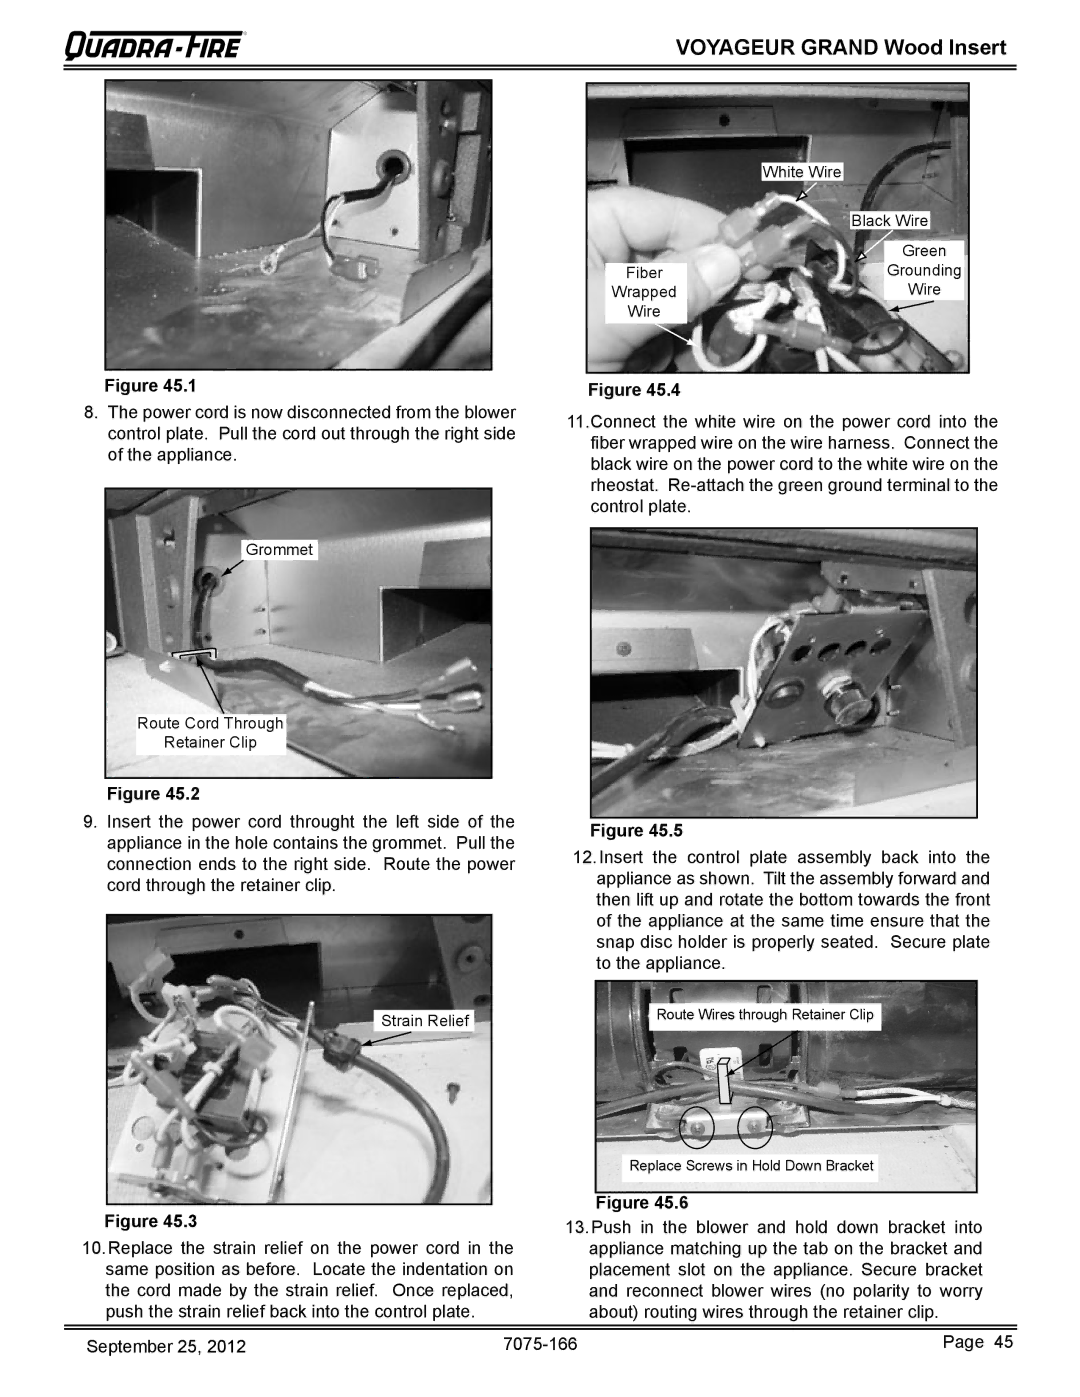
D.Leveling Legs

1.Remove the 2 screws already installed on each leg.

2.Move legs to the desired height.

3.Re-install the screws to secure in place.

Figure 40.1


Flue

A

B

Adapter


Vertical

14 in. (344mm)

25 3/4 in. (532mm)

30 Degree

15 in. (371mm)

25 1/2 in. (525mm)

Remove 2 screws from both sides. Adjust the legs up or down to level appliance.

Figure 40.3

Page 40

7075-166

September 25, 2012

Image 40
Contents Voyageur Grand Wood Insert Hot glass will cause burnsVoyageur Grand Wood Insert Welcome to the Quadra-Fire FamilyTable of Contents Limited Lifetime Warranty Warranty Conditions BTU & Efficiency Specifications Glass SpecificationsListing and Code Approvals Appliance CertificationYour Wood Appliance Operating InstructionsGeneral Operating Parts Voyageur Grand Wood Insert Fire Safety Combustible/Non-combustible MaterialsOverfiring Seasoned WoodVoyageur Grand Wood Insert Burning Process Kindling or First StageSecond Stage Final StageAir Controls Voyageur Grand Wood Insert Automatic Combustion Control ACCBurn Rates and Operating Efficiency Incorrect Positions Voyageur Grand Wood Insert Building a Fire Fuel Reloading InstructionsWood Fuel MoistureBlower Operating Instructions Voyageur Grand Wood Insert Clear Space Frequently Asked QuestionsOpacity Smoke Voyageur Grand Wood Insert Quick Start Guide Your specific modelMaintenance and Service Chimney and Chimney Connector Inspection/CleaningCleaning Plated Surfaces Disposal of AshesVoyageur Grand Wood Insert Glass Cleaning Inspect Firebrick & Replacement InstructionsVoyageur Grand Wood Insert Quick Reference Maintenance Guide Troubleshooting Guide Start Fire Problems Possible Cause SolutionService Parts Replacement Glass ReplacementSnap Disc Replacement Contd Snap Disc ReplacementVoyageur Grand Wood Insert Blower Replacement Shock RiskBaffle & Ceramic Blanket Removal Voyageur Grand Wood Insert Door Handle Assembly51mm. Figure Voyageur Grand Wood Insert Tube Channel Assembly Replacement Getting Started Design and Installation ConsiderationsDraft Voyageur Grand Wood Insert Negative Pressure Voyageur Grand Wood Insert Locating Your Stove & Chimney Chimney Termination RequirementsVoyageur Grand Wood Insert Rule Inspect Appliance and Components Voyageur Grand Wood Insert Tools And Supplies NeededPre-Burn Check List Dimensions and Clearances Appliance DimensionsWall Clear of Ashes Thermal Conductivity k value Thermal Resistance R valueConverting k to R Converting R to kChimney Systems Venting SystemsInspections Larger ChimneysVoyageur Grand Wood Insert Masonry Chimney Cont’d Voyageur Grand Wood Insert Metal Heat Circulating Masonry Prefabricated Metal ChimneyAltering the Fireplace Voyageur Grand Wood Insert Securing Chimney ComponentsFactory-Built Sold Fuel Fireplace Chimney Height / Rise and Run Outside Air Kit Installation Items Needed for Installation not suppliedOption One Outside Air Installation Instructions Option Two Outside Air Installation InstructionsFlue Adapter Vertical Leveling LegsDegree Standard Surround & Trim Kit Installation Voyageur Grand Wood Insert Standard Surround & Cast Trim Kit 42.1Blower Cord Installation on Left Side Voyageur Grand Wood Insert All Cast Surround KitPlacement Slot Blower Access Assembly White Wire Mobile Home Installation Part number list on following Service PartsCast Iron Wood Insert Large #10 Brick Assembly StockedAt Depot #7 Baffle Protection Channel#13 Door Assembly Description Comments Part Number#14 Access Assembly #17 Control Asembly #25 & 26 Surround AssembliesVoyageur Grand Wood Insert Service And Maintenance Log Date of Service Performed By Description of ServiceVoyageur Grand Wood Insert Service And Maintenance Log Voyageur Grand Wood Insert Homeowner’s Notes Contact Information