Radware VOYA-GRAND-MBK, VOYA-GRAND-PMH owner manual Voyageur Grand Wood Insert Glass Cleaning

Page 18

VOYAGEUR GRAND Wood Insert

R

E. Glass Cleaning

Frequency: As desired

By: Homeowner

Clean glass with a non-abrasive glass cleaner. Abrasive cleaners may scratch and cause glass to crack.

If the deposits on the glass are not very heavy, normal glass cleaners work well. Heavier deposits may be removed by using a damp cloth dipped in wood ashes or by using a commercially available oven cleaner.

After using an oven cleaner, it is advisable to remove any residue with a glass cleaner or soap and water. Oven cleaner left on during the next firing can permanently stain the glass and damage the finish on plated metal surfaces.

A portion of the combustion air entering the firebox is de- flected down over the inside of the door glass.

This air flow “washes” the glass, helping to keep smoke from adhering to its surface.

When operated at a low burn rate, less air will be flowing over the glass and the smoky, relatively cool condition of a low fire will cause the glass to become coated.

Operating the appliance with the Burn Rate Air Control and Start-Up Air Control all the way open for 15-20 min- utes should remove the built up coating.

CAUTION! Handle glass assembly with care. Glass is breakable.

Avoid striking, scratching or slamming glass

Avoid abrasive cleaners

Do not clean glass while it is hot

F.Inspect Firebrick & Replacement

Instructions

Frequency: After each ash removal

By: Homeowner

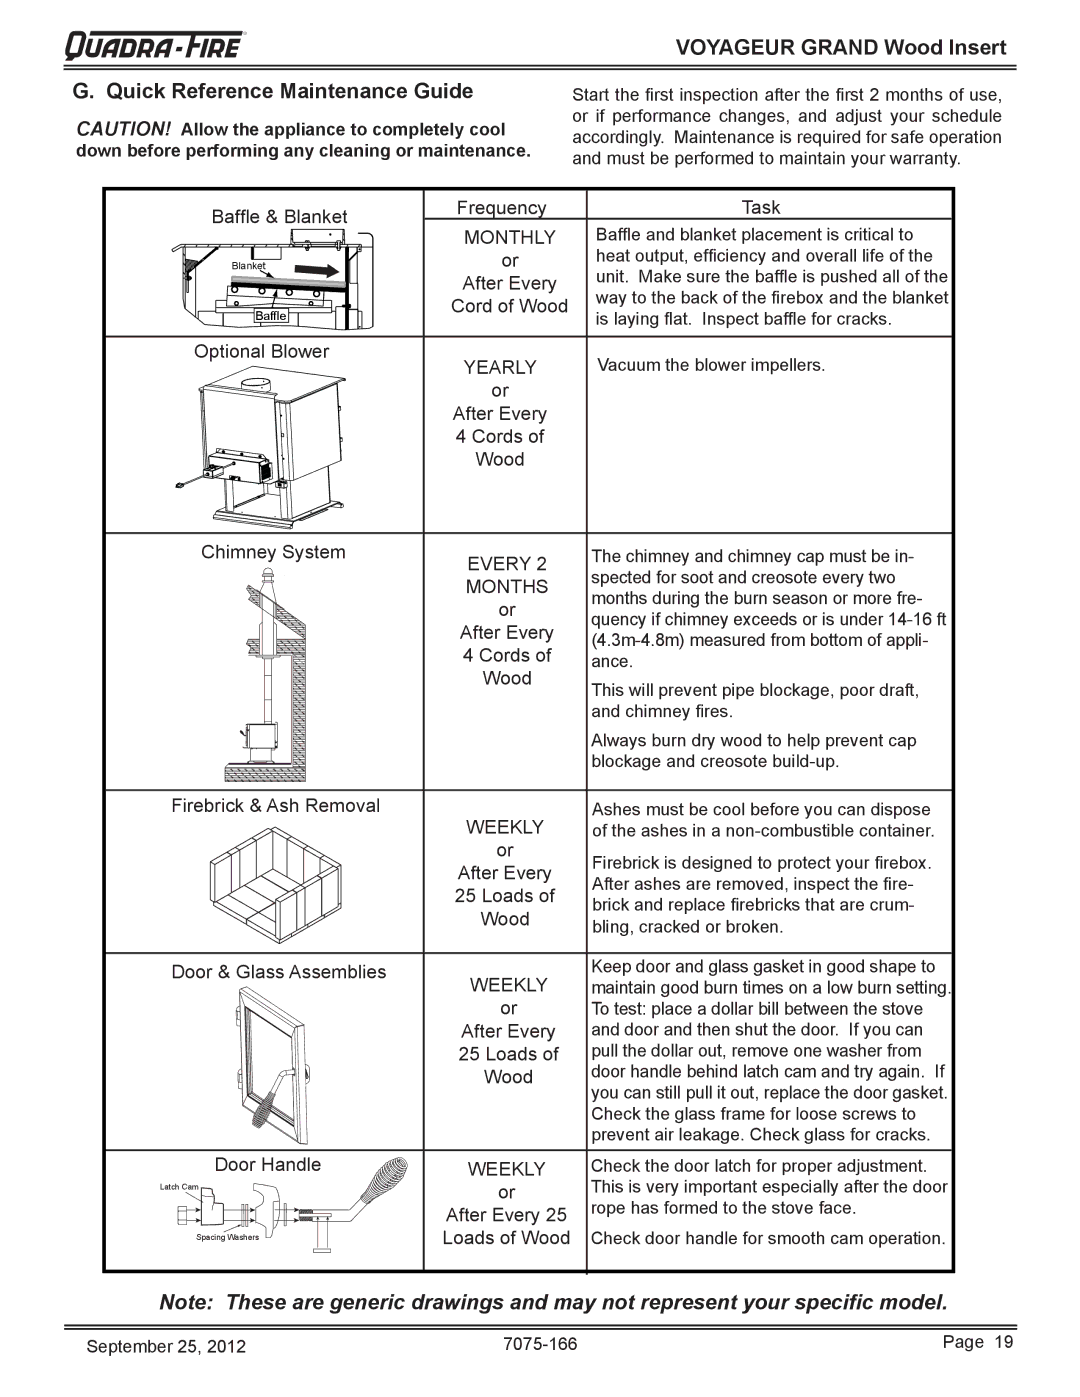
Replace the firebrick if they become crumbly and/or if there is a 1/4 inch (6.35mm) gap between the bricks.

The firebox is lined with firebrick, which has exceptional insulating properties. Do not use a grate; simply build a fire on the firebox floor. Do not operate appliance without firebrick.

1.After the coals have completely cooled, remove all old brick and ash from unit and vacuum firebox.

2.Remove new brick set from box and lay out to the diagram shown in the instructions that come with the replacement brick set.

3.Lay bottom bricks in unit.

4.Install rear bricks on the top of the bottom bricks.

5.Install side bricks. Slide top of brick under clips on side of firebox and push the bottom of the brick until it is flush with the side of the unit.

Use Part 832-0550 when ordering individual brick. Provide brick dimension or copy the page in the service parts list, mark the desired brick and take it to your authorized dealer.

Page 18

7075-166

September 25, 2012

Image 18
Contents Voyageur Grand Wood Insert Hot glass will cause burnsVoyageur Grand Wood Insert Welcome to the Quadra-Fire FamilyTable of Contents Limited Lifetime Warranty Warranty Conditions Listing and Code Approvals BTU & Efficiency SpecificationsGlass Specifications Appliance CertificationOperating Instructions Your Wood ApplianceGeneral Operating Parts Overfiring Voyageur Grand Wood Insert Fire SafetyCombustible/Non-combustible Materials Seasoned WoodSecond Stage Voyageur Grand Wood Insert Burning ProcessKindling or First Stage Final StageVoyageur Grand Wood Insert Automatic Combustion Control ACC Air ControlsBurn Rates and Operating Efficiency Incorrect Positions Voyageur Grand Wood Insert Building a Fire Fuel Reloading InstructionsWood Fuel MoistureBlower Operating Instructions Frequently Asked Questions Voyageur Grand Wood Insert Clear SpaceOpacity Smoke Voyageur Grand Wood Insert Quick Start Guide Your specific modelCleaning Plated Surfaces Maintenance and ServiceChimney and Chimney Connector Inspection/Cleaning Disposal of AshesVoyageur Grand Wood Insert Glass Cleaning Inspect Firebrick & Replacement InstructionsVoyageur Grand Wood Insert Quick Reference Maintenance Guide Troubleshooting Guide Start Fire Problems Possible Cause SolutionSnap Disc Replacement Contd Service Parts ReplacementGlass Replacement Snap Disc ReplacementVoyageur Grand Wood Insert Blower Replacement Shock RiskVoyageur Grand Wood Insert Door Handle Assembly Baffle & Ceramic Blanket Removal51mm. Figure Voyageur Grand Wood Insert Tube Channel Assembly Replacement Design and Installation Considerations Getting StartedDraft Voyageur Grand Wood Insert Negative Pressure Voyageur Grand Wood Insert Locating Your Stove & Chimney Chimney Termination RequirementsVoyageur Grand Wood Insert Rule Voyageur Grand Wood Insert Tools And Supplies Needed Inspect Appliance and ComponentsPre-Burn Check List Dimensions and Clearances Appliance DimensionsWall Clear of Ashes Converting k to R Thermal Conductivity k valueThermal Resistance R value Converting R to kInspections Chimney SystemsVenting Systems Larger ChimneysVoyageur Grand Wood Insert Masonry Chimney Cont’d Voyageur Grand Wood Insert Metal Heat Circulating Masonry Prefabricated Metal ChimneyVoyageur Grand Wood Insert Securing Chimney Components Altering the FireplaceFactory-Built Sold Fuel Fireplace Chimney Height / Rise and Run Option One Outside Air Installation Instructions Outside Air Kit InstallationItems Needed for Installation not supplied Option Two Outside Air Installation InstructionsLeveling Legs Flue Adapter VerticalDegree Standard Surround & Trim Kit Installation Voyageur Grand Wood Insert Standard Surround & Cast Trim Kit 42.1Blower Cord Installation on Left Side Voyageur Grand Wood Insert All Cast Surround KitPlacement Slot Blower Access Assembly White Wire Mobile Home Installation Service Parts Part number list on followingCast Iron Wood Insert Large At Depot #10 Brick AssemblyStocked #7 Baffle Protection Channel#13 Door Assembly Description Comments Part Number#14 Access Assembly #17 Control Asembly #25 & 26 Surround AssembliesVoyageur Grand Wood Insert Service And Maintenance Log Date of Service Performed By Description of ServiceVoyageur Grand Wood Insert Service And Maintenance Log Voyageur Grand Wood Insert Homeowner’s Notes Contact Information