Philips 44PL9773, 44PL9522, 55PL9773 setup guide Setting the Sleeptimer

Page 48
HELPFUL HINTS
• To see how many minutes remain before the TV shuts itself off, press the Information Plus m button.
• An on-screen countdown will appear dur-
ing the last minute before the TV shuts itself off. At this time, you may cancel the Sleeptimer setting by pressing the OK button on the remote control.
Press the Cursor Right button to set the sleeptimer in 5-minute increments, from 5 minutes to 180 minutes.

Setting the Sleeptimer

NOTE: If you have not selected your time zone and set the Daylight Savings control, do so before making a Sleeptimer setting. Details are on page 65.

If you have ever fallen asleep while watching TV, you may have wished you could have programmed your TV to turn off automatical- ly. The Sleeptimer feature allows you to set your TV to do that. With the Sleeptimer con- trol, you can set a timer to automatically switch the TV off after a period of time you choose—5 minutes up to 180 minutes in 5-minute increments.

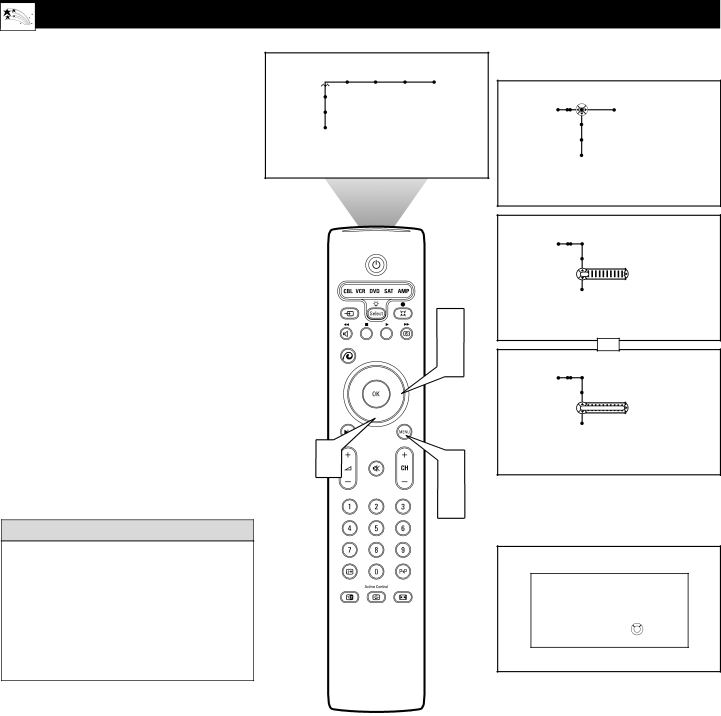
1 Press the Menu button on the remote control to display the on-screen menu.

2 Press the Cursor Right button repeated- ly until “Features” is selected.

3 Press the Cursor Down button repeat- edly to select “Sleeptimer.”

4

TV

Settings

Demo

Install

Picture Sound Features Channels

2

x 4

Features Channels

TV

Closed captions

Sleeptimer

On timer

Features


TV


Closed captions


Sleeptimer

5 min.

On timer


Up To

Features


TV


Closed captions


Sleeptimer

180 min.

On timer


Press the Menu button to remove the

3

1

5 on-screen menu from the TV screen.


5

During the last minute of a sleeptimer set- ting, the TV will display a countdown screen that will allow you to cancel the setting.

The sleeptimer will switch off the TV in 45 seconds.

Cancel OK

48

Image 48
Contents 55PL9773 44PL9773 44PL9522 Warranty Owner Verification Confirmation Dear Philips product ownerImportant Safety Instructions Contents Features Compact design with low weightWays TV Signals Can Come toYour Home Your High-definition-ready SetDescriptions of Jacks, Cables, and Connectors Cables used RF coaxial cable 75ΩUse only one of the video signal inputs at a time Panel Jack Compatibility InformationPre-connection Recommendations Positioning the TVConnecting a VCR Back of TVConnecting a VCR and Cable Box Connecting an S-Video Device Back of TVConnecting a Standard DVD Player Helpful HintsConnecting a Progressive-scan DVD Player Connecting an HD Satellite Receiver to YPbPr Connecting an HD Satellite Receiver to DVI Back of TVConnecting Surround Sound Equipment Powered Subwoofer Front SpeakersConnecting to the Side InputsVideo Game System Labeling the Audio/Video Input Sources Remote Control Buttons Select CBL VCR DVD SAT AMP and BacklightStandby-On Programming the Remote Control VCR DVDCheck IT OUT Programming the Remote Control Setup Codes AmplifierVCR Operating Accessory Devices with the TV Remote CBL Cable Mode VCR Mode DVD ModeSAT Mode AMP Mode Using Active Control Plus Active Control Plus SettingsAdjusting/Setting the Picture Controls Color temperature, or TintSelecting a Digital Processing Option DemoSelecting a Dynamic Contrast Option Press the Cursor Right button to select PictureSelecting a DNR Dynamic Noise Reduction Option DNR is not available for use with input sources AV3-AV6Turning on Color Enhancement Selecting an AutoPicture Option AutoPicture OptionsSelecting a Picture Format Option Your TV’s Picture Format OptionsAuto Adjusting the TV and Headphone Volume To control the television volumeSelecting a TV Equalizer Option Adjusting TV Speaker Balance Loudness On Off Headphone volume Turning Loudness on or offSettings Demo Install Using Alternate Audio SAP Setting the TV for Stereo Programming Turning the AVL Audio Volume Leveler on or off Adjusting the Delta Volume Selecting an AutoSound Option AutoSound OptionsUsing Closed Captioning CC-1, CC-2, CC-3, or CC-4-DialogueSetting the Sleeptimer Setting the On Timer Using the Channel List Removing Channels from the Channel List Using Lock Channel Using Lock After Blocking Programming Based on TV Ratings TV Ratings from TV BroadcastersBlocking Programming Based on Movie Ratings Movie RatingsTurning the Antenna Attenuator on or off Using Surf Channels SurfUsing Dual Screen and PIP When using Dual Screen Selecting a Picture Freeze Option Photo finishResetting the Audio/Video Settings to Factory Default Values Minimum mode default mode Selecting an On-screen Display OptionSetting up or Changing a PIN Personal Identification Number Setting the Subwoofer Control Setting the Clock-Auto Clock Mode 10 6 8 Auto clock channel Atlantic Using Installation Features Language and Autoprogram For LanguageCleaning the Cabinet Cleaning the ScreenCleaning or Replacing the Filters Replacing the Lamp Groove Resetting the Lamp’s Lifetime Counter You have changed the lampTroubleshooting Remote-related Checks Remote control does not work TV-related Checks Picture appears doubled or tripledPicture shakes or is not clear Picture has no colors or colors are not correctProduct Specifications PictureIndex Factory Service Locations Milwaukee call ChicagoHouston LOS Angeles Limited Warranty Philips Television