JVC Installing the Projector, No.51666, DLA-M4000LU DLA-M4000LE, Precautions for Installation

Page 42
Manual background

No.51666

Installing the Projector

Precautions for Installation

CAUTION

Do not install the projector in the following places :

There is much water, humidity or dust.

The projector may be subjected to oil smoke or cigarette smoke.

On a soft surface such as a carpet or cushion.

The projector may be subjected to direct sunlight.

Temperature is high or humidity is low.

Allowable operation temperature range: + 5°C to + 40°C

Allowable relative humidity range: 90% or less (no condensation)

Allowable storage temperature range: –5°C to +60°C

When installing the projector, observe the followings:

• Do not use the projector placed on its side.

Avoid using the projector placed on its side. This could cause a malfunction.

• Use the projector within the installed angle.

Avoid using the projector inclined ±5° or more right-to-left or left-to-right. This could cause color variation or harm the lamp life.

• Do not block the exhaust vents.

Do not use a cover which encloses the projector air-tight or blocks the exhaust vents. Allow sufficient space around the projector. When the projector is enclosed in a space of the following dimensions, use an air conditioner so the temperature inside becomes equal to the outside temperature.

Allowable minimum space required

305 mm

600 mm

600 mm

Installing the Projector (Cont.)

Precautions for Installation (Cont.)

Observe the following points when installing the projector by hanging it from the ceiling

To prevent falling or overturning, it is recommended that the projector be fixed to its stand with bolts.

When mounting the projector to the ceiling, first install a special shelf and then set the projector on it securely. For safety and maintenance purposes, a suitable facility is necessary to easily lift and lower the projector from the shelf for mainte- nance access.

305 mm or more

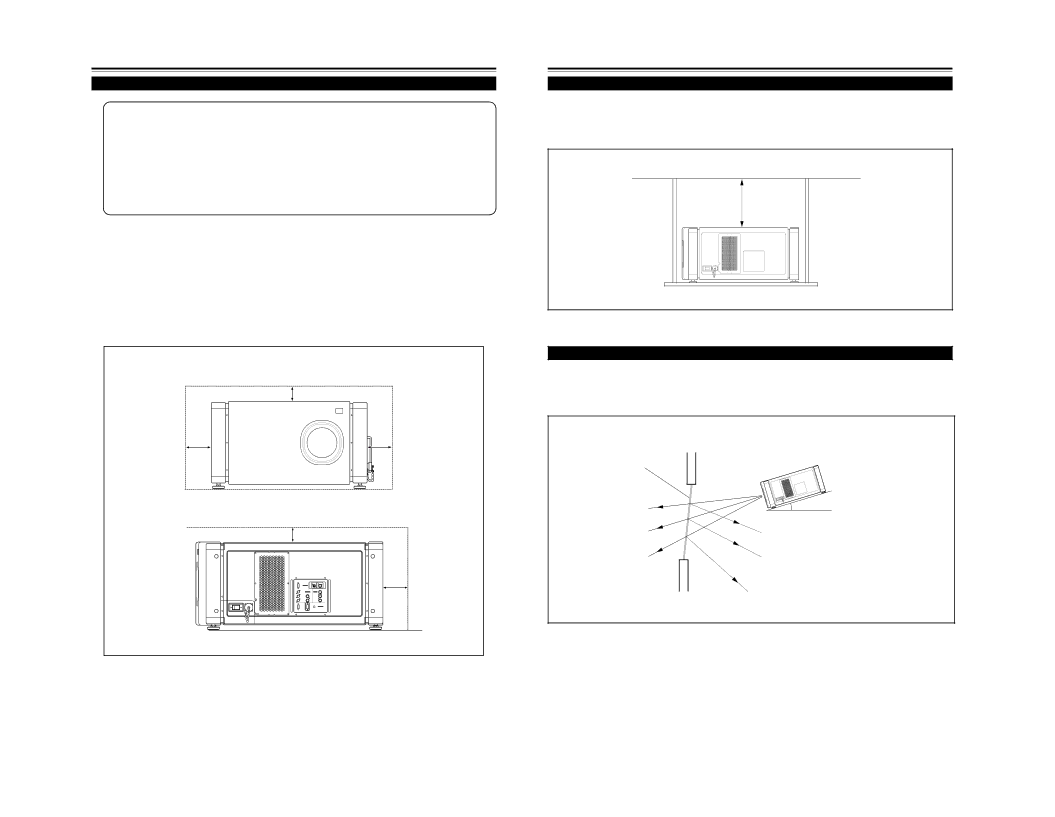
Relationship relative to Glass Surface

Light energy decreases as it passes a glass. So, no more than one glass should be used in the projecting room.

Avoid using panes of glass as much as possible.

Pay attention to the angle of the glass and the installed angle of the projector so that the light emitted from the projector does not come back into the lens after reflection.

DLA-M4000LU DLA-M4000LE

305 mm

Glass (tilted as required)

Projection light

Installation angle

Avoid the light reflected from the glass entering the surface of the projector lens. (Tilt the projecting room glass as required.)

600 mm

Reflected light

14

15

Image 42
Contents PROJECTOR No.51666DLA-M4000LU SUPER Model No. DLA-M4000LUSAFETY PRECAUTIONS Cont SAFETY PRECAUTIONSIMPORTANT INFORMATION IMPORTANT SAFEGUARDS DO NOT allow any unqualified person to install the unitFilter Maintenance and Light-Source ContentsAccessories Operating the Setting MenuFront Side / Top Surface / Right Side Controls and FeaturesControls and Features cont Left-hand side / Back SideControl Panel Control Panel ContNo.51666 Connector Panel Remote Control UnitControls and Features Cont Precautions for using batteries Installing BatteriesInstall the batteries MENU / ENTER Menu Operation ButtonPrecautions for Installation Cont Installing the ProjectorPrecautions for Installation Installing the Projector ContRelational table for maximum shift amounts aspect ratio 4 Lens Shift FunctionLens Shift Function Cont Relational table for maximum shift amounts aspect ratio 16Adjustable range of the lens Connecting to Various DevicesSignals that Can Be Input to the Projector Video signalsConnecting to Various Devices Cont.Connecting to Various Devices Cont Examples of System ConfigurationConnecting to Computer Devices Example of a basic systempower cord into a wall outlet, and Connecting to Devices which Control the ProjectorConnecting the Power Cord Supplied Connecting to Various Devices ContTurning off the Power When Turning On the Devices Connected to the Projector1. Turning on the Power Power switch of AV devices which provide input to the projectorFor Operating Other Functions 3. Adjust the screen size4. Adjust focus Basic Operations ContProjector’s button To display the SETTING menuTo use the remote control’s PRESET button To display “CHANNEL” on the screen1 Press the SETTING button of the projector Operating the Setting MenuMaking Basic Settings 2 Press the SETTING button to select the desired item3 Set adjust the item Configuration of the Main Menu Computer-related inputRemote control unit Operating the Main Menu Basic Operation of the Main Menu2 Press MENU/ENTER toward the 5 or ∞ mark to select “DECODER” Changing the Color SystemChanging the Language Display 3 Press MENU/ENTER toward the 2 or 3 mark to set3 Press the MENU/ENTER button Adjusting the Pixel ClockAdjusting the Screen Position To return to the main menu, press the PAGEWhen AV signals are input Adjusting Picture QualityAdjusting Picture Quality Cont When computer-related signals are inputSetting and Adjusting Other Functions OPTIONS Setting and Adjusting Other Functions OPTIONS Cont When a source setting “A UTO” is selected Changing Setting the SourceChanging Setting the Source Cont When a source setting “DEDICA TED SOURCE” isThe “USER SOURCE setup menu” is displayed Setting Up ChannelsWhen a source setting “USER” is selected “CHANNEL”CHANNEL setup selection menu Setting Up Channels LINE setupSetting Up Channels SOURCE setup CHANNEL setup selection menu1 Press MENU/ENTER toward the 2 or 3 mark to select a switcher number Setting Up Channels SOURCE setup ContSetting Up Channels SWNo. setup When a switcher number “SWNo” is selectedChanging Channels CH Change Changing Channels CH Change Cont5 Press the MENU/ENTER button to set SOURCE SETUP” Setting Up or Changing User SourcesSetting Up or Changing User Sources Cont Press the MENU/ENTER buttonmark to select a submenu item Setting Up or Changing the Display Size6 Press the MENU/ENTER button to set “DISPLAY SIZE”Cleaning and Replacing the Filter Filter Maintenance and Light-Source Lamp ReplacementSetting Up or Changing the Display Size Cont 2 Remove the filter cover screws4 Clean the filters TroubleshootingCleaning and Replacing the Filter Cont 5 Reinstall the filtersWhen the emergency indicator starts blinking Troubleshooting ContOptical mechanism system SpecificationsSpecifications Cont Electrical systemDTV-format signals Outside dimensionsPin assignment Specifications for terminals Specifications ContDLA-M4000LE SUPER PROJECTOR DLA-M4000LE INSTRUCTIONSSUPER PROJECTOR THIS APPARATUS MUST BE EARTHED IMPORTANT SAFEGUARDSIMPORTANT INFORMATION MACHINE NOISE INFORMATION Germany onlySAFETY PRECAUTIONS POWER CONNECTIONInformation on the power cord plug Connecting to Various DevicesDLA-M4000LU DLA-M4000LE Controls and FeaturesControls and Features cont No.51666DLA-M4000LU DLA-M4000LE Controls and Features contControls and Features cont Control PanelControls and Features cont Connector PanelRemote Control Unit Controls and Features ContInstall the batteries Remote Control UnitInstalling Batteries Controls and Features ContPrecautions for Installation Cont Installing the ProjectorPrecautions for Installation Installing the Projector ContNo.51666 Installing the Projector ContInstalling the Projector Cont DLA-M4000LU DLA-M4000LEInstalling the Projector Cont Connecting to Various DevicesSignals that Can Be Input to the Projector Adjustable range of the lens
Related manuals
Manual 68 pages 40.21 Kb