Paxar 4 manual Operator’s Handbook

Page 43

9490 Operator’s Handbook

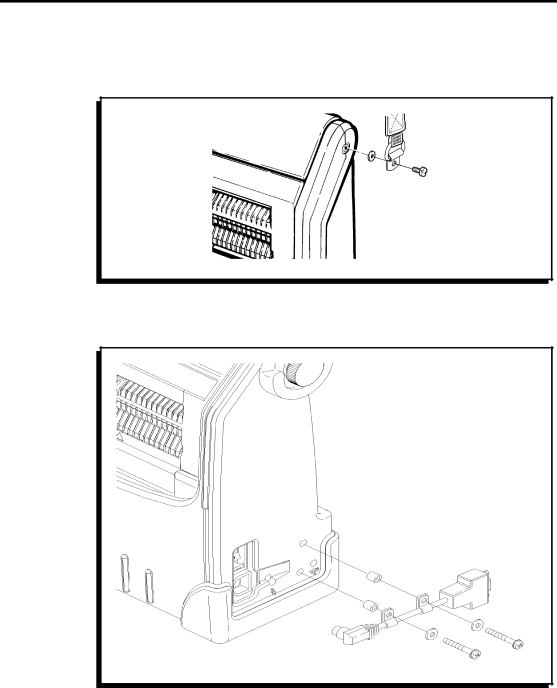
4.With Shoulder Strap Only. For both sides of the printer, put together the knob assembly and screw it into the threaded insert. Do not over-tighten the assembly.

5.Industrial Version Only. Put together screw assemblies using the longer screws. Then, replace the cable.

6-2

TC9490OH Rev. C 3/97

Image 43
Contents Operator’s Handbook Canadian D.O.C. Warning Page Table of Contents Operator’s Handbook Additional Optional Manuals Chapter Getting StartedAudience Charging the BatteryGetting Started Battery Charger Contacts Connector Loading and Removing the Battery Connecting the AC Power Supply Connecting the Shoulder Strap Using the Trigger and LED Opening the Printer Chapter Loading SuppliesPull the supply guide forward and down as shown Loading Supplies Loading Ribbon Reloading a Ribbon Cassette Operator’s Handbook Loading Supplies Loading for Peel ModeSupply Holder Arrow Width Tabs Make sure the labels turn freely in the supply well Label Guide Upper Opening Lower Loading for Non-Peel Mode Make sure the supplies turn freely in the supply well Supply Guide Upper Opening Lower Operator’s Handbook Establishing Communications Chapter PrintingRemoving the Communications Cable Communication Values Printing in On-Demand ModeInterrupting a Print Job Printing in Continuous ModeCare and Maintenance Clearing Label Jams Voids Correct Print CleaningCleaning the Battery Contacts Reload the battery Operator’s Handbook Printing a Test Label Chapter TroubleshootingLED Indicator Problem Solution Problems and SolutionsAddressing a Monarch 9490 Printer Putting the Boot on the Printer Chapter Using the BootOperator’s Handbook Taking the Boot off the Printer Operator’s Handbook Attaching the Cable Cover Using the Cable CoverRemoving the Cable Cover Specifications Chapter SpecificationsSupply Sizes Accessories and OptionsPin Description Direction Cable Pin OutsOperator’s Handbook Format GlossaryOnline Toll Free