Zenith XBS245 warranty Connections Speaker System Connections, Speaker Positioning, Dvd+Vcr

Page 13

Connections (Continued)

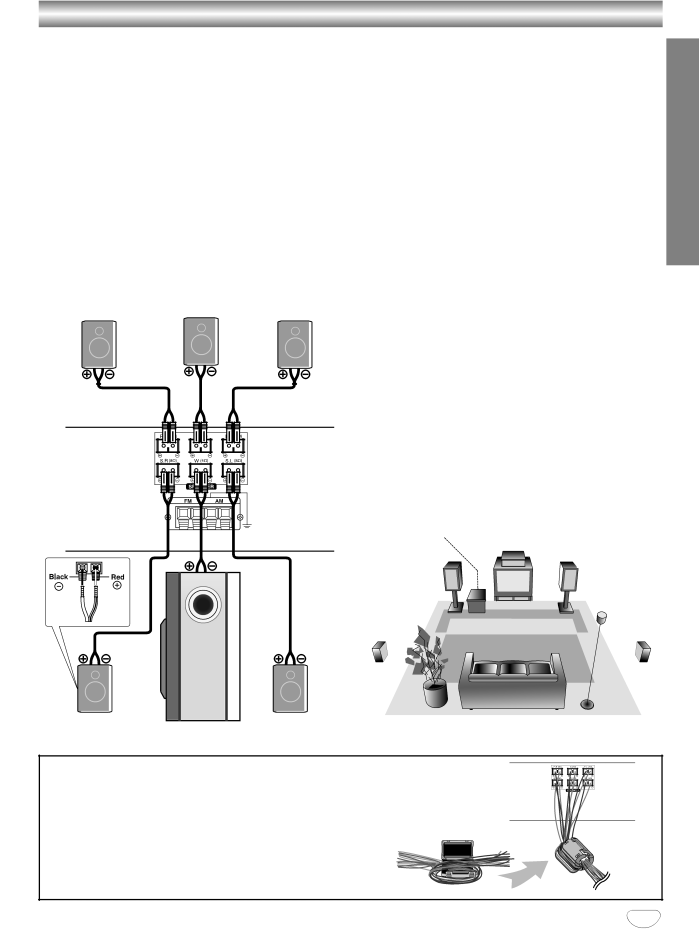
Speaker System Connections

Connect the speakers using the supplied speaker cords by matching the colors of the terminals and those of the cords. To obtain the best possible surround sound, adjust the speaker parameters (distance, level, etc.).

otes

Be sure to match the speaker cord to the appropriate terminal on the components: 3 to 3 and # to #. If the cords are reversed, the sound will be distorted and lack bass.

If you use front speakers with low maximum input rat- ing, adjust the volume carefully to avoid excessive volume output to the speakers.

Do not disassemble the front covers of supplied speakers.

Front speaker


Front speaker

(Right)

Center speaker

(Left)


Rear of

DVD+VCR

Speaker Positioning

For a normal setup use 6 speakers (2 front speakers, center speaker, 2 rear speakers and subwoofer).

Front Speakers

Based on your listening position, set up the speakers at equal distance. And by hearing position, set up an interval between speakers of 45 degree.

Center Speaker

It is ideal that the center speakers and front speakers are same height. But normally place it above or below the television as shown below.

Rear Speakers

Place left and right behind the listening area. These speakers recreate sound motion and atmosphere required for surround playback. For best results, do not install the rear speakers too far behind the listen- ing position, install them at or above the level of the listener’s ears. It is also effective to direct the rear speakers towards a wall or ceiling to further disperse the sound.

In the case of a smaller room size, if the audience is near to the rear wall set the rear speakers opposite each other, and set the rear speakers 60 - 90 cm above the listener’s ears.

Subwoofer

This can be placed in any front position.

PREPARATION

Subwoofer

Center Speaker

Front

Speaker

(Left)

Rear Speaker (Left)

Front Speaker (Right)

Rear Speaker (Right)

Rear speaker

Subwoofer

Rear speaker

Speaker Positioning Example

(Right surround)

(Left surround)


IMPORTANT NOTE

After connecting the speakers and DVD+VCR, bind the speaker cables with the provided Ferrite Core as right.

The Ferrite Core has the function which reduces the electromagnetic effect which this DVD+VCR gives to the other products

13

Image 13
Contents Installation and Operating Guide Warranty Regulatory Information FCC Part Safety PrecautionsImportant Safety Instructions Table of Contents Remote Control Operation Range Remote control battery installationBefore Use Playable DiscsAbout Symbols PrecautionsFront Panel Display Window Indicates sound mode isDigital Audio PrologicRemote Control RF OUT DVD/VCR OUT Rear PanelANT.IN Digital Audio in OpticalConnections Connecting Antenna/Cable TV toOptional TV Connections Connections Basic TV ConnectionsSpeaker Positioning Connections Speaker System ConnectionsDVD+VCR Digital Device Connections Connections Radio Antenna ConnectionsGame Device Hdtv Receiver Rear of DVD+VCR Front of DVD+VCR VCR Radio Selecting the Input/Output SourceMini Glossary for Sound Mode Before Operation Sound Mode DescriptionsSurround OFF 2CH Stereo When DVD is inserted Sound ModeWhen DVD is inserted and Prologic II indicator lights Sound LevelSurround delay time setting Delay Time SettingCenter delay time setting Dolby Digital mode only Before OperationSetting the On-Screen Display Before Operation VCR Mode On-Screen Display OSDMenu Selection Channel Selection Before Operation VCR Mode Using the VCR Setup MenuPress Menu when finished Ote Before Operation VCR Mode Setting the ClockAuto Clock Set Manual Clock SetGeneral Explanation Before Operation DVD ModeOn-Screen Display On-screen display operationInitial Settings General Operation Before Operation DVD Mode Initial SettingsLanguage PictureRating DVD Parental ControlCountry Code DVD Changing the 4-digit codeSpecial Effect Playback VCR Mode Tape Playback Normal PlaybackTimer Recording VCR Mode Tape Recording Normal RecordingTo pause the recording To record one TV program while watching anotherChecking Erasing the Timer Program VCR Mode Tape RecordingProgram Priority Checking the Recording Time Instant Timer Recording One-Touch RecordTo extend the Recording Time Dubbing and EditingVCR Mode Tape Recording Sound Setup Additional Information VCR Mode Other Features Tape Counter Memory FeatureGeneral Features DVD Mode Operation Playing a DVDMoving to another Title DVD Moving to another ChapterDVD Mode Operation General Features Special DVD Features DVD DVD Mode Audio CD Operation Playing Audio CDs and MP3 discs Repeat Programmed Tracks Programmed Playback with Audio CD and MP3 DiscsErasing a Track from Program List Erasing the Complete Program ListVideo Mode Setting DVD DVD Mode Additional InformationScreen Saver About MP3To listen to non-preset radio stations Radio Operation Presetting Radio StationsListening to the Radio To clear all the memorized stationsSymptom Cause Solution TroubleshootingPlace the disc with the playback side down Camcorder image is not Audio in Optical Symptom Cause CorrectionMoisture Condensation Code Language Language Code ListCode Country Country Code ListSpecifications Speakers AccessoryAmplifier Line 1, Line 2, OpticalReference Page Reference Zenith Electronics Corporation