Promise Technology Version 4.4 user manual Create a RAID Server, Create a New Server

Page 50

Promise Array Management

Create a RAID Server

The Message Server relays data and commands between the Monitoring Utility on this computer and the Message Agent on the RAID PC. In order for your monitoring PC to communicate with the Message Server, you must create a RAID Server.

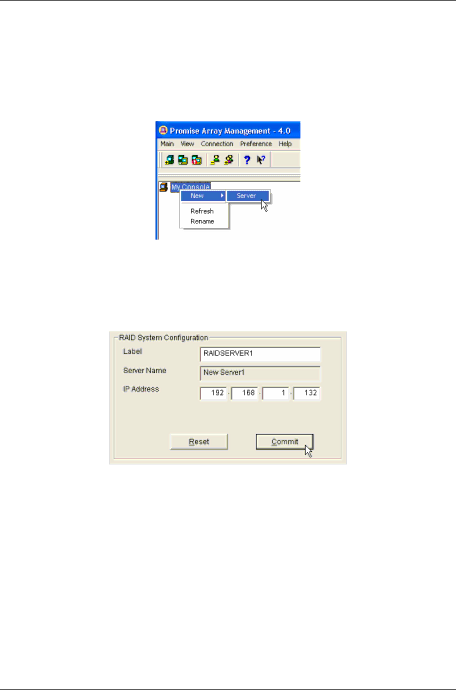
Figure 42. Create a New Server.

1.The first time you run Remote PAM, right-click on the MyConsole icon and select New > Server from the popup menu. Or click the New Server icon in the Toolbar. A RAID Server icon appears.

Figure 43. Input the Server's IP address.

2.Click on the RAID Server icon. In Information View (above) type in the IP address of the computer where the Message Server software is installed.

If the Message Server software is installed on the monitoring PC, you can use the default 127.0.0.1 IP address.

3.Click Commit. A list of networked RAID PCs appears as shown in Figure 43, above.

46

Image 50
Contents FastTrak S150 SX4 and SX4000 series Important data protection information CopyrightTrademarks Contents Promise Array Management Introduction PAM ComponentsHow They Work Together PAM Installation Options LAN and Internet connectionsCompany LAN without a File Server PCs with Internal RAID Promise Array Management Monitoring Utility InstallationInstallation Locations Networked RAID has many installation options Message Agent Operating System SupportMessage Server Network Requirements Pre-Installation ProcedurePAM Installation PAM Setup Opening Screen Setup Type dialog box Add User Account dialog box Install Complete dialog box Initial Setup Launch PAMLocal PAM Log-in Local PAM Log-outRemote PAM Log-in Create a New ServerRemote PAM Log-out Disconnect from a Message ServerRemote PAM Future Log-ins Logout of RAID PCPAM User Interface PAM Monitor window has three viewsCreate a New User User Information ViewCreate an Array Create Array Settings New Array Setup Email Alert Notification CRAM-MD5Add a User to the Recipient List Email Sender and RecipientsEvent Alert Setting box Specify Alert Notification EventsInformation Events PAM User Interface Tree View Local PAMRemote PAM An example of a RAID system in Tree View on Remote PAMTree View and Component Specific Menus Object ViewInformation View Status BarMain Menu Pulldown MenusDynamic Menus My Console MenuRAID System Menu Maintenance MenuRAID Machine Menu View Menu Connection Menu Remote PAM onlyPreference Menu Help MenuToolbar ToolbarMessage Server Icon Popup MenusMy Console Icon RAID Machine IconChannel Icon RAID System IconController Icon Disk IconUser Icon Array IconUser Management Icon Promise Array Management RAID Monitoring Maintenance with PAM Log-out Local PAMLog-in Remote PAM Create a RAID Server Logout of RAID PC Delete a RAID ServerDisconnect from a Message Server Future Log-ins Message Server IP Address Change Manage Users Create a New UserChange User Rights Change PasswordDelete a User Alert Notification Add a User to the Recipient List Delete a User from the Recipient List Current Recipients windowSpecify Alert Notification Events Information Events Read Bad Sector Table ControllerView Event Log Controller Options System InformationDisk Parameters Rebuild SettingController Cache PCI Bus Utilization Maintenance Error HandlingInconsistency Error Handling Arrays Create an ArrayCreate Array Settings New Array Synchronize an Array Scheduled SynchronizationOn Demand Synchronization Start SynchronizationSynchronization Settings Stop, Pause, ContinueExpand / Convert an Array ExpansionSelect a disk drive to add to the array Verify the Array name and click Finish Conversion From CommentsStart Conversion Select the new RAID Level Conversion progress Array Critical RAID Monitoring and Maintenance Rebuild an Array Automatic RebuildManual Rebuild Start Rebuild WizardRebuild Wizard Confirmation window Rebuild Settings Rebuild Settings in Information ViewError Handling Array Offline Delete ArrayPromise Array Management Appendix a RAID Concepts Striping RAID RAID 0 writes data to both drives at the same timeMirroring RAID Data Mirror Disk DrivesStriping / Mirroring RAID 0+1 About Dual Data Redundancy Block and Parity Striping RAID RAID 5 Stripes all Drives with Data and Parity InformationJbod Single Drive Jbod manages drives Individually, unlike RAIDPromise Array Management Appendix B Partition and Format Right-click on the My Computer iconDisk Management Window and Disk Wizard New Partition Wizard Newly formatted array as it appears under Disk Management Appendix C Networking Issues IP AddressDhcp Issues Dhcp enabled. . . . . . . . YesTechnical Support Services Appendix D Technical SupportPacific Rim Sales Office