JVC TH-A85, TH-A55 manual Connecting to an analog component, Connecting to a digital component

Page 17

Getting started

Connecting to an analog component

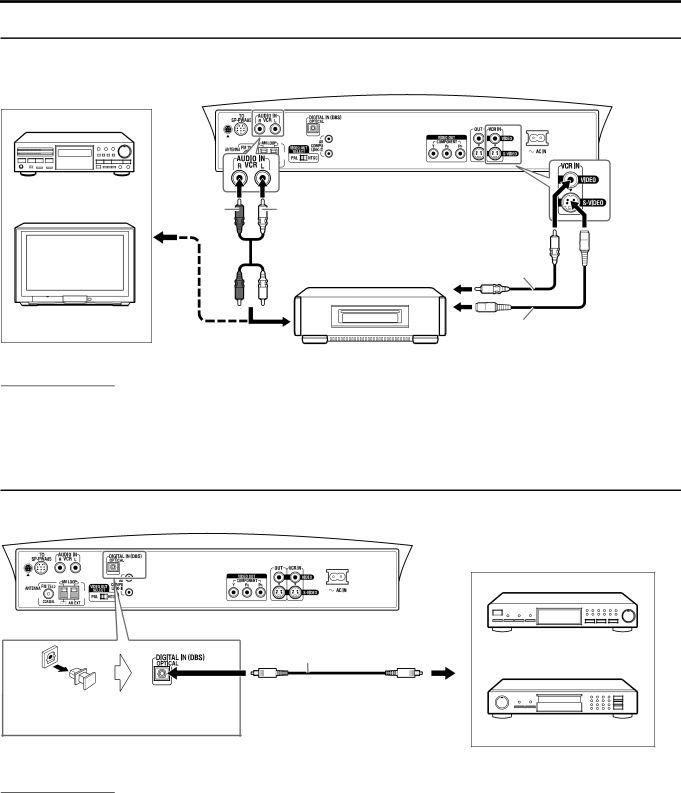
You can enjoy the sound of an analog component such as a VCR, TV, or Cassette recorder with this system. Use RCA pin plug cords (not supplied) for connection.

Center unit

Cassette recorder


A To composite video output

Red

White

B To S-video output

C To audio output


TV

NOTE

RCA pin plug cord (not supplied)

C

VCR

Composite video cord (not supplied)

A

or

BS-video cord (not supplied)

The signals input to the VIDEO jack of the VCR IN jacks will be output only from the VIDEO jack of the VIDEO OUT jacks, not from the S-VIDEO jack of the VIDEO OUT jacks.

If you connect a sound-enhancing device such as a graphic equalizer between the source components and this system, the sound output through this system may be distorted.

Connecting to a digital component

You can enjoy the sound of a digital component such as a DBS (Direct Broadcast Satellite) tuner or MD recorder with this system. Use digital optical cord (not supplied) for connection.

Before connecting a digital optical cord, unplug the protective plug.

Center unit

Digital optical cord (not supplied)

To digital optical output

MD recorder

DBS tuner

NOTE

When playing a video component such as a DBS tuner;

To listen to the sound, select “DBS” as the source to play. (A pg. 20)

To see the picture, connect the video output jack of the component to the video input jack of the TV directly, and select the correct input mode on the TV.

14

Image 17
Contents Consists of XV-THA85, SP-PWA85, SP-THA85C and SP-THA85F TH-A55Class 1 Laser Product Important for Laser ProductsXV-THA85 XV-THA55 Table of contents Safety precautions Supplied accessoriesIntroduction Important cautionsPlayable disc types About discsDiscs you can play About MP3 discsPlayback Control function PBC VCD and Svcd only Disc structureRear panel center unit Names of parts and controlsFront panel center unit Names of parts and controls Powered subwooferDisplay window center unit Remote control Connections Connecting a TVGetting started FM antenna Connecting the FM and AM antennasAM loop antenna Connecting the satellite speakers Connecting the powered subwooferSpeaker layout TH-A85Join the stand to the speaker section Connect the speaker connectors to the stand connectorsFix the stand to the speaker section Assembling the satellite speakers TH-A85 onlyTwist and pull the insulation coat off and remove Before connecting the speaker cordsSP-THA55S Connecting to a digital component Connecting to an analog componentConnecting the power cord Putting batteries in the remote control Using the remote controlOperating the system from the remote control Replace the coverFor DBS tuner or Catv converter operations For TV operationsFor VCR operations Press VCR Remote control mode selecting buttonRelease F VCR/DBS Try operating your VCR by pressing Press and hold F VCR/DBSTurning the system on/off Basic operationsListening with headphones Adjusting the volumeSelecting the source to play Turning off the sound temporarilyAdjusting the output level of the subwoofer Adjusting the brightnessUsing the Sleep Timer Changing the decode mode Adjusting the bass/treble soundChanging the scan mode Press Decode to select the decode modeBasic playback PlaybackPlayback information on the display window Resume Playback DVD/Video CD/SVCD onlyOn-screen guide icons One Touch Replay Playback featuresPress and hold 7, then press Tray lockLocating the beginning of a desired selection Locating a desired selection using number buttonsFast-forward/fast-reverse search Setting the AM tuner interval spacing Manual tuningPreset tuning Tuner operationsReducing the noise of AM broadcast Reception modeSelecting the FM Dolby Surround Creating realistic sound fieldsDTS Digital Surround DSP modesDigital signal format indicators Indicators on the display windowAvailable Surround modes for each input signal Creating sound fieldWhen playing back digital multichannel software Using the surround modeWhen playing back 2 channel source Press SURR-MODEAdjust the speaker output levels -10 to +10 Adjusting the soundPress Test Press Test again to stop the test toneContents of the on-screen bar during playback Using the on-screen barAdvanced operations Showing the on-screen barBasic operation on the on-screen bar Playing from a specified position on a discChanging the time information Locating a desired scene from the DVD menuPress GROUP/TITLE Locating a desired chapter using the on- screen barLocating a desired title/group using number buttons Display Using the MP3 controlLocating a desired position by specifying the time Use number buttons 0-9 to enter the timePress number buttons 0-10, +10 to enter the track number Using the Jpeg control displayPress number buttons 0-10, +10 to enter the file number Press MenuSelecting a view angle Selecting a view anglePress Angle Press Angle repeatedly to select the desired view angleSelecting the audio language Selecting the subtitle/ audio languagesSelecting the subtitle language Advanced operations Press Cursor To select the desired Selecting the audio channelAudio language Press Audio repeatedly to select the desired audio channelZooming Special picture playbackFrame-by-frame playback Playing back in slow-motionChanging the VFP setting Repeat to program following orders Program PlaybackAdvanced operations Press 3 play button to start Program Repeat Playback Random PlaybackRepeating the current selection Press RepeatRepeating a desired part Choice menus Setting DVD preferencesUsing the choice menus Press Cursor //5 repeatedly to select the desired option Basic operation on the choice menusPress Choice Language menu Language Language codes listMenu description Center Picture menu PictureAudio menu Audio Adjust the output level of related speakers Speaker setting menuThis item is fixed to USE This case, set the distance of each speaker as followsSetting Parental Lock Other setting menu OthersParental Lock Parental Lock sub-menu appears on the TV screenReleasing Parental Lock temporarily Changing the Parental Lock settingPress number buttons 0-9 to enter your password Country/Area codes list for Parental Lock Press Setting System settingPress Cursor 3/2 to make an adjustment or selection Repeat steps 2 and 3 to set other itemsConnecting a TV and VCR AV Compu Link remote control systemAvailable functions Connect the center unit to a TV and VCRTrouble shooting MaintenanceReferences GeneralDVD Playback Others MP3 PlaybackJpeg Playback Refers to individual chapters included in a title GlossaryIndex Surround modeAll Channel Stereo ALL CH ST Choice menuCenter unit XV-THA85/XV-THA55 SpecificationsSubwoofer SP-PWA85/SP-PWA55 Satellite Speakers SP-THA85FFront Speakers SP-THA55F AccessoriesCenter Speaker SP-THA55C Surround Speakers SP-THA55STH-A85/TH-A55 DVD Digital Cinema System