Runco VX-33I Connections to, VX-33i, Connector Panel Access, Connecting Source, Components to

Page 44

3.7

Proceed as follows to connect the VX-33i to your video sources, external controller(s) – if

Connections to the

present – and AC power.

VX-33i

When connecting your equipment:


• Turn off all equipment before making any connections.


• Use the correct signal cables for each source.


• Ensure that the cables are securely connected. Tighten the thumbscrews on


connectors that have them.

Connector Panel Access

To access the connector panel, pull firmly on the cable access cover to open it.

Connecting Source

Connect your video sources to the VX-33i as shown and described in the sections that

Components to the VX-33i

follow.


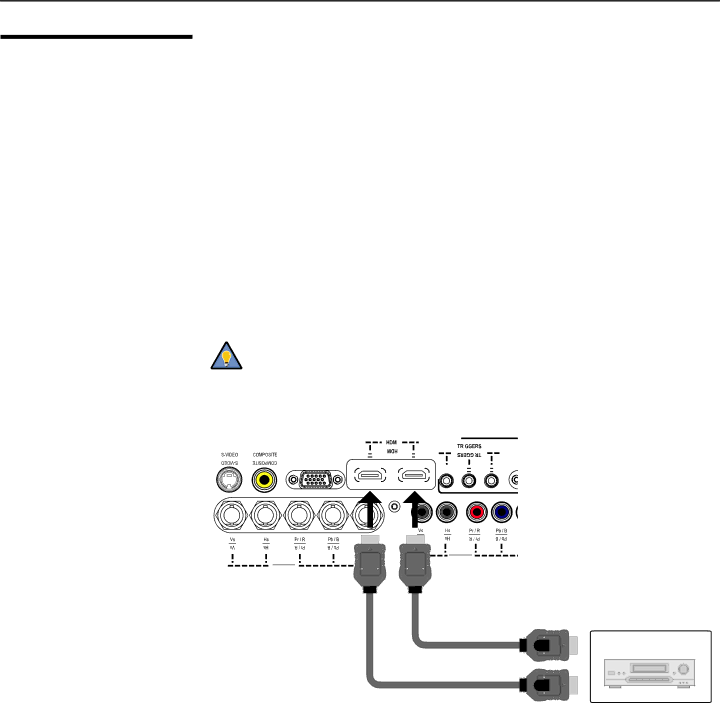
HDMI Connections: See Figure 3-10.


Tip

Use the HDMI inputs whenever possible. This ensures the highest


video quality because the signal is carried in the digital domain


throughout the entire signal path, from source component output


into the projector.


HD3 (VGA / Y-Pb-Pr)


Pr)-Pb-Y / (VGA HD3


HD2 (BNC)

(BNC) HD2

HD1 (RCA)

(RCA) HD1

HDMI or DVI-to-HDMI Cable (sold separately)

BD/HD-DVD/

DVD/DTV STB

Figure 3-10. HDMI Source Connections

28

Runco VX-33i Installation/Operation Manual

Image 44
Contents VX-33i Page RuncoCare Standard Two Year Limited Warranty RuncoCare Standard FeaturesRuncoCare Claim Procedure Page Copyright and Trademarks Important Safety Instructions Compliance Information Declaration of ConformityFCC Part Page Table of Contents Operation Serial Communications Maintenance and TroubleshootingSpecifications Table of Contents Xiv List of Figures List of Figures Xvi Introduction About This ManualUsing This Manual If you need Turn toDescription, Features and Benefits Key Features and BenefitsOptional Accessories Controls and Functions VX-33i at a GlanceVX-33i Rear Panel VX-33i Rear PanelPower Input 100 to 240 VAC Connect the VX-33i to power here Left ButtonVX-33i Rear Connector Panel Service only For future useRS-232/485 Control Port Volt 750 mA Trigger OutputsHdmi I 1 / Hdmi II 2 Digital HD3 InputVX-33i Remote Control VX-33i Remote ControlPicture Adjustment Buttons BRT Brightness On / OFFSource Selection Buttons VID S-VideoMemory Preset Buttons Aspect Ratio Selection Buttons169 Lbox LetterboxInstallation Remote ControlIf installing a VX-33i/CineWide or VX-33i/CineWide Quick SetupStep Procedure For Details, Refer to Ambient Light Installation ConsiderationsInstallation Type Throw Range Throw Ratio Inches, with Lens Option 96x54-inchLens Lens Only Anamorphic Minimum Maximum Apollo B 134.40Ceiling Installation Floor InstallationVertical and Horizontal PositionHorizontal Lens Shift Example only Folded Optics Folded OpticsInstalling the Primary Projection Lens Other ConsiderationsPage Installing the Optional CineWide Lens Mount Remove Installing the AutoScope Lens Motor VX-33i/CineWide withAutoScope VX-33i with Ceiling Mount Adapters/Projector Stands AutoScope Lens Motor Installation Installing the Fixed CineWide Base Plate Mounting Connector Panel Access Connecting SourceConnections to VX-33i11. Digital DTV RGB or Component Video Connections HD1, HD2 12. Digital DTV RGB or Component Video Connections HD3 DTV or Progressive Component YPbPr SourceAnalog Computer RGB Connections See Figure 13. Analog RGB ConnectionsVideo/Composite Video Connections See Figure DVD Player, VCR Satellite Receiver Laser Disc etcRS-232 Controller ConnectionConnecting 12-volt Trigger Outputs toExternal Equipment AutoScope Lens Motor RearConnecting an External IR Connecting to AC PowerReceiver to Rear PanelTurning on the Power Adjusting the Picture OrientationPrimary Lens Adjustments FocusZoom Lens ShiftInstalling and Adjusting the CineWide Anamorphic Lens Assembly to Lens MotorCarriage Plate CineWide With AutoScope or Base19. Attaching the Anamorphic Lens to the Lens Adapter Ring Configure Lens Motor Adjust the AnamorphicAdjusting the Horizontal X Lens Position TriggerPage Anamorphic Lens Top View Adjusting the Geometry Page Using the On-Screen Menus OperationMemory Presets ServiceInput Source Aspect RatioAspect Ratio Main MenuInput Source Remote Aspect Ratio Control Description Key 169 Select 169 to view 169 DVDsHdtv programs in their Native aspect ratioPicture PictureRemote Aspect Ratio Control Description Key Typical Pluge Pattern for Adjusting Brightness Gray Yellow Cyan Green Magenta Red Blue Gray Yellow Cyan Green Magenta Red Blue Input Position Input PositionMemory Presets Memory PresetsInformation InformationISF Day CalibrationCalibration ISF Night Gain/Offset Refer to ISF Night Display Color, above HD Format ServiceService ISF Day/Night presets Maintenance and Troubleshooting Lamp ReplacementFilter Replacement Side Filter Access PanelTroubleshooting Tips Symptom Possible Causes SolutionPage If you are using a PC to communicate with Serial CommunicationsAspect Ratio Commands Command Description ResponseInput Selection Commands Command Description Response Image Preset Commands Menu Navigation CommandsPicture Adjust Commands Enter or Select buttonCommand Description Response Status Commands Status============================== Resolution 720P60 Page Specifications VX-33i SpecificationsSpecifications are subject to change without notice Home Theater Calibration SpecificationsIndustry-Standard Specifications VX-33i Dimensions VX-33i/CineWide with AutoScope DimensionsSupported Timings Format Resolution Frequency HD 1/HD 2/HD Horizontal Supported? √ = Yes, = NoPage Page 020-1002-00 rev. a September