|
| PLAY |
|
|
|
|
| REW | FF |
STOP/EJECT |
| PLAY | DIGITAL |
|
TIMER |
|
| TBC/NR |
|
STANDBY/ ON |
|
|
|
|
|
| PAUSE |
|
|
TV PROG |
|
|
| JOG |
INSERT | A.DUB |
|
| |
|
|
| SHUTTLE | |
SYNCHRO EDIT SP/LP/EP | COLOUR SYSTEM | REC |
|
|
|
|
|
|
|
| EN |
| 45 |
|
|
|
|
|
|
|
|
| ||
|
|
|
|
| |||||
|
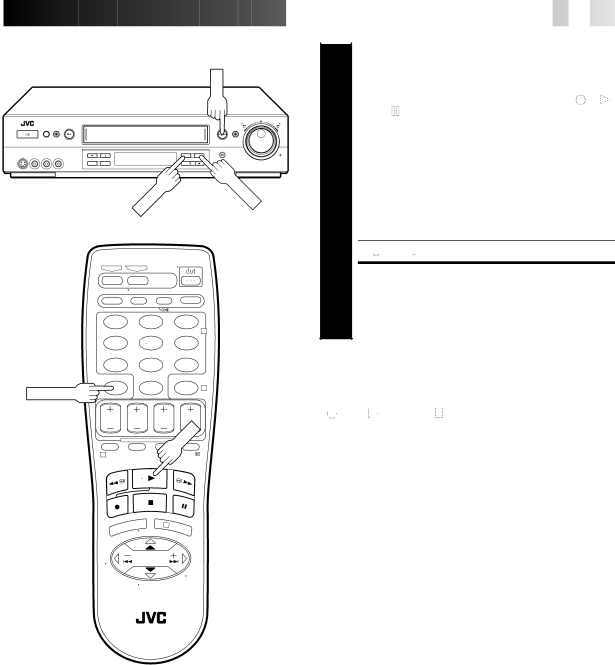
| 6 | ENGAGE INSERT EDITING |
| |||||
|
| Press INSERT. | |||||||
|
|
|
| ||||||
|
| ● Your recorder enters the | |||||||
|
| and " " light up on the front display panel.) | |||||||
|
|
| ● The TV screen changes from the still picture to the | ||||||
|
|
| input source you are going to record. | ||||||
|
|
|
| ||||||
|
|
| START EDITING |
| |||||
INSERT
1 2 3
4 5 6
7 8 9
C.RESET0
A . DUB
2
4
Load the source cassette and play back the segment that |
is to be inserted. When you reach the start of the |
7 section of the source tape that you wish to insert, press |
PLAY to start the tape in your recorder; Insert Editing |
begins at this point. |
●"![]()
![]()
![]()
![]() " and "
" and "![]()
![]()
![]() " are displayed on the front display panel.
" are displayed on the front display panel.
END INSERT EDITING
8 At counter "0:00:00", Insert Editing will stop automati- cally while the tape continues running in the Play mode. If you wish to stop Insert Editing before the specified
FOR AV INSERT EDITING
If you want to replace the picture,
normal audio soundtrack all at the same time...
... In step 6 above, after you press INSERT, press A. DUB also.
("![]()
![]() " and "
" and "![]() " blink and "
" blink and "![]() " lights up on the front display panel.)
" lights up on the front display panel.)
PLAY
1
3
NOTES:
●Suitable leads can be obtained from your dealer.
●Insert editing is not possible with cassettes whose safety tab has been removed.
●When insert editing is performed on a tape that has been recorded on another video recorder, the inserted portion may appear distorted.
●In insert editing, the recording speed (SP/LP) is determined by the previous recording to be replaced. If the previous recording's speed changes within a single edit, the inserted picture will be distorted at the switching point.
●A small portion of the recording which precedes an insert edit may become erased.
●Insert Editing is also possible using the rear panel AUDIO/ VIDEO (or S VIDEO) IN connectors. When using these connectors, make sure to select the correct input mode in step 2.
●Insert Editing is not possible with an NTSC tape.