JVC HM-DH5U manual Satellite Auto Recording, Set timer program on DBS receiver

Page 47

Filename [HM-DH5U_Eng.fm]

HM-DH5U_Eng.fm Page 47 Wednesday, June 2, 2004 12:43 PM

Masterpage:Right-FullCol


EN 47

Satellite Auto Recording

A Set timer program on DBS receiver

For timer programming method, refer to the manual supplied with the DBS receiver.

Turn on the VCR and the TV, and select the AV mode on the TV.
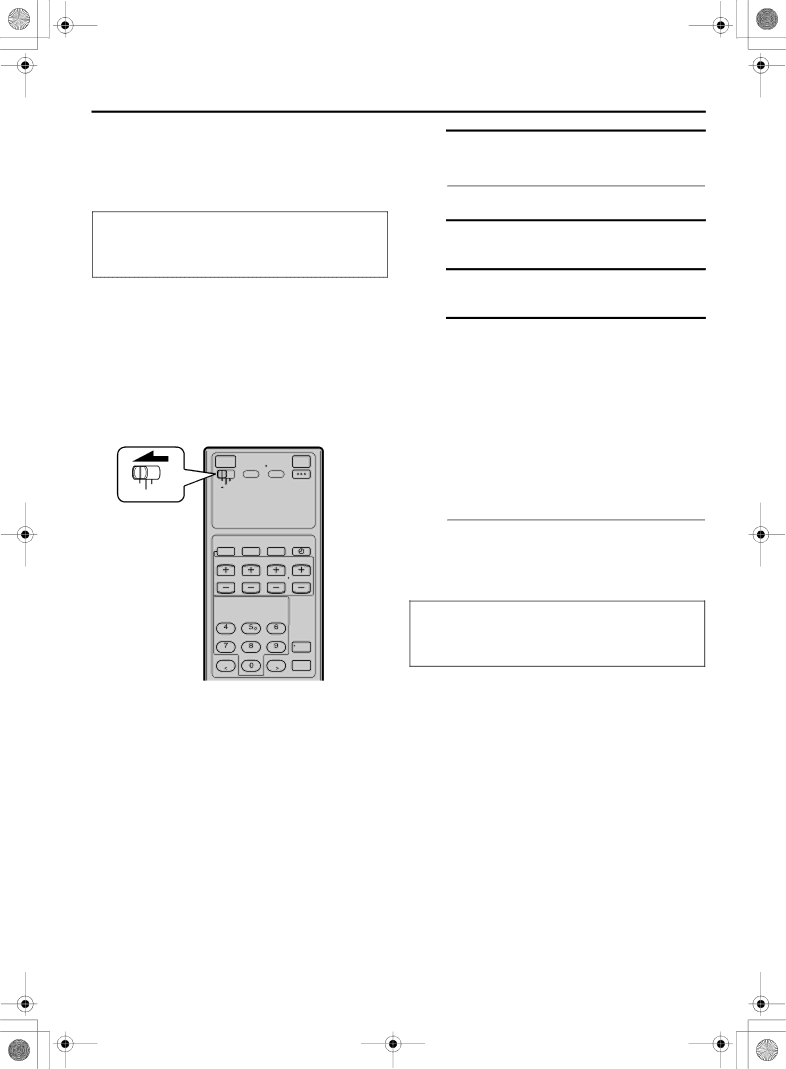
Set the [VCR/TV/CABLE/DBS] selector on the Remote to [VCR].

This function allows you to automatically record a satellite program which is timer-programmed on your DBS receiver.

Preparation : Connect a DBS receiver to the [AUDIO/ VIDEO INPUT L-1] or [S VIDEO INPUT L- 1] connectors* on the rear; otherwise, you cannot use this function.

You can also connect the cable box if it

has a timer.

*To use these connectors, you have to select which one to use (A page 66).

VCR CABLE

TV /DBS

B C D

Load a cassette

Make sure the record safety tab is intact.

Set recording speed

Press [REC SPEED] to set the recording speed.

Engage Satellite Auto Recording standby mode

Turn off the DBS receiver.

Press and hold [REC LINK] on the Remote for more than 2 seconds.

The VCR turns off automatically, [V] and [j] appear on the front display panel (Satellite Auto Recording standby mode).

When the DBS receiver outputs a signal, the VCR starts recording and [V] blinks, the [j] and record [X] indicator light up. The VCR stops recording and powers off when the DBS receiver stops outputting a signal.

This VCR will enter into Satellite Auto Recording standby mode after recording is finished.

To release the Satellite Auto Recording standby mode, press [REC LINK]. [V] and [j] disappear.

D

C

NOTES:

IMPORTANT:

Be sure not to turn on the DBS receiver before the program starts broadcasting; otherwise, the VCR will start recording when the DBS receiver is turned on.

While in the Satellite Auto Recording standby mode or after Satellite Auto Recording is finished, the VCR will not enter the timer recording standby mode even though “AUTO TIMER” is set to “ON” (A page 66).

If you turn off this VCR while Satellite Auto Recording is in progress, recording stops.

Video Calibration (A page 63) does not work while Satellite Auto Recording is in progress.

Auto Clock (A page 18) does not work while in the Satellite Auto Recording standby mode.

The VCR may not record a short portion at the beginning of the program or may record slightly longer than the actual length of the program when Satellite Auto Recording method is used.

If you engage the Satellite Auto Recording standby mode while the DBS receiver is turned on, the VCR will not start Satellite Auto Recording, [V] on the front display panel blinks rapidly and [j] lights up. When you turn off the DBS receiver, [V] and [j] light up and the VCR enters the Satellite Auto Recording standby mode.

If you have connected another component other than a DBS receiver (or cable box) to the [AUDIO/VIDEO INPUT L-1] or [S VIDEO INPUT L-1] connectors, be sure not to engage the Satellite Auto Recording standby mode; otherwise, the VCR will start recording when the connected component is turned on.

Satellite Auto Recording and timer-recording cannot be performed at the same time.

If the [V] blinks rapidly on the front display panel in the Satellite Auto Recording standby mode (even though your DBS receiver is

turned off), Satellite Auto Recording will not work properly.

If this is the case, perform ‘Express Timer Programming’ (A page 44) to timer-record a satellite program.

(Some DBS receivers output signals even if the power is off. Satellite Auto Recording is not possible with those DBS receivers.)

Image 47
Contents HM-DH5U Dear Customer CDGAntenna Installation Instructions InstallationServicing Before YOU Install Your NEW VCRUSE Do not expose the apparatus to dripping or splashing About Head CleaningSymptoms of dirty video heads Do not block the VCR’s ventilation openings or holesContents C E F I K M N Front panelVHF/UHF Rear panelAbcd Front display panelOn-screen display 10 ENRemote How to use the Remote12 EN ConnectionsBasic Connection 14 EN Hdmi Connection Digital Set Top Box ConnectionConnect VCR to Digital Set Top Box Connect Digital Set Top Box to TV16 EN SettingPerform Plug & Play setup Plug & PlayPreparations Clock SettingAccess Main Menu screen Access Clock Set screen18 EN Setting clock semiautomaticallySetting clock manually 20 EN Tuner SettingSetting channels automatically Access Tuner Set Up screenManual Channel Set Setting channels manuallyAccess Manual Channel Set screen Add or skip desired channels22 EN Cable Box Control SettingInstalling Controller Turn on cable box Setting cable box input channel & brandAccess Main Menu screen on VCR Access Cable Set Up screenBrand Code Engage test mode24 EN Enter cable box brandConnect DBS receiver to VCR DBS Receiver Control SettingIf your DBS receiver has audio/video output connectors How to control the DBS receiverTurn on DBS receiver Setting DBS receiver input channel & brandAccess DBS Receiver Set screen 26 ENAs shown above Enter DBS Receiver’s brandBrand Code Load a cassette PowerBasic Playback 28 ENPlaying back tape repeatedly FeaturesChecking tape position Eliminate the noises on the TV screen Adjusting tracking condition Selecting monitor sound30 EN Activate manual trackingStart search Access distant codeAutomatic operations after rewinding Skipping unwanted portionsSubtitle Selection 32 ENProgram Selection Angle SelectionVariable-Speed Picture Search VHS/VHS only Special Effect PlaybackLocating particular scene rapidly Picture Search High-Speed Picture SearchViewing slow motion picture 34 ENViewing still picture frame by frame Viewing still pictureSet recording speed Set up link between this VCRBasic Recording Load a D-VHS cassetteSelect recording channel 36 ENVHS/S-VHS/VHS Recording Specifying recording length Basic Recording FeaturesInstant Timer Recording ITR Changing display informationShowing on-screen display 38 ENWatching one program while recording another Second Audio Recording a VHS Recording Mode aOther useful functions for recording Calibration S-VHS/VHS only aEnter PlusCode number VCR Plus+ Timer ProgrammingAccess VCR Plus+ screen 40 ENCheck program data Return to normal screen Engage timer recording standby modeTo use the VCR while it is in timer recording standby mode For that station Screen a page 41 step E . When this happens, performVCR Plus+ guide channel matching If you have moved to a different area or if a broadcastingReturn to normal screen Input guide channel number Access Main Menu screen Input receiving channel numberAccess Guide Channel Set screen 44 EN Express Timer ProgrammingTo timer-record daily or weekly serials 46 EN Checking program settingsCanceling or changing program settings Satellite Auto Recording Set timer program on DBS receiverEngage Satellite Auto Recording standby mode Make sure the record safety tab is intact48 EN Link Timer ProgrammingSet timer program on the Inte- grated Hdtv source Engage recording standby modeAUX Video Remote Control Timer ProgrammingSet timer program on the Inte- grated Hdtv Select analog input location on the VCR50 EN Other Useful functions for timer recordingAuto Timer a Auto SP N EP Timer S-VHS/VHS only aPress Navi Access Video Navigation screenNavigation Playback Select programDeactivating Video Navigation Access Video Navigation screenAccess Navigation Set Up screen 52 ENFinding by tape number Access Library screenAccess tape number list screen Finding TapesConfirm lists 54 ENFinding by program title Finding by categoryFinding by recording date 56 EN LIBRARY, then press Editing TitlesEditing tape title Select tape numberNumber KEY Characters Access edit screen58 EN Enter titleSelect program 7 D-5 Access edit screenEntering or Editing program title Deleting tape information Access category screen60 EN Editing program categoryCheck memory Access delete screenDeleting program information Checking memory62 EN Useful Function SettingsVideo settings Video Function 2ND Audio REC Audio settings Audio Function64 EN ModeInput/Output settings IN/OUT Function 66 EN Additional settings AdditionalLink Lighting 68 ENVHS ET DisplaySet Jlip ID Number Jlip ID Number SettingSelect Jlip ID Set Up screen 70 EN Link Set UpAccess i.LINK Set Up screen Confirm Linc settingGood connection examples What is i.LINK?Link Connection Link Branched Connection72 EN LINK/DV ConnectionsConnection with the VCR Make connectionsSelect input location on this VCR Connection with the camcorder74 EN VIDEO/VIDEO ConnectionsTo use a Master Edit Control-equipped JVC camcorder Select video input terminalSet Picture Control to Edit Connection with the VCR76 EN TV Brand SettingOperate cable box or DBS receiver Cable Box or DBS Receiver Brand SettingTurn on the cable box or DBS receiver Enter brand code78 EN Changing Remote Control CodeSymptom Possible Cause Corrective Action VCR Sound cannot be heard When a Hdmi to DVI conversion80 EN Recorded properly 1 or I-1 etc. input locationThere are no programs in memory Cable Set Up screen and selectSetting procedure a Blinks on the front display82 EN Image or sound is distorted Playback of tapes recorded in D-VHS modeSearching images on D-VHS tapes Picture stops/There is no soundCode Message Description Error Codes and Messages84 EN This Program Video Signal is not Found forContent is not Acceptable INST.BOOKPlayback Questions and answersTimer Recording 86 ENDTS GlossaryHdcp HdmiList of terms 88 ENGeneral TimerConnectors AccessoriesWhat WE will do What YOU Must do for Warranty ServiceWhat is not Covered 90 ENMemo To OUR Valued Customer
Related manuals
Manual 92 pages 54.47 Kb