JVC HM-DH5U manual Finding by recording date

Page 55

Filename [HM-DH5U_Eng.fm]

HM-DH5U_Eng.fm Page 55 Tuesday, June 1, 2004 4:16 PM

Masterpage:Right-FullCol


EN 55

D Finding by recording date

VCR CABLE TV /DBS

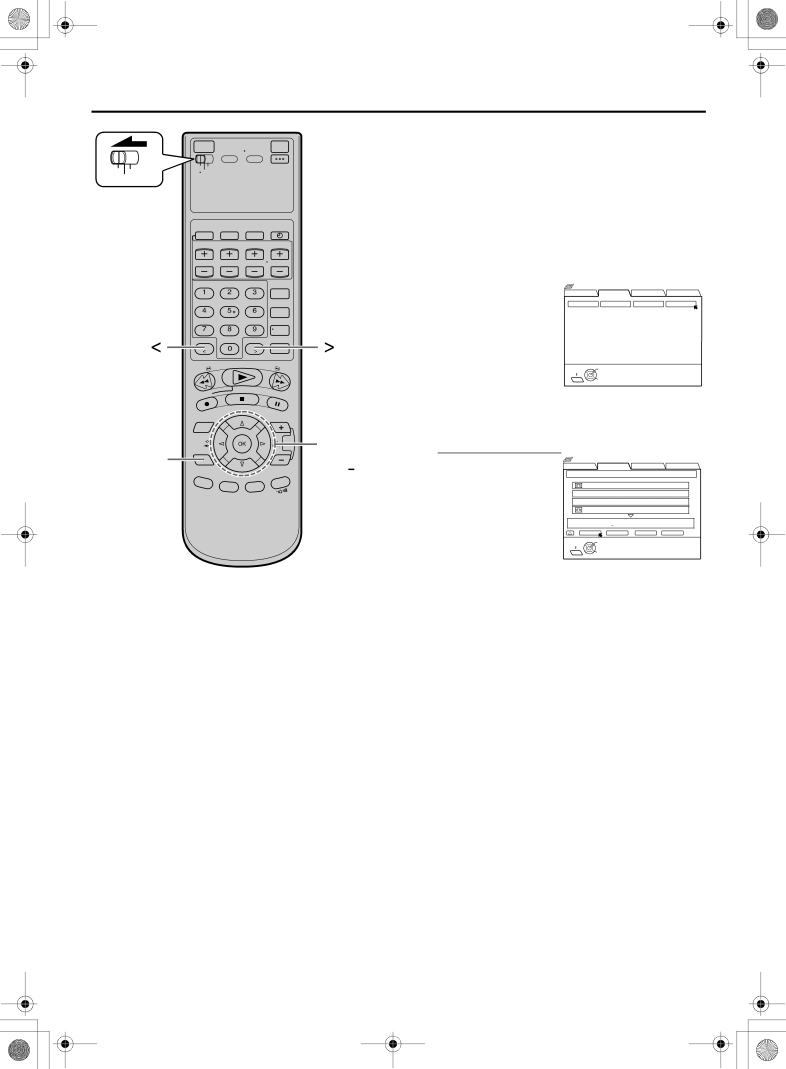
Use the Remote to do the following operations.

1 Follow steps 1 to 2 on page 53, then go to the following steps

2 Access date screen


Press [D E] to move


the arrow to “DATE”,


then press [OK].


The list screen appears,

[ ]

[ ]

being sorted by the

recording date.

Navigation


SEARCH

LIBRARY

BLANK

NAVI. SET UP

TAPE NUMBER

TITLE

CATEGORY

DATE

EXIT

OK

SELECT WITH ARROW KEYS

NAVI

SELECT

THEN PRESS [OK]

3 Confirm lists

D-4

D-2,3

“*” is displayed


SEARCH

LIBRARY

BLANK

NAVI. SET UP


E-2

4,6


Navigation


E-1

beside the tape

DATE LIST


1 / 3


number of the loaded

0017*

SOCCER


cassette.

0017* 1. JAPAN VS KOREA


0017*

2. ENGLAND VS BRAZIL


The cassette mark is

0016

EURO 2000


SOCCER


[SPORTS]


displayed on the left

RETURN

DELETE


SEARCH

EDIT


12/21/02 SAT

6:30 AM

5:53 PM

i.LINK

LS3


of the tape title. The

EXIT

OK

SELECT WITH ARROW KEYS


items without the

NAVI

SELECT

THEN PRESS [OK]


cassette marks are the program titles included in the tape.

To go to another page of the lists, press [<] or [>].

To play back the desired program, refer to ‘To play back a selected program on the list screen’ on page 53.

4 Return to normal screen

Press [NAVI].

Image 55
Contents HM-DH5U Dear Customer CDGAntenna Installation Instructions InstallationUSE Before YOU Install Your NEW VCRServicing Do not expose the apparatus to dripping or splashing About Head CleaningSymptoms of dirty video heads Do not block the VCR’s ventilation openings or holesContents C E F I K M N Front panelVHF/UHF Rear panelAbcd Front display panelOn-screen display 10 ENRemote How to use the Remote12 EN ConnectionsBasic Connection 14 EN Hdmi Connection Digital Set Top Box ConnectionConnect VCR to Digital Set Top Box Connect Digital Set Top Box to TV16 EN SettingPerform Plug & Play setup Plug & PlayPreparations Clock SettingAccess Main Menu screen Access Clock Set screen18 EN Setting clock semiautomaticallySetting clock manually 20 EN Tuner SettingSetting channels automatically Access Tuner Set Up screenManual Channel Set Setting channels manuallyAccess Manual Channel Set screen Add or skip desired channelsInstalling Controller Cable Box Control Setting22 EN Turn on cable box Setting cable box input channel & brandAccess Main Menu screen on VCR Access Cable Set Up screenBrand Code Engage test mode24 EN Enter cable box brandConnect DBS receiver to VCR DBS Receiver Control SettingIf your DBS receiver has audio/video output connectors How to control the DBS receiverTurn on DBS receiver Setting DBS receiver input channel & brandAccess DBS Receiver Set screen 26 ENBrand Code Enter DBS Receiver’s brandAs shown above Load a cassette PowerBasic Playback 28 ENChecking tape position FeaturesPlaying back tape repeatedly Eliminate the noises on the TV screen Adjusting tracking condition Selecting monitor sound30 EN Activate manual trackingStart search Access distant codeAutomatic operations after rewinding Skipping unwanted portionsSubtitle Selection 32 ENProgram Selection Angle SelectionVariable-Speed Picture Search VHS/VHS only Special Effect PlaybackLocating particular scene rapidly Picture Search High-Speed Picture SearchViewing slow motion picture 34 ENViewing still picture frame by frame Viewing still pictureSet recording speed Set up link between this VCRBasic Recording Load a D-VHS cassetteVHS/S-VHS/VHS Recording 36 ENSelect recording channel Specifying recording length Basic Recording FeaturesInstant Timer Recording ITR Changing display informationWatching one program while recording another 38 ENShowing on-screen display Second Audio Recording a VHS Recording Mode aOther useful functions for recording Calibration S-VHS/VHS only aEnter PlusCode number VCR Plus+ Timer ProgrammingAccess VCR Plus+ screen 40 ENTo use the VCR while it is in timer recording standby mode Engage timer recording standby modeCheck program data Return to normal screen For that station Screen a page 41 step E . When this happens, performVCR Plus+ guide channel matching If you have moved to a different area or if a broadcastingAccess Guide Channel Set screen Access Main Menu screen Input receiving channel numberReturn to normal screen Input guide channel number 44 EN Express Timer ProgrammingTo timer-record daily or weekly serials Canceling or changing program settings Checking program settings46 EN Satellite Auto Recording Set timer program on DBS receiverEngage Satellite Auto Recording standby mode Make sure the record safety tab is intact48 EN Link Timer ProgrammingSet timer program on the Inte- grated Hdtv source Engage recording standby modeAUX Video Remote Control Timer ProgrammingSet timer program on the Inte- grated Hdtv Select analog input location on the VCR50 EN Other Useful functions for timer recordingAuto Timer a Auto SP N EP Timer S-VHS/VHS only aPress Navi Access Video Navigation screenNavigation Playback Select programDeactivating Video Navigation Access Video Navigation screenAccess Navigation Set Up screen 52 ENFinding by tape number Access Library screenAccess tape number list screen Finding TapesConfirm lists 54 ENFinding by program title Finding by categoryFinding by recording date 56 EN LIBRARY, then press Editing TitlesEditing tape title Select tape numberNumber KEY Characters Access edit screen58 EN Enter titleEntering or Editing program title 7 D-5 Access edit screenSelect program Deleting tape information Access category screen60 EN Editing program categoryCheck memory Access delete screenDeleting program information Checking memory62 EN Useful Function SettingsVideo settings Video Function 2ND Audio REC Audio settings Audio Function64 EN ModeInput/Output settings IN/OUT Function 66 EN Additional settings AdditionalLink Lighting 68 ENVHS ET DisplaySelect Jlip ID Set Up screen Jlip ID Number SettingSet Jlip ID Number 70 EN Link Set UpAccess i.LINK Set Up screen Confirm Linc settingGood connection examples What is i.LINK?Link Connection Link Branched Connection72 EN LINK/DV ConnectionsConnection with the VCR Make connectionsSelect input location on this VCR Connection with the camcorder74 EN VIDEO/VIDEO ConnectionsTo use a Master Edit Control-equipped JVC camcorder Select video input terminalSet Picture Control to Edit Connection with the VCR76 EN TV Brand SettingOperate cable box or DBS receiver Cable Box or DBS Receiver Brand SettingTurn on the cable box or DBS receiver Enter brand code78 EN Changing Remote Control CodeSymptom Possible Cause Corrective Action VCR Sound cannot be heard When a Hdmi to DVI conversion80 EN Recorded properly 1 or I-1 etc. input locationThere are no programs in memory Cable Set Up screen and selectSetting procedure a Blinks on the front display82 EN Image or sound is distorted Playback of tapes recorded in D-VHS modeSearching images on D-VHS tapes Picture stops/There is no sound84 EN Error Codes and MessagesCode Message Description This Program Video Signal is not Found forContent is not Acceptable INST.BOOKPlayback Questions and answersTimer Recording 86 ENDTS GlossaryHdcp HdmiList of terms 88 ENGeneral TimerConnectors AccessoriesWhat WE will do What YOU Must do for Warranty ServiceWhat is not Covered 90 ENMemo To OUR Valued Customer
Related manuals
Manual 92 pages 54.47 Kb