JVC HR-XVC15U manual Power source, Laser Beam, Disc, Condensation, To USE AC Power Source

Page 5

IMPORTANT SAFEGUARDS / Power source

25.LASER BEAM

Do not look into the opening of the disc tray or ventilation opening of the product to see the source of the laser beam. It may cause sight damage.

26.DISC

Do not use a cracked, deformed, or repaired disc. These discs are easily broken and may cause serious personal injury and product malfunction.

27.NOTE TO CATV SYSTEM INSTALLER

This reminder is provided to call the CATV system installer’s attention to Article 820-40 of the NEC that provides guidelines for proper grounding and, in particular, specifies that the cable ground shall be con- nected to the grounding system of the building, as close to the point of cable entry as practical.

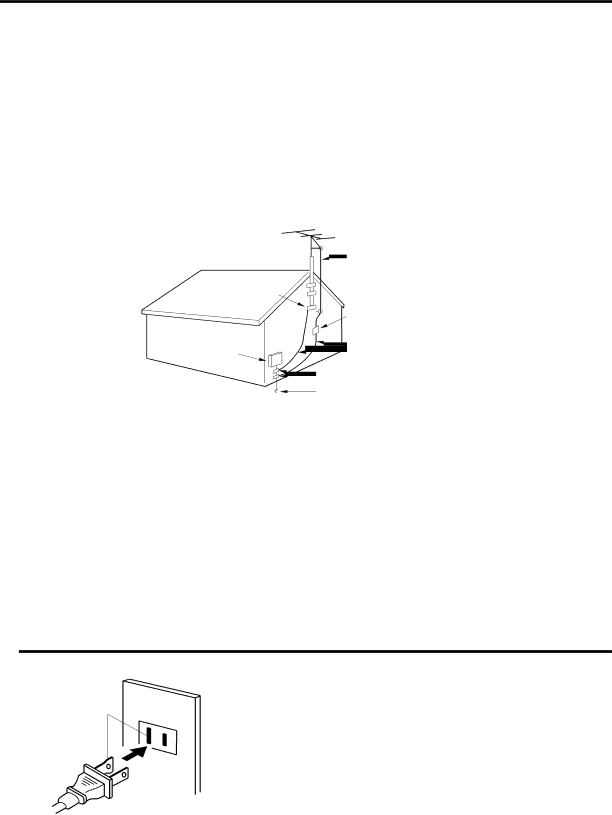
EXAMPLE OF ANTENNA GROUNDING AS PER THE

NATIONAL ELECTRICAL CODE


ANTENNA LEAD IN WIRE

GROUND CLAMP

ANTENNA

DISCHARGE UNIT


(NEC SECTION 810-20)

ELECTRIC SERVICE

GROUNDING CONDUCTORS

EQUIPMENT

(NEC SECTION 810-21)


GROUND CLAMPS

POWER SERVICE GROUNDING

NEC-NATIONAL ELECTRICAL CODEELECTRODE SYSTEM (NEC ART 250, PART H)

S2898A

CONDENSATION

Moisture will form in the operating section of the DVD/VCR if the player is brought from cool surroundings into a warm room or if the temperature of the room rises suddenly. And when this happens, DVD/VCR's performance will be impaired.

To prevent this, let the DVD/VCR stand in its new surroundings for about an hour before switching it on, or make sure that the room temperature rises gradually.

Condensation may also form during the summer if the DVD/VCR is exposed to the breeze from an air conditioner. In such cases, change the location of the DVD/VCR.

Power source

Wider Hole and Blade

AC Outlet

TO USE AC POWER SOURCE

Use the AC polarized line cord provided for operation on AC. Insert the AC cord plug into a standard 120V 60Hz polarized AC outlet.

Polarized AC Cord Plug

(One blade is wider than the other.)

NOTES:

Never connect the AC line cord plug to other than the specified voltage (120V 60Hz). Use the attached power cord only.

If the polarized AC cord does not fit into a non-polarized AC outlet, do not attempt to file or cut the blade. It is the user’s responsibility to have an electrician replace the obsolete outlet.

If you cause a static discharge when touching the unit and the unit fails to function, simply unplug the unit from the AC outlet and plug it back in. The unit should return to normal operation.

5

Image 5
Contents DVD/CD Player Risk of Electric Shock Do not Open Location of the required MarkingAccessories CleaningPower Sources POWER-CORD ProtectionDamage Requiring Service Power LinesReplacement Parts Safety CheckTo USE AC Power Source Power sourceLaser Beam DiscDVD/CD Player/Video Cassette Recorder FeaturesVCR Section DVD SectionContents Rear Parts and functionsFront Display Explanation for On-Screen-Symbol DVDDisplay window Track display for CDJVC TV Remote Control Remote controlBattery precautions Remote controlRemote control basics Change the custom code for remote controlSeparate VHF and UHF Antennas Basic connectionsCombination VHF/UHF Antenna with 75 ohm Coaxial Cable 75/300 ohm outputs Basic connectionsOhm Coaxial Cable not supplied SuppliedCatv Cable TV connections Cable Descrambler Switch SwitchCatv Cable TV connections IncomingConnect to a TV with Audio/Video Output Playback connectionsConnect to a BS Tuner Connect to a TV with S-VideoOutput / Component Video OutputConnect to an AV Amplifier with built-in digital surround Playback connectionsConnect to a Stereo Amplifier with Audio Output Setting the Video Channel Setting the video channel/Setting the languageSetting the language EnterSetting channels automatically Tuner settingPresetting the channels into memory TV/CATV SelectionNoise elimination To ADD/DELETE channels/Noise eliminationTo ADD/DELETE channels Zone, then press the Enter OFF Auto clock settingDaylight Saving Time setting To make corrections any time during the process Manual clock settingLoading and Unloading a cassette tape Cassette tape playback Forward/Reverse picture search modeTo stop playback To rewind the tape or forward it rapidlySpecial playback Zero Return function Zero Return function/Video Index Search systemVideo Index Search system DISPLAY-buttonAppear on the display Recording a TV programRecording and viewing the same TV program Recording a TV program To cancel ITR Instant Timer Recording ITRPress Number keys or VCR CH +/- to Select the channel to be recordedSet the start time, end time, channel Timer recordingTimer recording special case Timer-recordingCase timer programs-overlap Confirmation / Cancellation of the timer recordingOutput selection Stereo Recording and PlaybackDuplicating a disc material onto a video tape Duplicating a video tapeConnection with second VCR Connection with CamcorderDisc Setup language can be selected Preparation Setting setup languagePress OPEN/CLOSE Playback procedureReview Playback Fast Forward PlaybackStill Playback Frame AdvanceLocating desired scene Zooming/Locating desired sceneZooming Repeat playback of Title, Chapter and Track Press Play Mode during playback or stop modeRepeat playback Program playback Program playback/Random playback CDRandom playback You can arrange the order of tracks on the discMP3/WMA CD playback MP3/WMA/JPEG CD information MP3/WMA/JPEG playbackAbout file menu Jpeg CD playbackPress OPEN/CLOSE or Play Setting the Jpeg Interval Setting the Jpeg IntervalOr Enter OffAll Setting the Select FilesMusic Only Pictures OnlyChanging angles Zooming/Changing angles Jpeg CDThis unit will allow you to zoom in on the Jpeg image Zoom mode, press Zoom repeatedly to return to a 11 view OffMarking desired scenes To cancel the markMarking the scenes Returning to the scenesChanging soundtrack language Changing soundtrack language/Karaoke playbackKaraoke playback Case of Video CD playbackTurning the Subtitles On and Off Subtitles/Changing angles/Title selection/DVD menuTitle selection DVD menuTo unlock the Parental Control Setting Parental control settingCancel Parental controlTemporary disabling of rating level by DVD disc Press or Enter To select Then press Menu Setting menu languagePress To select your Desired Language, then press English, Francais, EspanolAutomatic Setting subtitle languageOther Then Press Audio Setting audio soundtrack languageYour Press To select Desired Audio Language Then Press EnterYou can select the aspect ratio for your TV Preparation Setting the aspect ratio of TV screenLetterbox PanscanStatus display of disc Setting on screen display/Status display of discDVD Video AudioEnter to Dynamic Range ControlLanguage code list VCR Problems and troubleshootingSymptoms Possible Solutions DVD/VCR Video head cleaning Problems and troubleshooting/Video head cleaningAuto Clock Setting Symptoms Possible SolutionsAccessories SpecificationsGeneral VCR sectionWhat is not Covered What YOU Must do for Warranty ServiceFor customer use What WE will doNew Maple Avenue Pine Brook, NJ For Servicing Only in U.S.AJ2C31501A U 02/12