JVC HR-XVC15U manual Duplicating a video tape, Duplicating a disc material onto a video tape

Page 34

Duplicating a video tape/Duplicating a disc material onto a video tape

Duplicating a video tape

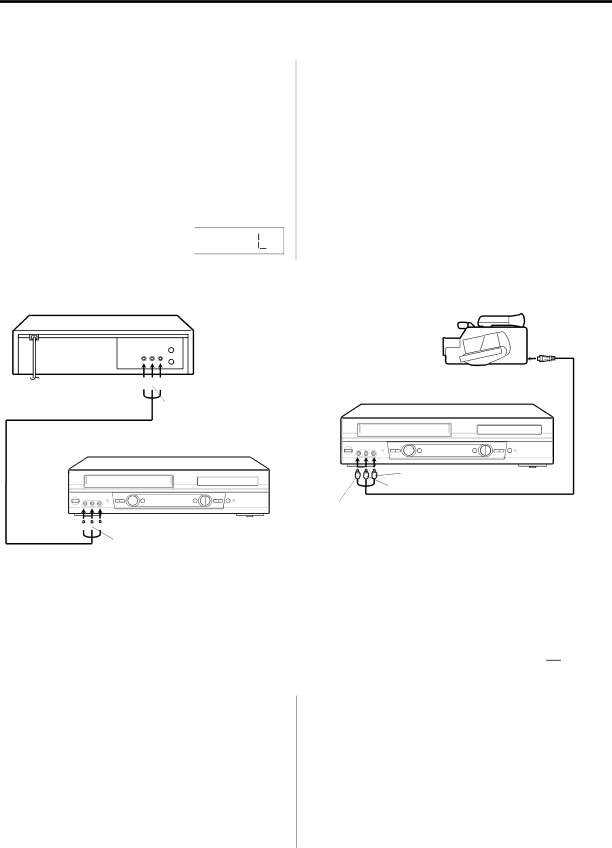
If you connect the VCR to another VCR or camcorder, you can duplicate a previously recorded tape. Make all connections before turning on the power.

1 Load a blank cassette tape with the erase preven- tion tab intact into the recording VCR.

Load a previously recorded tape into the playback VCR or CAMCORDER.

2 Press SP/EP to select the desired tape speed SP or EP.

It is recommended that you set the speed to the SP mode on the recording VCR for best results.

3 Press VCR CH + or to select AUDIO/VIDEO input position. "L" will appear in the

display.

Connection with second VCR

Playback VCR

To VIDEO OUT To AUDIO (R) OUT

To AUDIO (L) OUT

AUDIO/VIDEO cable (supplied)

Recording VCR

4 Press REC on the recording VCR or on the Remote. While holding REC, press PLAY.

Then press PAUSE.

5 Press PLAY button on the playback VCR or CAMCORDER, then press PAUSE button.

6 Press PAUSE on both the VCRs simultaneously to begin the duplicating process.

Connection with Camcorder

Playback Camcorder

To AV Jack

Recording VCR

To AUDIO (R) IN

To AUDIO (L) IN

To VIDEO IN

AUDIO/VIDEO cable (not supplied)

To VIDEO IN To AUDIO (R) IN To AUDIO (L) IN

For duplicating a previously recorded tape from a camcorder, follow the camcorder manufacturer’s instructions. A typical camcorder dubbing hookup is shown above.

Duplicating a disc material onto a video tape

You can record disc material in DVD, Video CD, Audio CD, etc. onto a video tape with this DVD/VCR only.

If the DVD disc has a Copy-guard feature, the duplicating is not possible. A symbol mark “ ” will appear on the screen for approx. 4 seconds. See page 37 for more information about the DVD playback.

Preparation:

Load a cassette tape with the erase prevention tab intact.

Select the tape speed (SP or EP) in the VCR mode.

Load a disc you wish to duplicate.

1 Press DVD to select the DVD mode. (The DVD indicator will light.)

2 Press PLAY to start the disc playback.

3 During disc playback, press REC on the VCR or while holding REC, press PLAY on the Remote. The duplicating will start.

NOTE:

You can set the duplicating time using the ITR-function. At step 3 above press REC repeatedly until the desired duplicating time appears on the screen (see page 30).

34

Image 34
Contents DVD/CD Player Location of the required Marking Risk of Electric Shock Do not OpenPower Sources CleaningAccessories POWER-CORD ProtectionReplacement Parts Power LinesDamage Requiring Service Safety CheckLaser Beam Power sourceTo USE AC Power Source DiscVCR Section FeaturesDVD/CD Player/Video Cassette Recorder DVD SectionContents Front Parts and functionsRear Display window Explanation for On-Screen-Symbol DVDDisplay Track display for CDRemote control JVC TV Remote ControlRemote control basics Remote controlBattery precautions Change the custom code for remote controlCombination VHF/UHF Antenna with 75 ohm Coaxial Cable Basic connectionsSeparate VHF and UHF Antennas Ohm Coaxial Cable not supplied Basic connections75/300 ohm outputs SuppliedCatv Cable TV connections Catv Cable TV connections SwitchCable Descrambler Switch IncomingConnect to a BS Tuner Playback connectionsConnect to a TV with Audio/Video Output Connect to a TV with S-VideoOutput / Component Video OutputConnect to a Stereo Amplifier with Audio Output Playback connectionsConnect to an AV Amplifier with built-in digital surround Setting the language Setting the video channel/Setting the languageSetting the Video Channel EnterPresetting the channels into memory Tuner settingSetting channels automatically TV/CATV SelectionTo ADD/DELETE channels To ADD/DELETE channels/Noise eliminationNoise elimination Zone, then press the Enter Daylight Saving Time setting Auto clock settingOFF Manual clock setting To make corrections any time during the processLoading and Unloading a cassette tape To stop playback Forward/Reverse picture search modeCassette tape playback To rewind the tape or forward it rapidlySpecial playback Video Index Search system Zero Return function/Video Index Search systemZero Return function DISPLAY-buttonRecording and viewing the same TV program Recording a TV programAppear on the display Recording a TV program Press Number keys or VCR CH +/- to Instant Timer Recording ITRTo cancel ITR Select the channel to be recordedTimer recording Set the start time, end time, channelCase timer programs-overlap Timer-recordingTimer recording special case Confirmation / Cancellation of the timer recordingStereo Recording and Playback Output selectionConnection with second VCR Duplicating a video tapeDuplicating a disc material onto a video tape Connection with CamcorderDisc Setting setup language Setup language can be selected PreparationPlayback procedure Press OPEN/CLOSEStill Playback Fast Forward PlaybackReview Playback Frame AdvanceZooming Zooming/Locating desired sceneLocating desired scene Repeat playback Press Play Mode during playback or stop modeRepeat playback of Title, Chapter and Track Random playback Program playback/Random playback CDProgram playback You can arrange the order of tracks on the discMP3/WMA/JPEG playback MP3/WMA CD playback MP3/WMA/JPEG CD informationPress OPEN/CLOSE or Play Jpeg CD playbackAbout file menu Or Enter Setting the Jpeg IntervalSetting the Jpeg Interval OffMusic Only Setting the Select FilesAll Pictures OnlyThis unit will allow you to zoom in on the Jpeg image Zooming/Changing angles Jpeg CDChanging angles Zoom mode, press Zoom repeatedly to return to a 11 view OffMarking the scenes To cancel the markMarking desired scenes Returning to the scenesKaraoke playback Changing soundtrack language/Karaoke playbackChanging soundtrack language Case of Video CD playbackTitle selection Subtitles/Changing angles/Title selection/DVD menuTurning the Subtitles On and Off DVD menuCancel Parental control settingTo unlock the Parental Control Setting Parental controlTemporary disabling of rating level by DVD disc Press To select your Desired Language, then press Setting menu languagePress or Enter To select Then press Menu English, Francais, EspanolOther Setting subtitle languageAutomatic Your Setting audio soundtrack languageThen Press Audio Press To select Desired Audio Language Then Press EnterLetterbox Setting the aspect ratio of TV screenYou can select the aspect ratio for your TV Preparation PanscanDVD Setting on screen display/Status display of discStatus display of disc Video AudioDynamic Range Control Enter toLanguage code list Symptoms Possible Solutions DVD/VCR Problems and troubleshootingVCR Auto Clock Setting Problems and troubleshooting/Video head cleaningVideo head cleaning Symptoms Possible SolutionsGeneral SpecificationsAccessories VCR sectionFor customer use What YOU Must do for Warranty ServiceWhat is not Covered What WE will doFor Servicing Only in U.S.A New Maple Avenue Pine Brook, NJJ2C31501A U 02/12