JVC GR-DV1800 specifications 10 EN, Loading/Unloading a Cassette

Page 10

10 EN

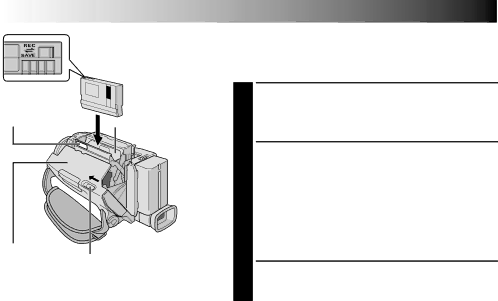
Erase protection tab*

GETTING STARTED (cont.)

Loading/Unloading A Cassette

The camcorder needs to be powered up to load or eject a cassette.

PUSH HERE

Make sure the window side is facing out.

Cassette holder

1 Slide and hold OPEN/EJECT in the direction of the arrow then pull the cassette holder cover open until it locks. The cassette holder opens automatically.

•Do not touch internal components.

2 Insert or remove a tape and press “PUSH HERE” to close the cassette holder.

•Once the cassette holder is closed, it recedes automatically. Wait until it recedes completely before closing the cassette holder cover.

Cassette


holder cover

OPEN/EJECT Switch

*To Protect Valuable Recordings . . .

.... slide the erase protection tab on the back of

the tape in the direction of “SAVE”. This prevents the tape from being recorded over. To record on this tape, slide the tab back to “REC” before loading it.

Be sure to press only the section labeled “PUSH HERE” to close the cassette holder; touching other parts may cause your finger to get caught in the cassette holder, resulting in injury or product damage.

•When the battery’s charge is low, you may not be able to close the cassette holder cover. Do not apply force. Replace the battery with a fully charged one before continuing.

3 Close the cassette holder cover firmly until it locks into place.

Approximate recording time

Tape

Recording mode


SP

LP


30 min.

30 min.

45 min.


60 min.

60 min.

90 min.


80 min.

80 min.

120 min.


NOTES:

It takes a few seconds for the cassette holder to open. Do not apply force.

If you wait a few seconds and the cassette holder does not open, close the cassette holder cover and try again. If the cassette holder still does not open, turn the camcorder off then on again.

If the tape does not load properly, open the cassette holder cover fully and remove the cassette. A few minutes later, insert it again.

When the camcorder is suddenly moved from a cold place to a warm environment, wait a short time before opening the cassette holder cover.

Closing the cassette holder cover before the cassette holder comes out may cause damage to the camcorder.

Even when the camcorder is switched off, a cassette can be loaded or unloaded. After the cassette holder is closed with the camcorder switched off, however, it may not recede. It is recommended to turn the power on before loading or unloading.

When resuming recording, once you open the cassette holder cover a blank portion will be recorded on the tape or a previously recorded scene will be erased (recorded over) regardless of whether the cassette holder came out or not. See page 21 for information about recording from the middle of a tape.

Image 10
Contents GR-DV2000 GR-DV1800 Dear Customer It is recommended that youSome DO’S and DON’TS on the Safe USE of Equipment Align the lens How To Attach The Lens HoodHood with Camcorder’s lens Screw it Clockwise How To Attach Core Filter Release the stoppers on both ends of the Core FilterCharging the Battery Pack PowerAbout Batteries To Detach The Battery Pack Using the Battery Pack Using AC Power Approximate recording timeShoulder Strap Attachment Grip AdjustmentViewfinder Adjustment Tripod MountingDate/Time Settings Built-in Clock’s Rechargeable Lithium Battery10 EN Loading/Unloading a CassetteEN11 Loading a Memory CardTo Unload a Memory Card Shooting Mode Switch Position Operation ModePower Switch Position Manual 12 ENRecording Mode Setting EN1314 EN Picture Mode SettingGo to step Storage Capacity EN15Approximate number of storable images 16 EN To Adjust The Brightness Of The DisplayTo Stop Recording Interface Shooting EN17Journalistic Shooting To turn the tally lamp or beep sounds off,  pgSnapshot Mode Selection Snapshot For Video RecordingBasic Shooting Snapshot Zoom Slide the Power Zoom Lever towards T20 EN Zoom OutEN21 When a blank portion is recorded on a tapeProper recording Progressive Mode Recording To End Progressive Mode RecordingEN23 Description of Progressive Scan CCDRegular shooting of moving images EN Recording Advanced Features For Video And D.S.C. Dual ShootingEN25 Feature Auto FocusFeature Manual Focus To obtain correct focusSee pg Using Menus For Detailed AdjustmentIf you have selected FADER/WIPE Program AE or W. Balance SYSTEM, Display or DSCEN27 Menu Screen ExplanationsVideo  pg and Camera Mode is set to PS-VIDEO Refer to Self-Timer  pgVideo  pg and Camera Mode is set to Video or PS Refer to 5-Second Recording  pgEN29 Self-Timer EN31 Second RecordingInstead of pressing the Recording Start/Stop Button FADE/WIPE Selection Fade/Wipe EffectsPicture Wipe or Dissolve Selection Fader And Wipe Menu EN33Menu Effect Press PROG.AE again so that the effect indicator Disappears To Deactivate The Selected ModeProgramme AE With Special Effects STROBE*2 EN35Sports Variable Shutter Speed 1/250 1/4000*1 Slow Slow Shutter*2Exposure Control Iris LockEN37 White Balance AdjustmentManual White Balance Operation To Return To Automatic White BalanceAvailable only with the remote control  pg To Control The Speaker Volume38 EN Playback Advanced Features For Video Playback Sound 40 ENDisplay EN41 To cancel Blank Search midwayBlank Search Press Blank SearchAuto Playback 42 ENNormal Playback Press Memory PlayIndex Playback Index ScreenEN43 To Protect AN Image 44 ENProtecting Images To Remove ProtectionTo Delete the Displayed Image Deleting ImagesEN45 To Delete ALL ImagesTo Make The Print Frame Disappear 46 ENSuperimposing a Print Frame Press Print FrameEN47 Initialising a Memory CardYou can initialise a memory card anytime 48 EN Print Frame DeletionTo Delete ALL Print Frames EN49Perform steps 1 through 5 on pag Setting Print Information Dpof Setting To Reset The SettingTo Print by Selecting Still Images and NO. of Prints To Reset The No. Of PrintsEN51 Perform steps 1 through 5 on pgUse the provided Cable Adapter If your TV/VCR has a 21-pin connector52 EN CamcorderEN53 54 EN Turn the camcorder’s Power Switch to WhileUSB Mode Accessing File appears on Connection To a Personal ComputerEN55 Connection To a Video Unit Equipped With a DV ConnectorMake sure all units are turned off To use this camcorder as a player 56 ENDubbing To a VCR For GR-DV2000 owners onlyTo use this camcorder as a recorder GR-DV2000 only Dubbing From a VCREN57 VCR Playback deck58 EN DubbingEN59 60 EN Dubbing Images Recorded On a Tape To a Memory CardInstalling The Batteries EN61Functions 62 ENButtons Feature Playback Zoom Feature Slow-Motion PlaybackFeature Frame-By-Frame Playback EN63Feature Playback Special Effects 64 ENSET REMOTE/VCR Code EN65VCR Recording deck Make Connections JVC VCR equipped with a remote pause connector66 EN VCR other than aboveEN67 Select Scenes68 EN Automatic Editing to VCRDiagnosing VCR/CAMCORDER Timing For More Accurate EditingEN69 Recording deckAdjustment of VCR/CAMCORDER Timing 70 ENEN71 Set 12BIT Mode to Sound 2 or MIX Menu Screen  pgAudio Dubbing To hear the dubbed sound during playback72 EN Insert EditingCorrective Action Clean the lens and checkReplace with new cassette 74 EN Recording. The effects are Mode of Programme AEEN75 Rapid panningDo not try to use the Classic 76 ENRemove protection from Displayed colours differ From those that are actually Camcorder When the LCD monitor’sEN77 Blink78 EN Press Memory Play toEN79 Subject to extremely high 10C to 35C  pg Low temperaturesLCD monitor LCD monitor’s Adjust the brightness Recommended to charge it Charger does not light80 EN Cleaning The CamcorderAfter Use Multi Connector DC Input Connector DC  pgConnect the editing cable when performing EN81RtyE 82 ENEN83 Rotates while the tape is running Displays the Uxga mode Double orThese indications also appear during Dual mode VGA in order of qualityEN85 LCD Monitor/Viewfinder Indications During D.S.C. Playback Displays the sound modeLCD Monitor/Viewfinder Indications During Video Playback Displays the brightness of the LCD monitor or ViewfinderEN87 Indications FunctionSnapshot is pressed Switch is set toPossible Appears, the memory card is corruptedDuring use EN89To avoid hazards Store cassettes90 EN About moisture condensation EN91Serious malfunctioning 92 EN EN93 Time Code  pg , 29, 39For Digital Video Camera 94 ENFor General For Digital Still CameraFor Connectors EN95GR-DV1800