03Controls and displays
Chapter 3
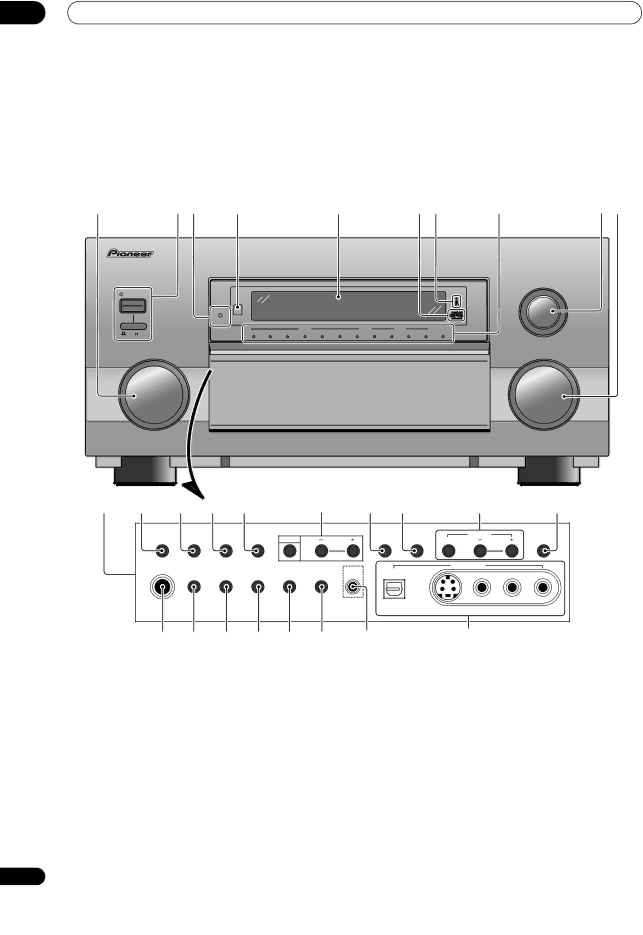
Controls and displays
Front panel |
|
|
|
|
|
|
|
|
1 | 2 | 3 | 4 | 5 | 6 | 7 | 8 | 9 10 |
|
|
|
|
|
|
| AUDIO/VIDEO | |
|
|
|
|
|
|
|
| LISTENING MODE SELECTOR |
|
|
|
|
|
|
|
| TURN/PUSH |
STANDBY/ON |
|
|
|
|
|
|
|
|
|
|
| STANDBY |
|
|
|
|
|
|
|
|
| VIDEO | AUDIO |
|
|
|
OFF |
| ON | DVD/LD | TV/DVD | SAT | VIDEO | DVR/VCR1 | VCR2 | VCR3 | CD | TUNER | PHONO | MULTI CH | |
| TAPE1/MD | INPUT | ||||||||||||
| ||||||||||||||
|
|
|
|
|
|
|
|
|
|
|
|
|
|
|
INPUT SELECTOR | MASTER VOLUME |
11 | 12 | 13 | 14 | 15 | 16 | 17 | 18 | 19 | 20 |
ACOUSTIC |
|
|
|
|
|
|
CAL. | MIDNIGHT | LOUDNESS | TONE | OPTION |
|
|
PHONES | SPSYSTEM | SIGNAL | VIDEO | TAPE2 | STREAM | SETUP |
| A/B | SELECT | SELECT | MONITOR | DIRECT | MIC |
|
|
| TUNER | SBCH |
DIGITALNR | INPUT ATT | CLASS | STATION | MODE |
|
|
| VIDEOINPUT |
|
DIGITALIN |
|
|
|
|
VIDEO | L AUDIO R |
21 | 22 | 23 | 24 | 25 | 26 | 27 | 28 |
1 INPUT SELECTOR dial (page 39)
Turn to select a source component. The input indicators show the current component.
2 STANDBY/ON and power OFF / ON
Press STANDBY/ON to switch the receiver on or into standby. The OFF / ON switch turns of the main power (you can’t switch on using the remote when it is in the OFF position).
3 STANDBY indicator
Lights when the receiver is in standby.
4 Remote sensor
Receives the signals from the remote control.
5 Display
See Display on page 30.
6 Advanced MCACC indicator (page 46)
Lights when Acoustic Calibration EQ is on. Acoustic Calibration EQ is automatically set to ALL CH ADJ after the Auto Surround Setup has been completed.
7 i.LINK indicator (page 83)
Lights when an
28
En