Sears 113.2433 manual HUB SET Screw, Key, Pulley Lockwasher Flat Washer

Page 9


HUB

SET SCREW


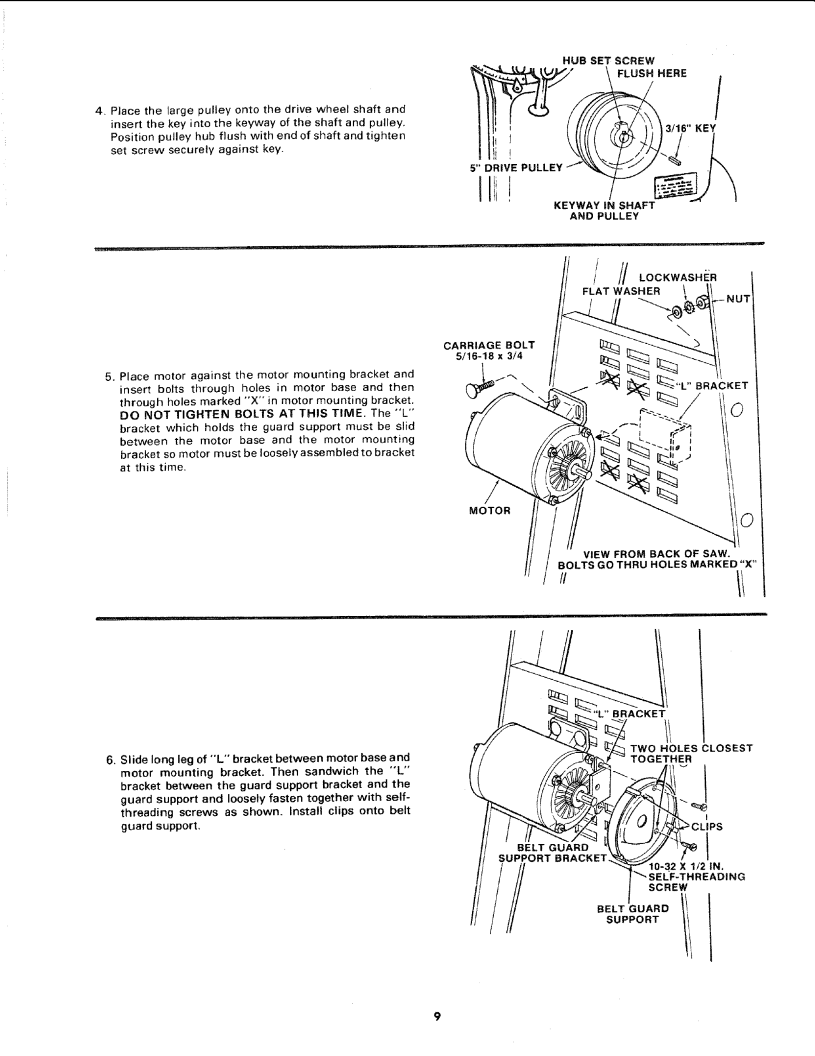
4. Place the large pulley onto the drive wheel shaft and

_"

FLUSH HER£

!

insert the key into the keyway of the shaft and pulley.


3/16"

KEY

Position pulley hub flush with end of shaft and tighten


set screw securely against key.


Ilil


KEYWAY iN SHAFT


AND

PULLEY


/ LOCKWASHER

FLAT WASHER

-NUT

CARRIAGE BOLT 5/16-18x 3/4

5. Place motor against the motor mounting bracket and

insert bolts through holes in motor base and then through holes marked "'X" in motor mounting bracket.

DO NOT TIGHTEN BOLTS AT THIS TIME. The "'L'" bracket which holds the guard support must be slid

between the motor base and the motor mounting bracket so motor must be loosely assembled to bracket at this time.

MOTOR

6, Slide long leg of "'L'" bracket between motor base and

motor mounting bracket. Then sandwich the "L" bracket between the guard support bracket and the guard support and loosely fasten together with self-

threading screws as shown. Install clips onto belt guard support.

VIEW FROM BACK OF SAW.

BOLTS GO THRU HOLES MARKED"X"

"/i


: "L"

BRACKET


TWO HOLES CLOSEST


TOGETHER


J

BELT

GUARD

I

SUPPORT

BRACKE"


10-32 X 1/;= IN,


""" SEL'F-THREADING


SCREW


SUPPORT

BELT GUARD !i

Image 9
Contents Save This Manuat For Future Reference SAW onlySAW with Legs Motor Keep Guards in Place Know Your Power ToolAvoid Dangerous Environment Keep Children AwayPAG E LocationProtection Eyes, Hands, Face, Ears, Body Front of the Band SAW/SANDER and Front of the Blade Guard Allow Tool to Stop Before Adjusting Belt DriveGerous Wear YourVolts Catalog no Contacting the SAW BladeThis Prong Prong Receptacle AdapterUnpackmn g and checking contents For Mounting Assembling Steel LegsABC Support HEX NUT LEG SCR EWBelt Guards INSTALLING MOTOR, PULLEY, V-BELTLE FT Foot \ Right FootHUB SET Screw KEYPulley Lockwasher Flat Washer Setscrew Small 2-9/2 DIA, Motor PulleyWrench Pulley FlushSELF-THR Eading Screw Clamp Sawdust Elbow Rubber Gasket Installing Sawdust ElbowUpper Blade Table TrunnionGuide BAR Lock Screw Guide BARSetscrews Upper Thrust Bearing Setscrew WrenchTHRUSTBEARIN!i tl / Upper Thrust Bearing Lower Thrust BearingScrew Arms LengthPointer Blade Centered On Tires Both WheelsStart of assembly section on pg for checking method Adjusting the TableKnob ApproxFor Your OWN Safety ON-OFF SwitchLock Switch RkkTENS,ONAUST,NGK.OB--GUIDE BAR Lock Screw OutletInside Lower Knob Not ShownGuide BAR Setscrew Wrench BAR CombinationSquare Belt AndingSanding Platen Lockwasher PlateSawing Basic Band SAW/SANDER OperationBlade StZEAccessories General MaintenanceYour Band SAW RecommendedRemedy Probable CauseTrouble Cause RemedyTrouble Trouble ShootngProbable Cause RemedyModel 113.243311 Craftsman Inch Band SAW/SANDERLiST PartsDescription IkeypartCraftsman 12-INCH Band SAW/SANDER, Model 113.243300 For Wiring DiagramSee 12 \KEY Part NO. no Kepart NonoDescr Iption Hardware for Mounting Tool & Motor Suppued WiTH Model 113.243311 onlyThread Supplied WiTH Model 113.243311 onlyMotor Connections Strain ReliefPage Page Model no