Contents
CAM6.6X-S1/S2 System
Important Safeguards
Table of Contents
Reference Section
Making Connections
Operation
Component Guides
Product Introduction
Component Guide
Main Power and Zone Status
CAM6.6 Controller-Front Panel
UNO-S1 Keypad-Front Panel
Blues
UNO-S2 Keypad-Front Panel
CD Player
Favorite 2 preset selections
UNO-LRC1 Remote Control
UNO-S1 Keypad
Operation
Feature and Setting
User Menu Settings
Party Party Mode Master or Off
UNO-S1 User Menu Operation
F1 and F2 Buttons
UNO-S2 Keypad
UNO-S2 User Menu Operation
Feature and Setting 1. Bass
Treble
Balance
XM Radio Overview
Internal Source XM Tuner
Display Condition
Category Search Now Playing Display Preferences
XM Radio Modes
UNO-S1 UNO-S2 UNO-LRC1
Previous Preset
Next Preset
Preset Mode
Next Bank
Next Category
Category Search Mode
Previous Category
Category Channel Up
Display Preference Mode
Now Playing Mode
Channel Number CH Number
Channel Name CH Name
Selecting the tuner
UNO-S1 Keypad Control UNO-S1 Keypad Control of Tuner
Selecting the desired channel
UNO-S2 Keypad Control
UNO-S2 Keypad Control of Tuner
XM Classics
Recall Last Channel
Setting a Memory Preset
User
Setup Menu Flow Charts
Installation Menu
Sample Configurations
System Programming Overview
Getting Started
Tools needed for installation
Unpacking the System Components
CAM6.6X-S1/S2 System Components
Keypad Wiring
Wiring Instructions
CAT-5 Wire Color Type
Speaker Wiring
CAM6.6 Controller-Rear Panel
Installer
Data Rx TTL Level Data Tx TTL Level GND +12VDC
UNO-S1 Keypad-Update Port
CAT-5 Connection
UNO-S1 Keypad-CAT-5 Connection
Data Rx RS-232 Data Tx RS-232
UNO-S2 Keypad-Update Port
GND
+12VDC
UNO-S2 Keypad-CAT-5 Connection
Keypad Location
UNO-S1 KEYPAD-INSTALLATION
UNO-S2 KEYPAD-INSTALLATION
UNO Keypad Port Connection
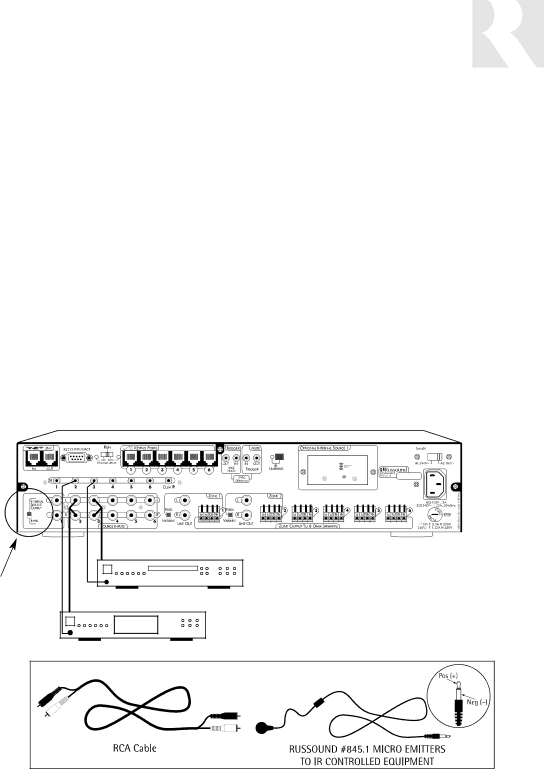
Source Audio Connections
Source Audio and IR Input Connections
Source IR Connections
CAM6.6 with Optional Internal Source XM satellite radio
Common IR Connections
Common IR Connection
Speaker Connections
Zone Fixed/Variable Audio Outputs
12VDC Home Theater Trigger
12VDC Home Theater Trigger In/Out
12VDC 100mA Trigger Out
12VDC Mute Trigger
12VDC Mute Trigger In/Out
12VDC Mute Trigger Out
Rnet Link In and Link Out
RS-232 Interface
Optional Internal Source XM Tuner Antennas
XM Signal Strength Mode
XM Antenna
Initial Install Test
Installation Menu Pages
Flow Charts Pages
Controller Setup Ctrlr Setup
Number of Sources # of Sources/SOURCE Setup
Peripheral Setup Pages 53-55 for Optional Internal Source
Basic Setup Source Setup Pages
Source Volume Trim Source Setup
Numeric IR Source Setup Pages
Setup Forms
Mute
Installer
UNO-S1 Keypad Five-Character Display
Installation Menu Overview
Memory Name
Memory #
Bank #
Bank Name
Are you sure? Sure? Please Wait Cycle Power
All controllers
Build Time
Command Type
Build Date
Version
Selected Unassigned Unasg
Device Code
KEY Name
KEY Function
Trim Level
Save CHANGES?
Highest NUM
Prefix CMD
Numeric Text
Selected Learned IR
Suffix CMD
SRC SEL CMD SrcSC
Syson Enable
ZonVT Each zone. -16 dB lowest to 0 dB max-3dB default
ZON VOL Trim
SysOn
Installation Menu
Power on CMD OnCmd
Learned SRC
Learn IR LrnIR
LEARN/DELETE
Command NUM
SUCCESS?
Macro ID
#CONTROLLERS
Peripheral Setup Memory Name, Bank Name
Menu
Flow Charts
Setup Menu Flow Charts
Installer
Periph Setup
Installer
Installer
Mute
Installer
Installer
LED on rear CAM Panel Blinks fast
Installer
Installer
Device Codes for TVs
IR Codes
Device Codes for Cable
Device Codes for Video Acc
Device Codes for VCRs
Device Codes for SAT/DSS
Device Codes for Laser Disc Players
Device Codes for Tuner/Amp
Device Codes for DVD Players
Device Codes for Amp and Misc. Audio
Device Codes for CD Players
KEY Function UNO-S1 TV Hdtv
KEY Codes TV Hdtv
SAP SAP, CC
KEY Function UNO-S1 Cable
KEY Codes Cable
SAP
KEY Function UNO-S1 Video ACC
KEY Codes Video ACC
Language, MTS
KEY Function UNO-S1 SAT/DSS
KEY Codes SAT/DSS
Alt/Audio,Lang.,CC
VCR
KEY Codes
KEY Function UNO-S1 VCR
KEY Codes VCR
KEY Function UNO-S1 Laser Disc
KEY Codes Laser Disc
Subtitle, CC
KEY Function UNO-S1 DVD
KEY Codes DVD
Format Wide,Zoom,Aspect
KEY Function UNO-S1 Receiver
KEY Codes Receiver
DVD, LD
KEY Function UNO-S1 AMP/MISC Audio
KEY Codes AMP/MISC Audio
TAPE, MD
KEY Function UNO-S1
KEY Codes CD
Input Tape, MD
KEY Function UNO-S1 Home Control
KEY Codes Home Control
Input Source/Scene
UNO-S1 UNO-S2
Source Names
Tivo
Multiple Controllers with ONE Tuner
Sample Configurations
Multiple Controllers with TWO Tuners
ST2-XM Tuner Back Panel
Multiple Controllers with Three Tuners
ST2-XM Tuner Back Panel
Multiple Controllers with ST2 Dual Tuner
Technical Specifications
Warranty & Repair
113
114
115