Cleaning Smoothtop Rangetop
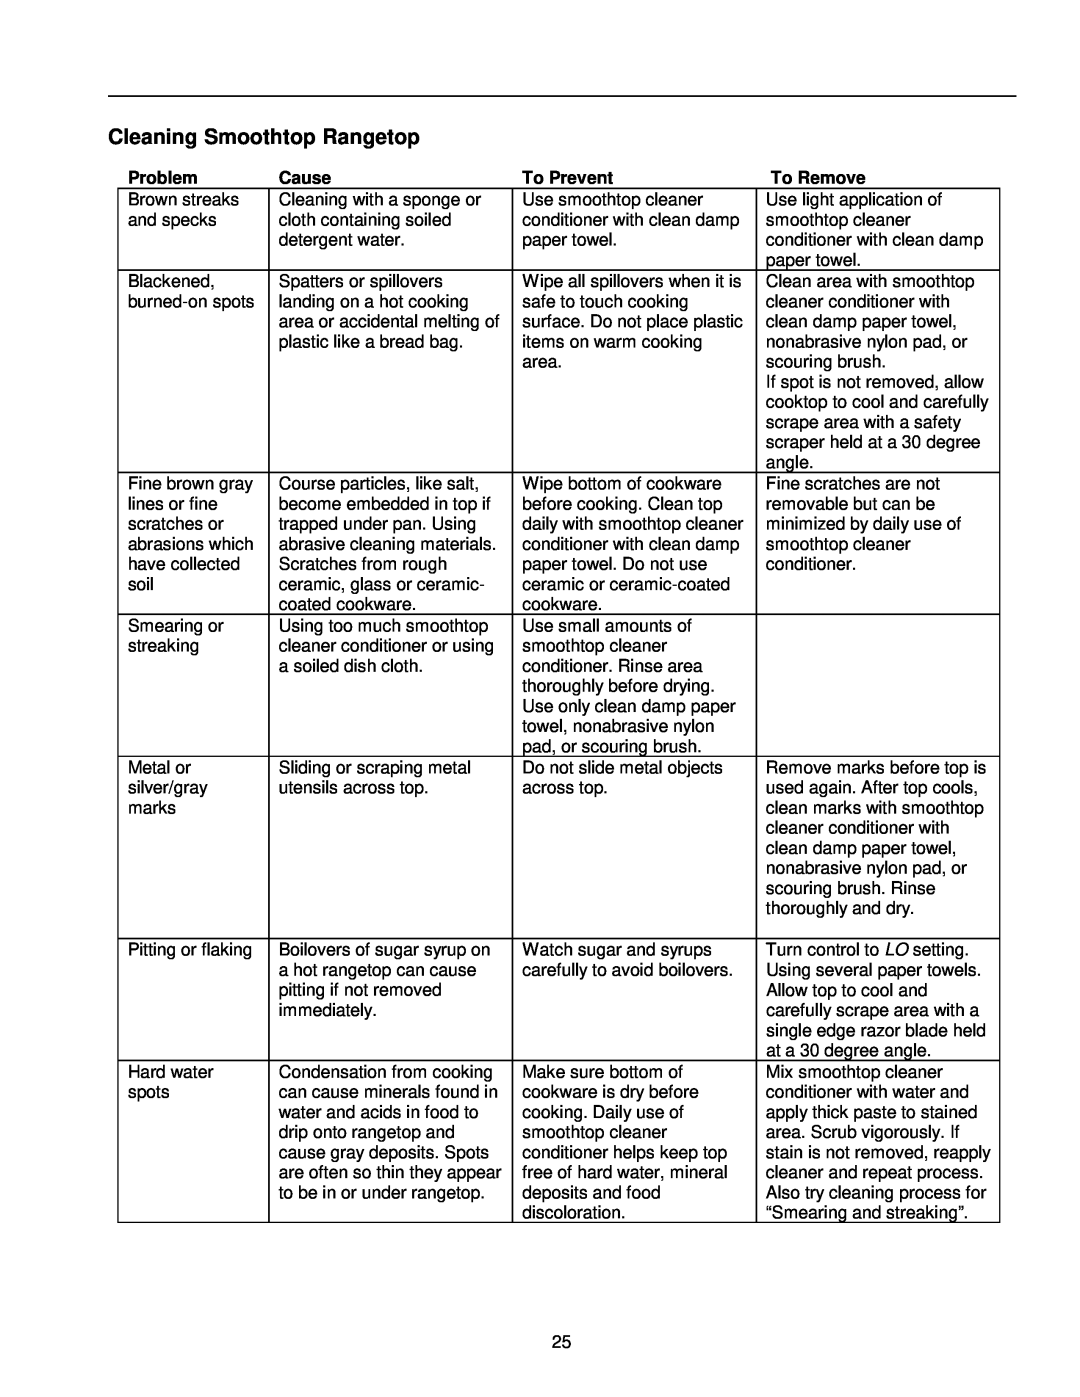
Problem | Cause | To Prevent | To Remove |
Brown streaks | Cleaning with a sponge or | Use smoothtop cleaner | Use light application of |
and specks | cloth containing soiled | conditioner with clean damp | smoothtop cleaner |
| detergent water. | paper towel. | conditioner with clean damp |
|
|
| paper towel. |
Blackened, | Spatters or spillovers | Wipe all spillovers when it is | Clean area with smoothtop |
landing on a hot cooking | safe to touch cooking | cleaner conditioner with | |
| area or accidental melting of | surface. Do not place plastic | clean damp paper towel, |
| plastic like a bread bag. | items on warm cooking | nonabrasive nylon pad, or |
|
| area. | scouring brush. |
|
|
| If spot is not removed, allow |
|
|
| cooktop to cool and carefully |
|
|
| scrape area with a safety |
|
|
| scraper held at a 30 degree |
|
|
| angle. |
Fine brown gray | Course particles, like salt, | Wipe bottom of cookware | Fine scratches are not |
lines or fine | become embedded in top if | before cooking. Clean top | removable but can be |
scratches or | trapped under pan. Using | daily with smoothtop cleaner | minimized by daily use of |
abrasions which | abrasive cleaning materials. | conditioner with clean damp | smoothtop cleaner |
have collected | Scratches from rough | paper towel. Do not use | conditioner. |
soil | ceramic, glass or ceramic- | ceramic or |
|
| coated cookware. | cookware. |
|
Smearing or | Using too much smoothtop | Use small amounts of |
|
streaking | cleaner conditioner or using | smoothtop cleaner |
|
| a soiled dish cloth. | conditioner. Rinse area |
|
|
| thoroughly before drying. |
|
|
| Use only clean damp paper |
|
|
| towel, nonabrasive nylon |
|
|
| pad, or scouring brush. |
|
Metal or | Sliding or scraping metal | Do not slide metal objects | Remove marks before top is |
silver/gray | utensils across top. | across top. | used again. After top cools, |
marks |
|
| clean marks with smoothtop |
|
|
| cleaner conditioner with |
|
|
| clean damp paper towel, |
|
|
| nonabrasive nylon pad, or |
|
|
| scouring brush. Rinse |
|
|
| thoroughly and dry. |
|
|
|
|
Pitting or flaking | Boilovers of sugar syrup on | Watch sugar and syrups | Turn control to LO setting. |
| a hot rangetop can cause | carefully to avoid boilovers. | Using several paper towels. |
| pitting if not removed |
| Allow top to cool and |
| immediately. |
| carefully scrape area with a |
|
|
| single edge razor blade held |
|
|
| at a 30 degree angle. |
Hard water | Condensation from cooking | Make sure bottom of | Mix smoothtop cleaner |
spots | can cause minerals found in | cookware is dry before | conditioner with water and |
| water and acids in food to | cooking. Daily use of | apply thick paste to stained |
| drip onto rangetop and | smoothtop cleaner | area. Scrub vigorously. If |
| cause gray deposits. Spots | conditioner helps keep top | stain is not removed, reapply |
| are often so thin they appear | free of hard water, mineral | cleaner and repeat process. |
| to be in or under rangetop. | deposits and food | Also try cleaning process for |
|
| discoloration. | “Smearing and streaking”. |
25
