BEFORE OPERATION

&.— .—.

n-—._ ,,,,,,,,,.. ,—-H

,— _,

M —... — ._—

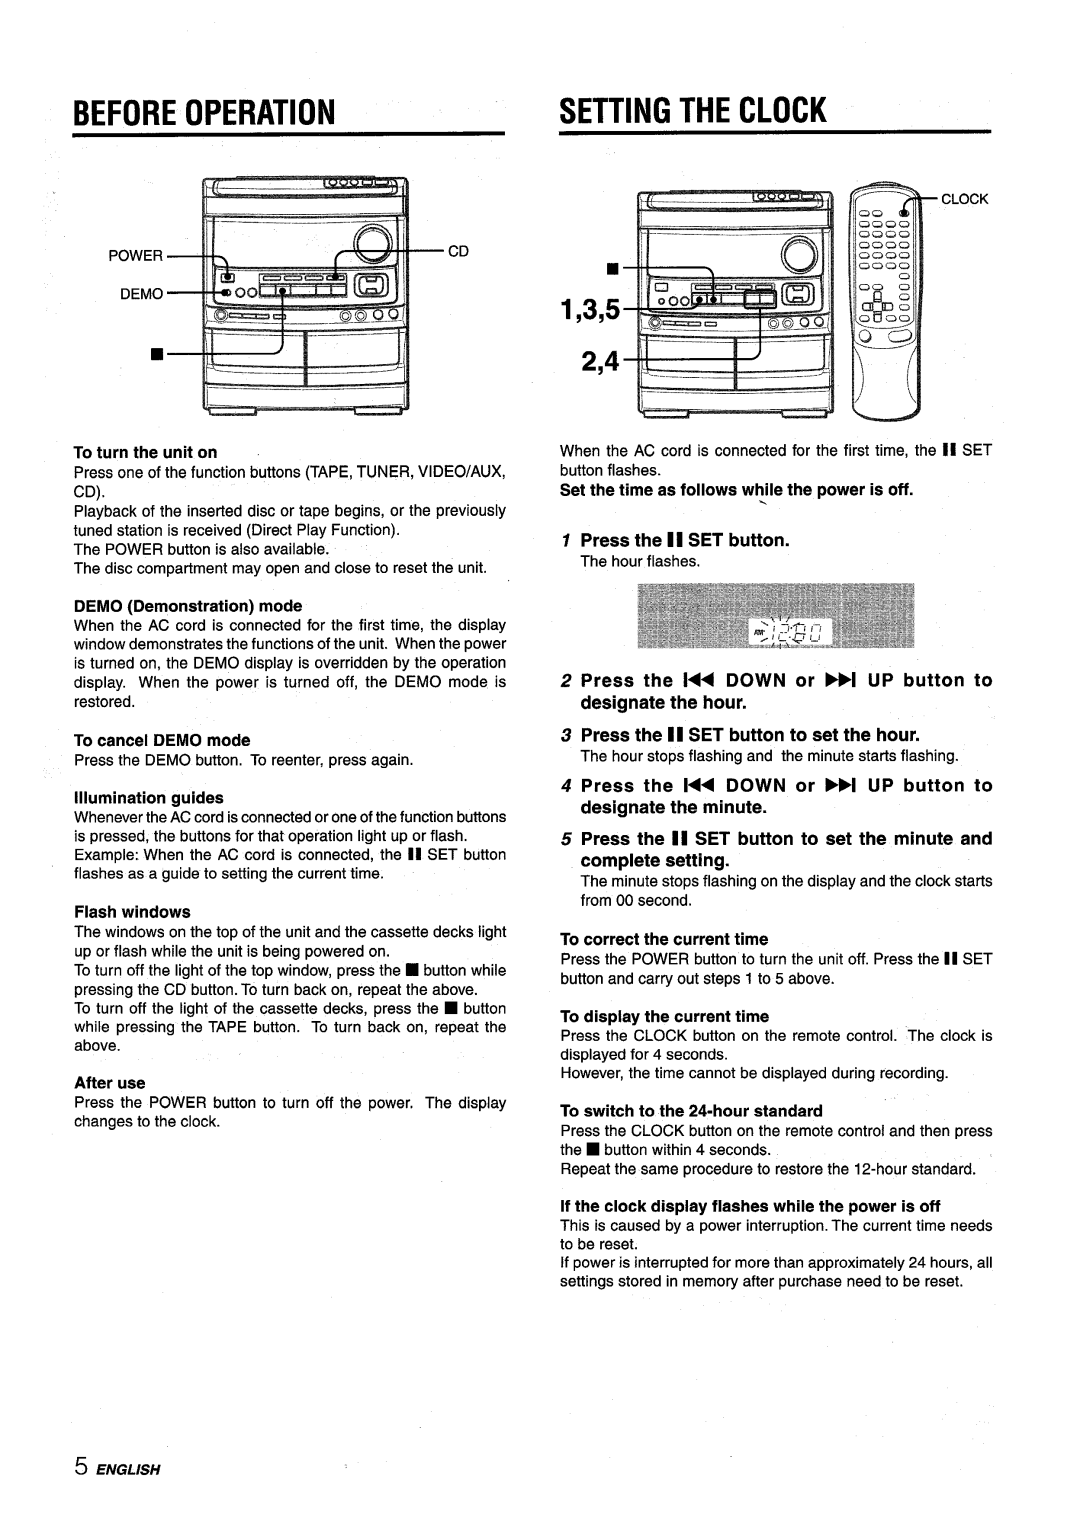
To turn the unit on

Press one of the function buttons (TAPE, TUNER, VIDEO/AUX, CD).

Playback of the inserted disc or tape begins, or the previously tuned station is received (Direct Play Function).

The POWER button is also available.

The disc compartment may open and close to reset the unit.

DEMO (Demonstration) mode

When the AC cord is connected for the first time, the display window demonstrates the functions of the unit. When the power is turned on, the DEMO display is overridden by the operation display. When the power is turned off, the DEMO mode is restored.

To cancel DEMO mode

Press the DEMO button. To reenter, press again.

Illumination guides

Whenever the AC cord is connected or one of the function buttons is pressed, the buttons for that operation light up or flash. Example: When the AC cord is connected, the II SET button flashes as a guide to setting the current time.

Flash windows

The windows on the top of the unit and the cassette decks light up or flash while the unit is being powered on.

To turn off the light of the top window, press the H button while pressing the CD button. To turn back on, repeat the above.

To turn off the light of the cassette decks, press the button while pressing the TAPE button. To turn back on, repeat the above.

After use

Press the POWER button to turn off the power, The display changes to the clock.

SETTING THE CLOCK

CLOCK

1,3,5

2,4

When the AC cord is connected for the first time, the 11 SET button flashes.

Set the time as follows while the power is off.

.

1 Press the II SET button.

The hour flashes.

2 Press the l<< DOWN or PM UP button to

designate the hour.

3Press the 11 SET button to set the hour.

The hour stops flashing and the minute starts flashing.

4Press the 144 DOWN or >1 UP button to designate the minute.

5Press the 11 SET button to set the minute and complete setting.

The minute stops flashing on the display and the clock starts from 00 second.

To correct the current time

Press the POWER button to turn the unit off. Press the 11 SET button and carry out steps 1 to 5 above.

To display the current time

Press the CLOCK button on the remote control. The clock is displayed for 4 seconds.

However, the time cannot be displayed during recording.

To switch to the 24-hour standard

Press the CLOCK button on the remote control and then press the button within 4 seconds.

Repeat the same procedure to restore the 12-hour standard.

If the clock display flashes while the power is off

This is caused by a power interruption. The current time needs to be reset.

If power is interrupted for more than approximately 24 hours, all settings stored in memory after purchase need to be reset.

5 ENGLISH

Page 6
Image 6
Aiwa NSX-V9000 manual Before Operation, Setting the Clock

NSX-V9000 specifications

The Aiwa NSX-V9000 is a standout component in the realm of audio systems, particularly known for its remarkable blend of robust design, versatile functionality, and innovative technology. Released in the late 1990s, this audio system quickly gained a reputation for delivering high-fidelity sound and a rich feature set that appealed to both casual listeners and audiophiles alike.

One of the most notable features of the NSX-V9000 is its powerful 200-watt amplification system. This ensures that the audio output remains clear and distortion-free, even at higher volumes. The dual cassette decks allow users to easily record from various sources and create mixtapes, making it a favorite among enthusiasts who cherish the analog experience. The inclusion of automatic tape selection and playback features adds convenience to the overall user experience.

Moreover, the NSX-V9000 boasts a 5-disc CD changer, enabling seamless playback of multiple CDs without the need for manual swapping. This functionality is complemented by its advanced programming options and random play features, allowing users to create personalized playlists effortlessly. The system also supports an array of audio formats, making it versatile in accommodating different media types.

Connectivity is another highlight of the Aiwa NSX-V9000. It comes equipped with multiple input and output options, including AUX, USB, and headphone outputs, allowing users to easily connect external devices such as smartphones, MP3 players, and computers. This feature supports the modern lifestyle, where digital music consumption is commonplace.

The NSX-V9000 is designed with user-friendly controls and an intuitive interface. Its large LCD screen displays track information and other relevant data, simplifying navigation through extensive libraries. The inclusion of remote control functionality further enhances user convenience, enabling operation from a distance.

Additionally, Aiwa integrated several sound-enhancing technologies within the NSX-V9000. The system features Digital Signal Processing (DSP) capabilities that allow users to experiment with different equalizer settings, giving them the freedom to tailor the audio experience to their preferences. Surround sound options create an immersive listening environment, making it ideal for both music and movie playback.

In summary, the Aiwa NSX-V9000 is a multifunctional audio system that combines power, versatility, and technological innovation. Its solid amplification, multi-format playback capabilities, and user-friendly interface make it a timeless choice for music lovers seeking a high-quality audio experience. Whether for casual listening or serious audiophile use, the NSX-V9000 remains a noteworthy contender in the world of home audio systems.