980320AKY-U-9
Digital Audio
88-SP1-903-01
English
\ 7 \ IRISKOFELECTRICSHOCKI/ \ ~i%~$
GE-NMIOOO MX-NMIOOO DX-NM1OOO FX-NM1OOO SX-NMTIOOO
Stereo Receiver
Preparations
Equalizer
CD Player
Connect the speaker cords to MX-NM1
Setting up the, units
Connect the speaker cords to the SX-NMTI 000 front speakers
FM antenna Right speaker SX NMT1
Left speaker
SX-NMT1
FM antenna
To turn the power on
To unplug the connector of the flat cable
Using the remote control
To turn the power off
Volume
BBE System
Demo
Freq Down GEQ Freq UP Clocwtimer
Rhythm Delay Time
Display Enter
To select the stored equalization curve
Setting a NEW Equalization Curve Manually
Within 4 seconds, press Enter
New equalization curve is stored
Selecting a Programmed DSP Surround Mode
To select the stored DSP Surround sound
See Setting a NEW DSP Surround Sound Manually
Memorizing the NEW DSP Surround Sound
New DSP Surround sound is memorized
To change the tempo of the selected rhythm pattern
To change the volume level of the selected rhythm pattern
To cancel the rhythm play function
Press Multi JOG
To cancel the sleep timer
To switch to the 24-hour standard
To check the time remaining until the power is turned off
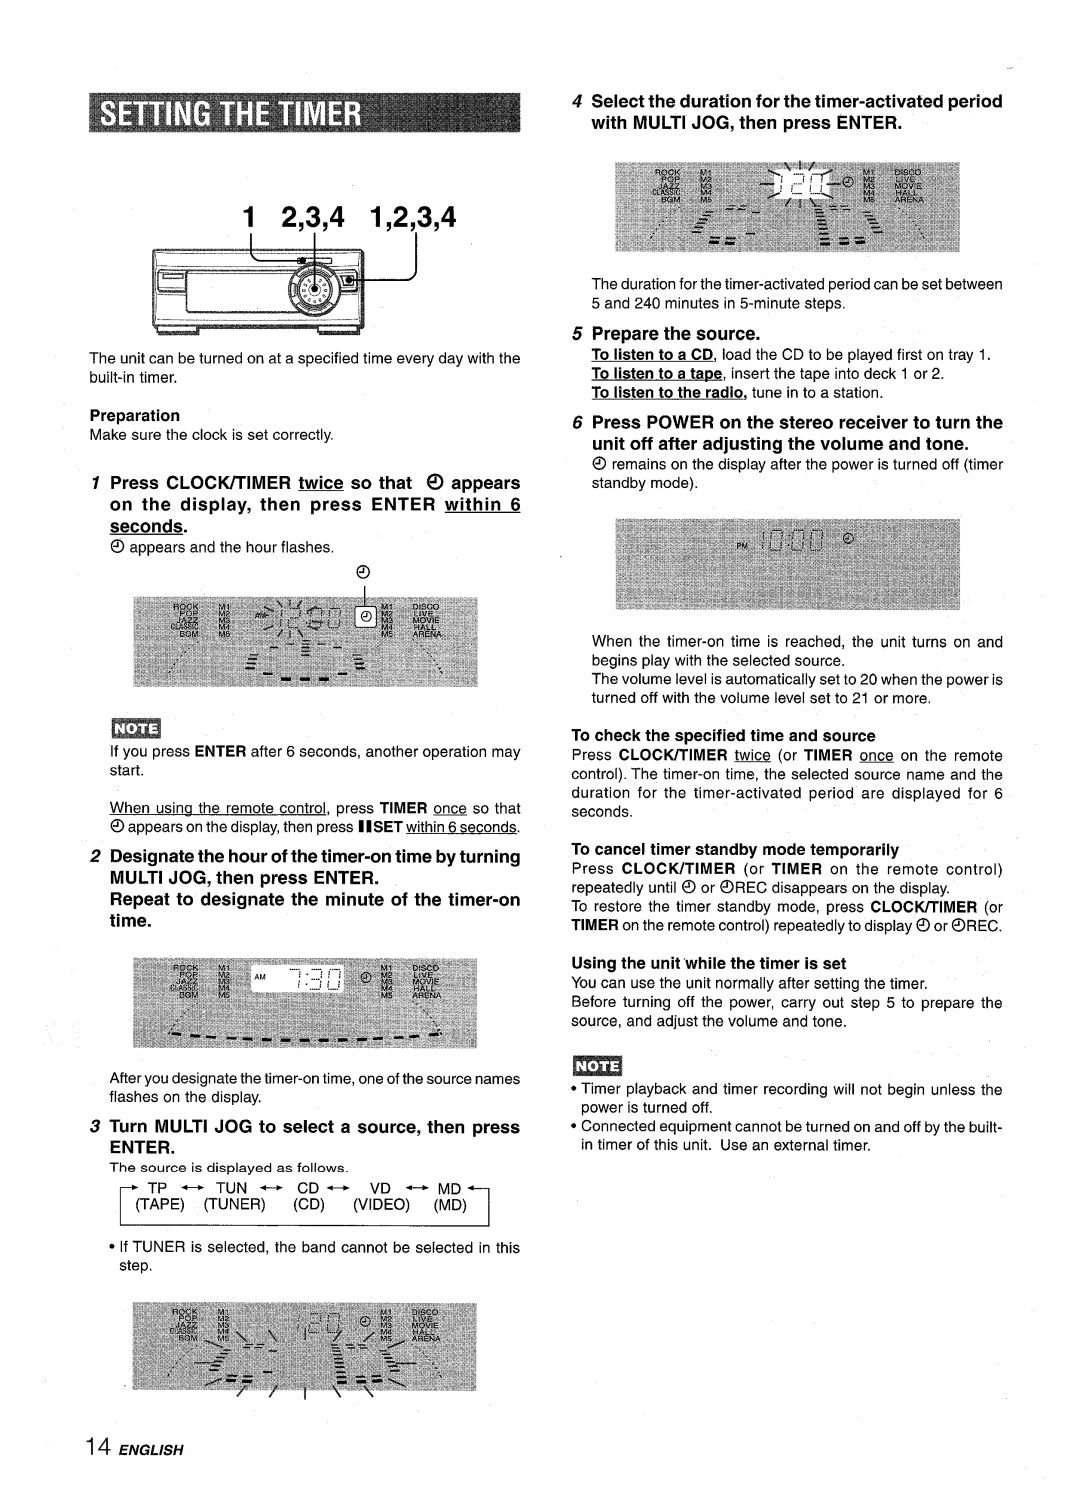
Turn Multi JOG to designate the minute, then press Enter
Preparation
To cancel timer standby mode temporarily
Using the unit’whiie the timer is set
Turn Multi JOG to select a source, then press
Timer
JOG English
SET TUNING/PRESET Volume
Power
Bass BBE Karaoke Echo MIC Phones TUNING/PRESET
Tape DECK1/2
LRepeat steps 1 to
Preset Number Tuning
LPress SET to store the station
Tuner Band
== ~~
Connect your microphones to NllC 1 and MIC 2 jacks
Karoke
ENGLISH19
SKIP/SEARCH
Disc Change
Stop
PLAY/PAUSE 4PLAY
Player to start play To check the program
Press CD and insert the discs Press Prgm twice in stop mode
Press numbered buttons O-9 and +1 Oto program Track
To clear the program
To stop play
To add a reservation during play
To check the reserved tracks
To skip a current track
Dolby
REV Mode Deck
4EJECT
Sync DUB NORM/HIGH REC/REC Mute
To set the tape counter to
To start play when the power is off Direct Play Function
Press 4 PLAY/DIR to start play
Dunr
Insert the tape to be recorded on into deck
Press REV Mode to select the reverse mode
Inserting Blank Spaces
Press Dolby NR to turn Dolby NR on or off
Sync DUB once Or twice To start Recording
Press Dolby NR to turn off the Dolby NR
Press Tape on the stereo receiver to select deck
Press REC/REC Mute to start recording on
First Side
Para borrar el programa de edition
Pulse REC/REC Mute para iniciar la grabacion
Para detener la grabacion
EDIT/CHECK
Press VIDEO/AUX or MD
To adjust the sound level of the external source
CD Digital OUT Optical Jack
Play the connected equipment
Care of tapes Store tapes in their cases after use
Care of discs
To demagnetize the heads
Cassette Deck
General
Stereo Receiver
CD Player
Copyright
General
CD Player DX-NMIOOO
Espanol
Anotacion del propietario
GE-NMIOOO MX-NM1OOO DX-NMIOOO FX-NMIOOO SX-NMTIOOO
Receptor Estereo
Prieparativos
Ecualizador Grafico
Reproductor DE Discos Compactos
De CA
Compruebe su sistema y accesorios
Antes de conectar
Instalacion de Ias unidades
Colnecte el cable de alimentacion de CA a una toma de CA
Conecte Ias antenas suministradas
Colocacion de Ias antenas Antena de FM
Conexion DE UNA Antena Exterior
Para silenciar el sonido del juego
Para cancelar la demostracion del juego
Para jugar con la demostracion del juego
Iii
Seleccion DE LA Curva DE Ecualizacion Programada
Freq Down GEQ Freq UP Clocivtimer
Rhythm Delaytime
Nombrepagina
Pulse Enter antes de que pasen 4 seaundos
Ecualizacion Nueva
Memorization DE Curvas DE Ecualizacion Nuevas
Personalizadas como modos manuales Ml M5
Modo programado RDSP
Disco Live
Hall Arena
DELA’YTIME EFF’ECT
Corno rnodos manuales Ml M5
Consulte Ajustemanual DE UN Nuevo Sonido DSP
Ritmo
Pulse Multi JOG
La hors deja de parpadear y empieza a parpadear el minute
Gire Multi JOG para designar et minuto y Iuego pulse Enter
Pulse Sleep
~arece Sleep
La fuente se visualiza de la forma siguiente
Prepare la fuente de sonido
Temporizador
TP*TUN+--+CD+ VD+MD Tape Tuner CD Video MD
Clocivtimer
Grabacion CON Temporizadcr
Visualizador
SET TUNING/PRESET
Nombre Pagina
Bass BBE Karaoke Echo MIC
De preajuste
PRESETNO. aparece en el visualizador
Repita Ios pasos 1 a
Conecte sus microfonos a Ias tomas MIC 1 y MIC
MIC1 MIC2
ESPAfiOL191
@ VF OFF
Disc Direct Play Rect Editi Check Randomi Repeat
LPLAY/PAUSE 21,22
Pulse CD y Iuego pulse a OPEN/CLOSE para abrir
+1o
Reproduction ALEATORIA/REPETICION DE Reprcduccion
3@%*w,.?JY,.,.,*!#!.p.nK.s,.Y,.,s,,e*s.y,=,#w~,,L,,,,p
Vaya al paso siguiente cuando la bandeja deje de girar
+Ioyo
3RANDOM/ Repeat
Ntimero del Numero De la Disco reservado Cancion
MMS PLAY/DIR Stop
REV Mode
11PAUSE
IIPA’USE 2 sop Inserte una cinta
Sensor Musical
Pulse +-PLAY/DIR para iniciar la reproduction
La reproduction continuara hasta que se pulse Stop
Acerca de Ias cintas de casete
Pulse REV Mode para seleccionar el modo de inversion
Pulse Dolby NR para activar o desactivar Dolby NR
Para arabar de una fuente de sonido conectada, pulse
DUB para iniciar La ~~h? Grabacion
Pulse Una Dos Veces
Sync
’TOP
Para detener la grabacion
Numero del programa
Para borrar el programa de edition
Para cambiar el programa de cada cara
CD Digital OUT Line OUT MD VIDEO/AUXOPTICAL
Toma CD Digital OUT Optical
Pulse VIDEO/AUX o MD
CD Digital OUT Optical Super Surround Woofer
ESPAfiOL
Generalidades
Power SET
Para reajustar la unidad
Receptor Estereo
Generalidades
Sistema DE Altavoces SX-NMTIOOO
Seccion
FX-NM
Reieve du proprietaire
GE-NM1OOO MX-NMIOOO DX-NMIOOO
SX-NMTI
Lecteur DE Disques Compacts
Egaliseur Graphique
Stereo
Magnetocassette
Connecter Ies cordons d’enceinte au MX-NMI
Contr61er la chaine et Ies accessoires @ @
Installation des appareils
Enfoncer Ie connecter jusqu’a ce qu’un declic soit audible
Brancher Ie cordon secteur a une prise de courant
Connecter Ies antennes fournies
Pour positioner Ies antennes
Pour mettre hors tension
Utilisation de la telecommande
Ii+
Mise en place des piles
Pour annuler la demonstration de jeu
Bass Bass BBE Volume
Demonstration DE JEU
Pour reinitialiser la demonstration de jeu
Freq Down GEQ Freq UP CLOCK/TIMER
Selection D’UNE Courbe
’egalisation
Reglage Manuel D’UNE Nouvelle Courbe D’EGALISATION
Courbes D’EGALISATION
FRAIV~AIS
Les elements du son Surround DSP peuvent Stre personnalises
Delay Time EFF’ECT
Reglage Manuel D’UN Nouveau SON Surround DSP
Hall ARENA~
Memorisation DU Nouveau SON Surround DSP
Temps
Appuyer sur Multi JOG
Mereng 1,2,3 e Beat 1,2,3
Clocwwmer
FRAN~AIS I
Preparer la source
Proceder de la m~me maniere pour specifier Ies minutes
Tourner Multi JOG pour selectionner une
Pour contr61er I’heure et la source specifiers
CL Ocivtimer
FRANL2AIS ~
VI DEO/AUX
Phones TUNING/PRESET
@ Volume
Bass BBE Karaoke
FRAN~AIS ~
Tuning
Prereglage directement +10
MIC 1 MIC
FRAPJ~AIS
FRAPl~AIS
Mise EN Place DE Disques
Lecture ALEATOIRE/REPETEE
Sks?.b’
Utiliser la teiecommande
On peut programmer jusqu’a 30 plages des disques en place
PLAY/PAUSE
Numero du Numero de la Disque reserve Plage reservee
Yff
Iecteur de
Pause
Platine
Sync DUB NORM/HIGH
25,26 ++-3J
La lecture continue jusqu’a ce qu’on appuie sur Stop
Appuyer sur 4 PLAY/DIR pour demarrer la lecture
Mettre une cassette en place
’enregistrement
Appuyer sur REV Mode pour selectionner Ie mode d’inversion
Inserer la cassette a enregistrer clans la platine
TP1 est affiche
Appuyer sur REC/REC Mute pour demarrer I’enregistrementm
Iionr disparalt de I’affichage du recepteur stereo
Face du premier enregistrement face a
44 EP
EDIT/CHECK
Face du deuxieme enegistrement face’ B
Apres s’i%re assure que best affiche, repeter I’etape
Repeter I’etape 5 pour Ie reste des plages de la face a
Appuyer sur REC/REC Mute pour demarrer I’enregistrement
Prise CD Digital OUT Optical
IJJ
Magnetocassette
Generalities
Recepteur Stereo
Lecteur DE Disques Compacts
Egaliseur Graphique GE-NM1OOO
Recepteur Stereo MX-NM1OOO
Lecteur DE Disques Compacts DX-NM1OOO
Dolby NR J
Page