English |
| Français |
| Español |
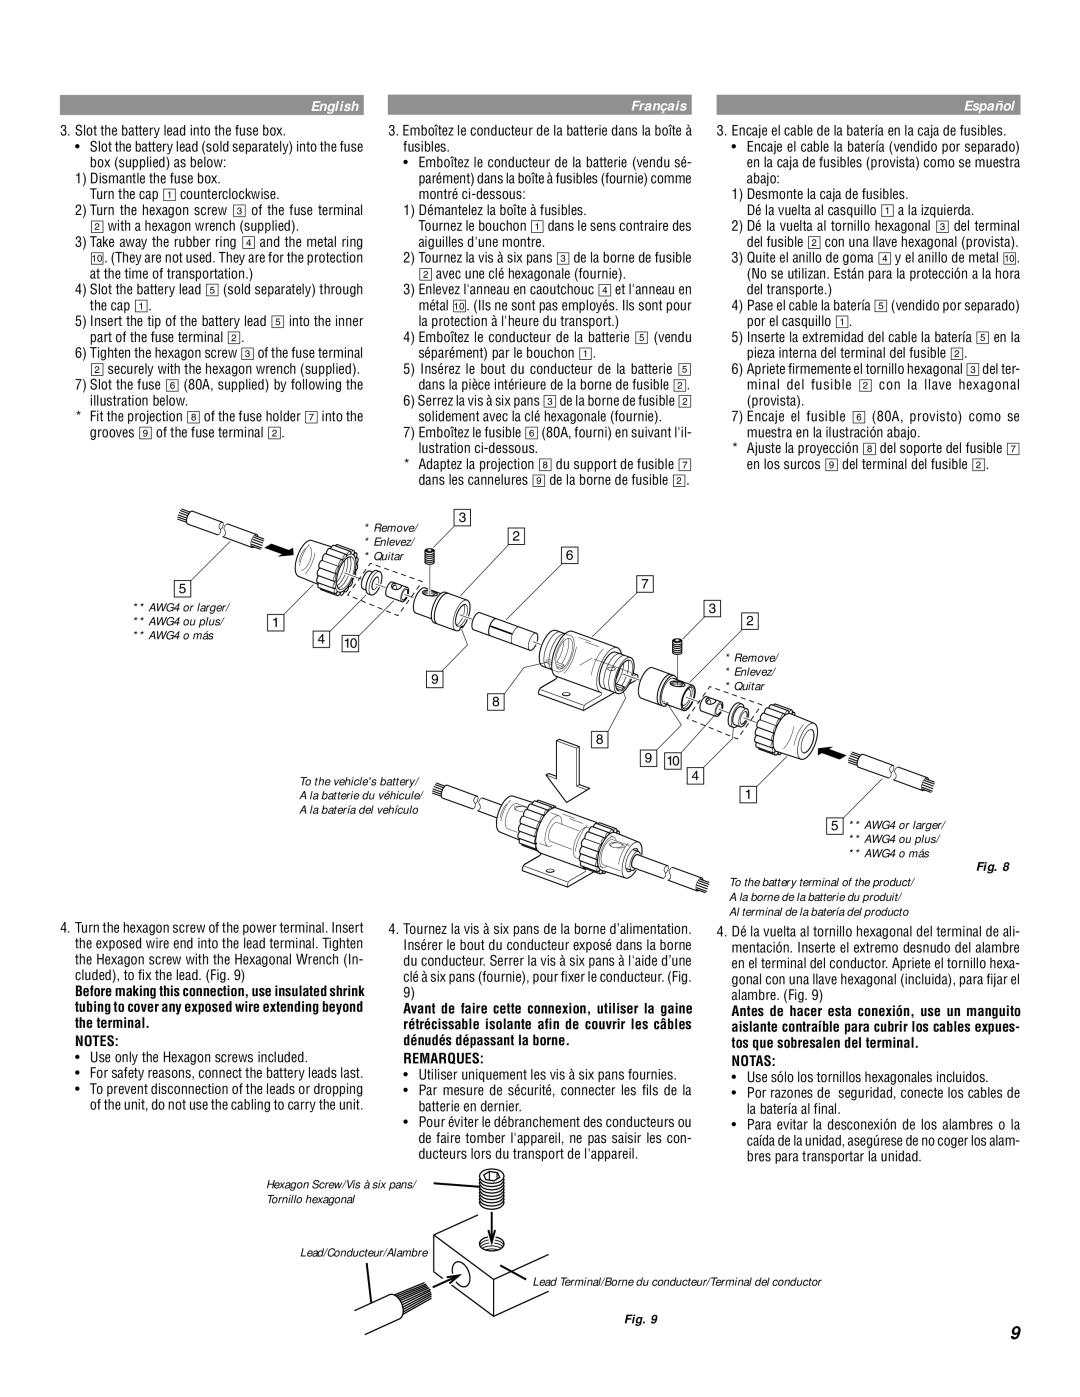
3. Slot the battery lead into the fuse box. | 3. Emboîtez le conducteur de la batterie dans la boîte à | ||||||||||
• | Slot the battery lead (sold separately) into the fuse | fusibles. |
|
|
|
| |||||
| box (supplied) as below: | • | Emboîtez le conducteur de la batterie (vendu sé- | ||||||||
1) | Dismantle the fuse box. |
| parément) dans la boîte à fusibles (fournie) comme | ||||||||
| Turn the cap 1 counterclockwise. |
| montré |
|
|
|
| ||||
2) | Turn the hexagon screw 3 of the fuse terminal | 1) Démantelez la boîte à fusibles. |
| ||||||||
| 2 with a hexagon wrench (supplied). |
| Tournez le bouchon 1 | dans le sens contraire des | |||||||
3) | Take away the rubber ring 4 and the metal ring |
| aiguilles d'une montre. |
| |||||||
| 10 . (They are not used. They are for the protection | 2) Tournez la vis à six pans 3 de la borne de fusible | |||||||||
| at the time of transportation.) |
| 2 avec une clé hexagonale (fournie). |
| |||||||
4) | Slot the battery lead 5 (sold separately) through | 3) | Enlevez l'anneau en caoutchouc 4 et l'anneau en | ||||||||
| the cap 1 . |
| métal 10 . (Ils ne sont pas employés. Ils sont pour | ||||||||
5) | Insert the tip of the battery lead 5 into the inner |
| la protection à l'heure du transport.) |
| |||||||
| part of the fuse terminal 2 . | 4) | Emboîtez le conducteur de la batterie 5 (vendu | ||||||||
6) | Tighten the hexagon screw 3 of the fuse terminal |
| séparément) par le bouchon 1 . |
| |||||||
| 2 securely with the hexagon wrench (supplied). | 5) Insérez le bout du conducteur de la batterie | 5 | ||||||||
7) | Slot the fuse 6 (80A, supplied) by following the |
| dans la pièce intérieure de la borne de fusible | 2 . | |||||||
| illustration below. | 6) Serrez la vis à six pans | 3 de la borne de fusible | 2 | |||||||
* | Fit the projection 8 of the fuse holder 7 into the |
| solidement avec la clé hexagonale (fournie). |
| |||||||
| grooves 9 of the fuse terminal 2 . | 7) | Emboîtez le fusible 6 | (80A, fourni) en suivant l'il- | |||||||
|
|
| lustration |
|
|
|
| ||||
|
| * | Adaptez la projection | 8 du support de fusible | 7 | ||||||
|
|
| dans les cannelures 9 | de la borne de fusible | 2 . | ||||||
|
|
|
|
|
|
|
|
|
|
|
|
|
| * Remove/ |
| 3 |
|
|
|
|
|
|
|
|
|
|
|
|
|
|
|
|
|
| |
|
| * Enlevez/ |
| 2 |
|
|
|
|
| ||
|
|
|
|
|
|
|
|
|
|
| |
|
| * Quitar |
|
|
|
|
|
| 6 |
|
|
3.Encaje el cable de la batería en la caja de fusibles.
• Encaje el cable la batería (vendido por separado)
en la caja de fusibles (provista) como se muestra abajo:
1)Desmonte la caja de fusibles.
Dé la vuelta al casquillo 1 a la izquierda.
2)Dé la vuelta al tornillo hexagonal 3 del terminal del fusible 2 con una llave hexagonal (provista).
3)Quite el anillo de goma 4 y el anillo de metal 10 . (No se utilizan. Están para la protección a la hora del transporte.)
4)Pase el cable la batería 5 (vendido por separado) por el casquillo 1 .
5)Inserte la extremidad del cable la batería 5 en la pieza interna del terminal del fusible 2 .
6)Apriete firmemente el tornillo hexagonal 3 del ter- minal del fusible 2 con la llave hexagonal (provista).
7)Encaje el fusible 6 (80A, provisto) como se muestra en la ilustración abajo.
*Ajuste la proyección 8 del soporte del fusible 7 en los surcos 9 del terminal del fusible 2 .
5
**AWG4 or larger/
**AWG4 ou plus/
**AWG4 o más
1
4 ![]()
![]() 10
10
9
8
To the vehicle's battery/
A la batterie du véhicule/
A la batería del vehículo
7
3
2
* Remove/
* Enlevez/
* Quitar
8
9 ![]()
![]() 10
10
4
1
5 ** AWG4 or larger/ ** AWG4 ou plus/ ** AWG4 o más
Fig. 8
To the battery terminal of the product/
A la borne de la batterie du produit/
Al terminal de la batería del producto
4.Turn the hexagon screw of the power terminal. Insert the exposed wire end into the lead terminal. Tighten the Hexagon screw with the Hexagonal Wrench (In- cluded), to fix the lead. (Fig. 9)
Before making this connection, use insulated shrink tubing to cover any exposed wire extending beyond the terminal.
NOTES:
•Use only the Hexagon screws included.
•For safety reasons, connect the battery leads last.
•To prevent disconnection of the leads or dropping of the unit, do not use the cabling to carry the unit.
4.Tournez la vis à six pans de la borne d’alimentation. Insérer le bout du conducteur exposé dans la borne du conducteur. Serrer la vis à six pans à l'aide d’une clé à six pans (fournie), pour fixer le conducteur. (Fig. 9)
Avant de faire cette connexion, utiliser la gaine rétrécissable isolante afin de couvrir les câbles dénudés dépassant la borne.
REMARQUES:
•Utiliser uniquement les vis à six pans fournies.
•Par mesure de sécurité, connecter les fils de la batterie en dernier.
•Pour éviter le débranchement des conducteurs ou de faire tomber l'appareil, ne pas saisir les con- ducteurs lors du transport de l'appareil.
4.Dé la vuelta al tornillo hexagonal del terminal de ali- mentación. Inserte el extremo desnudo del alambre en el terminal del conductor. Apriete el tornillo hexa- gonal con una llave hexagonal (incluida), para fijar el alambre. (Fig. 9)
Antes de hacer esta conexión, use un manguito aislante contraíble para cubrir los cables expues- tos que sobresalen del terminal.
NOTAS:
•Use sólo los tornillos hexagonales incluidos.
•Por razones de seguridad, conecte los cables de la batería al final.
•Para evitar la desconexión de los alambres o la caída de la unidad, asegúrese de no coger los alam- bres para transportar la unidad.
Hexagon Screw/Vis à six pans/
Tornillo hexagonal
Lead/Conducteur/Alambre
Lead Terminal/Borne du conducteur/Terminal del conductor
Fig. 9
9