CHAPTER 4 (CONTINUED)
D.Cellular Phone and Cordless Phone Connection
1.Connect one end of the Cell Cord into the jack in the back of the Q90 marked CELLULAR (2.5mm)
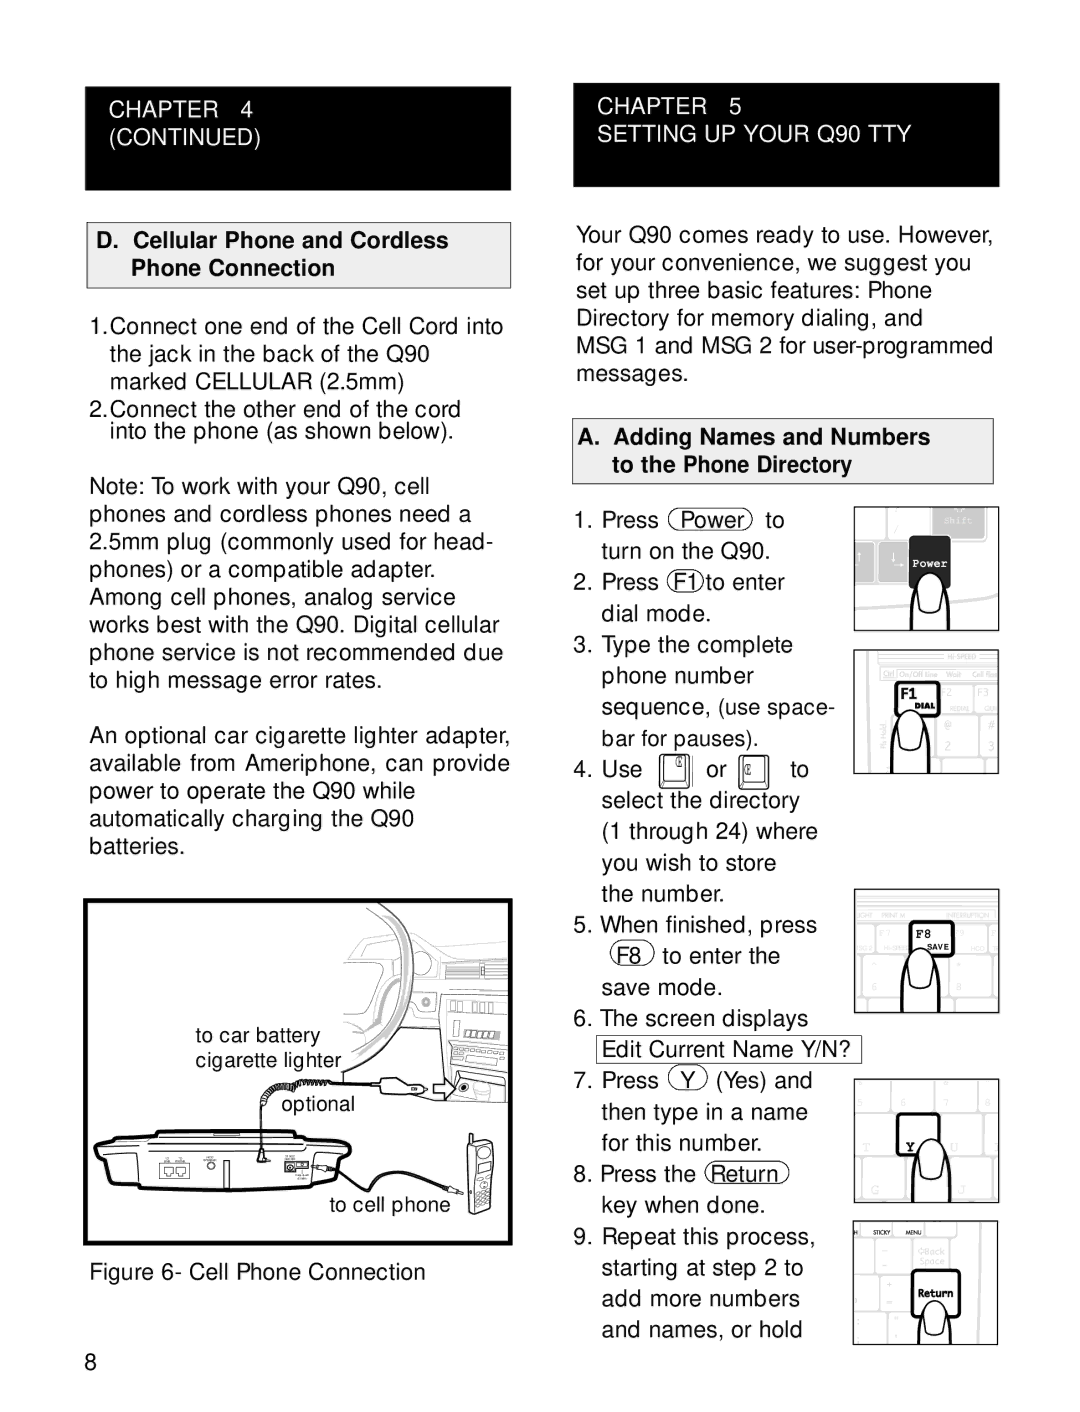
2.Connect the other end of the cord into the phone (as shown below).
CHAPTER 5
SETTING UP YOUR Q90 TTY
Your Q90 comes ready to use. However, for your convenience, we suggest you set up three basic features: Phone Directory for memory dialing, and MSG 1 and MSG 2 for
A.Adding Names and Numbers to the Phone Directory
Note: To work with your Q90, cell phones and cordless phones need a 2.5mm plug (commonly used for head- phones) or a compatible adapter. Among cell phones, analog service works best with the Q90. Digital cellular phone service is not recommended due to high message error rates.
1.Press Power to turn on the Q90.
2.Press F1 to enter dial mode.
3.Type the complete phone number sequence, (use space-
? |
Shift |
/ |
Power |
An optional car cigarette lighter adapter, available from Ameriphone, can provide power to operate the Q90 while automatically charging the Q90 batteries.
| to car battery | |
| cigarette lighter | |
|
| optional |
TO TO | HCO | 12 VDC |
LINE PHONE | SPEAKER | 300 MA |
|
| CELLULAR |
|
| (2.5MM) |
|
| to cell phone |
Figure 6- Cell Phone Connection
| bar for pauses). |
|
|
|
|
|
|
| ||
4. | Use | Π| or Π| to |
|
|
|
|
|
|
|
|
|
|
|
|
| ||||
| select the directory |
|
|
|
|
|
| |||
| (1 through 24) where |
|
|
|
|
|
| |||
| you wish to store |
|
|
|
|
|
|
| ||
| the number. |
|
|
|
|
|
|
| ||
5. | When finished, press |
| F7 | F8 | F9 | F1 | ||||
| F8 | to enter the |
| MSG 2 | SAVE |
| HCO | TR | ||
|
| ^ |
| & | * |
|
| |||
| save mode. |
|
|
|
| |||||
|
| 6 |
| 7 | 8 |
|
| |||
|
|
|
|
|
|
|
| |||
6. | The screen displays |
|
|
|
|
|
| |||
| Edit Current Name Y/N? |
|
|
|
|
|
| |||
7. | Press | Y | (Yes) and | % | ^ | & |
| * |
| |
| then type in a name | 5 | 6 | 7 |
| 8 |
| |||
|
|
|
|
|
|
| ||||
| for this number. |
| T | Y | U |
| I | |||
8. | Press the | Return |
| G |
| H | J |
|
| |
| key when done. |
|
|
|
| |||||
|
|
|
|
|
|
|
| |||
9. | Repeat this process, |
|
|
|
|
|
| |||
| starting at step 2 to |
|
|
|
|
|
| |||
| add more numbers |
|
|
|
|
|
| |||
| and names, or hold |
|
|
|
|
|
| |||
8
