INSTALLATION | figure a |
|
figure c
figure e
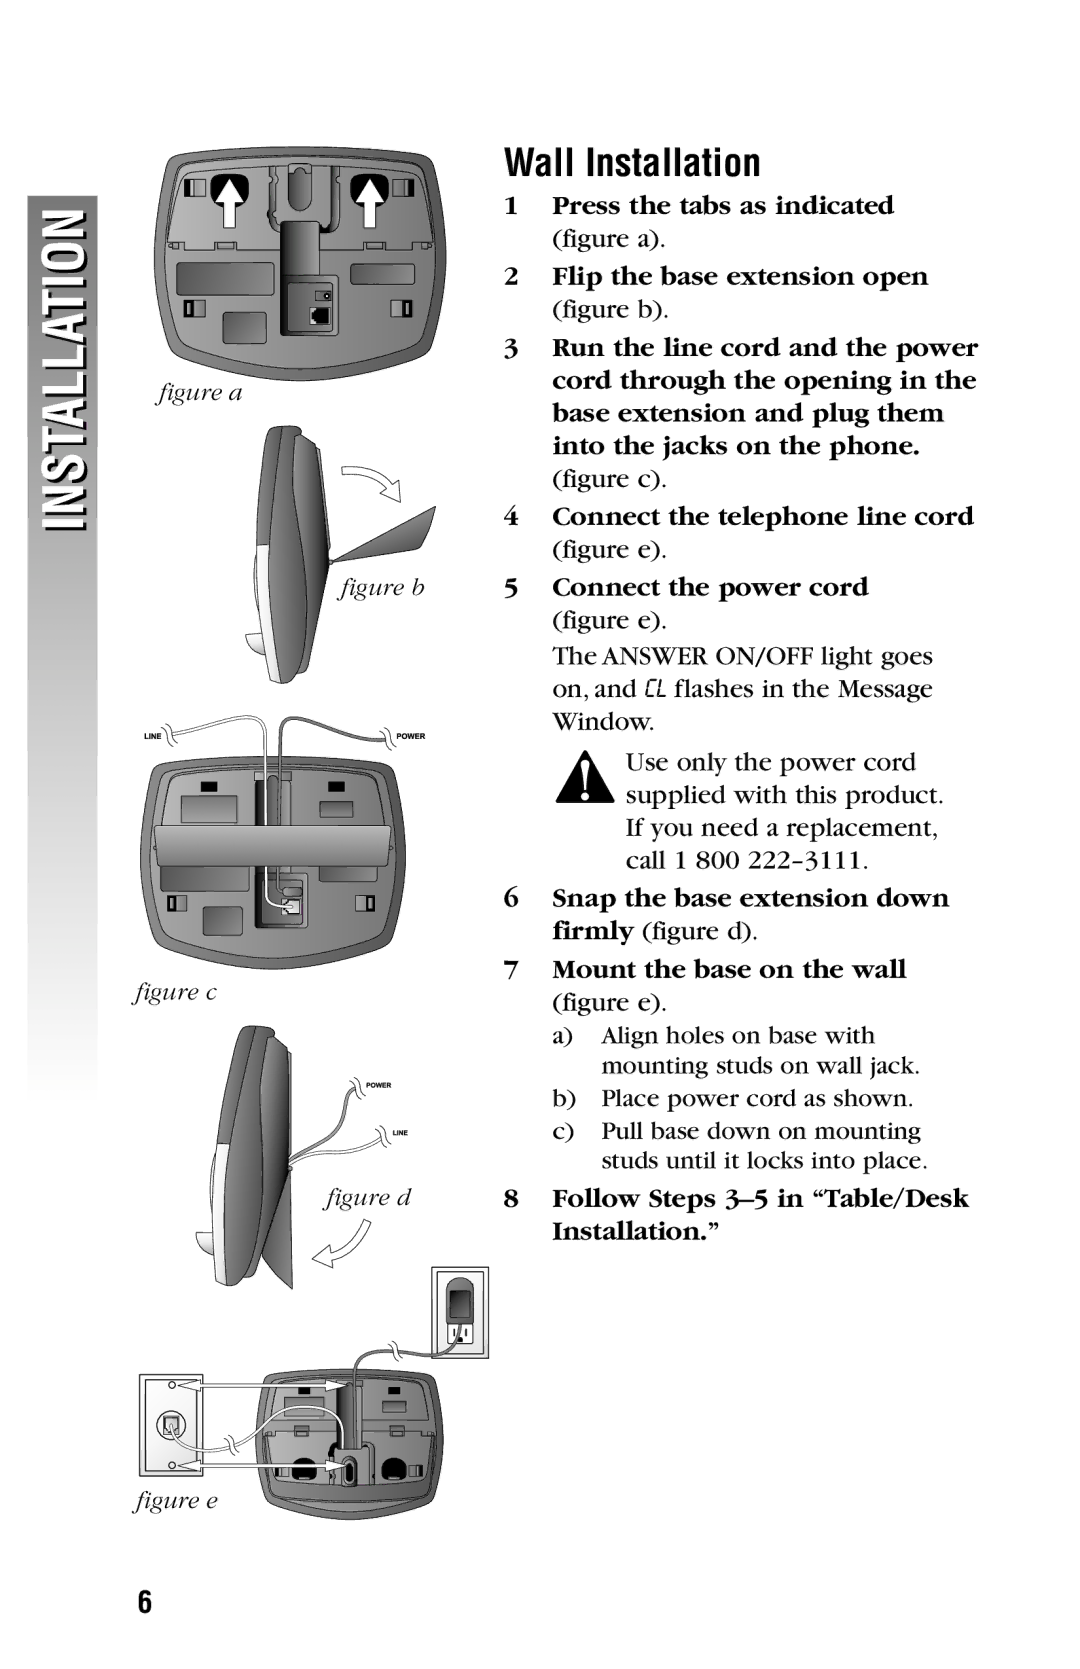
Wall Installation
|
|
|
|
|
|
|
|
|
|
|
| 1 | Press the tabs as indicated |
|
|
|
|
|
|
|
|
|
|
|
|
| (figure a). |
|
|
|
|
|
|
|
|
|
|
|
| 2 | Flip the base extension open |
|
|
|
|
|
|
|
|
|
|
|
|
| (figure b). |
|
|
|
|
|
|
|
|
|
|
|
| 3 | Run the line cord and the power |
|
|
|
|
|
|
|
|
|
|
|
|
| cord through the opening in the |
|
|
|
|
|
|
|
|
|
|
|
|
| base extension and plug them |
|
|
|
|
|
|
|
|
|
|
|
|
| into the jacks on the phone. |
|
|
|
|
|
|
|
|
|
|
|
|
| (figure c). |
|
|
|
|
|
|
|
|
|
|
|
| 4 | Connect the telephone line cord |
|
|
|
|
|
|
|
|
|
|
|
|
| (figure e). |
|
|
|
|
| figure b | 5 | Connect the power cord | ||||||
|
|
|
|
|
|
|
|
|
|
|
|
| (figure e). |
|
|
|
|
|
|
|
|
|
|
|
|
| The ANSWER ON/OFF light goes |
|
|
|
|
|
|
|
|
|
|
|
|
| on, and CL flashes in the Message |
|
|
|
|
|
|
|
|
|
|
|
|
| Window. |
|
|
|
|
|
|
|
|
|
|
|
|
| Use only the power cord |
|
|
|
|
|
|
|
|
|
|
|
|
| supplied with this product. |
|
|
|
|
|
|
|
|
|
|
|
|
| |
|
|
|
|
|
|
|
|
|
|
|
|
| |
|
|
|
|
|
|
|
|
|
|
|
|
| If you need a replacement, |
|
|
|
|
|
|
|
|
|
|
|
|
| call 1 800 |
|
|
|
|
|
|
|
|
|
|
|
| 6 | Snap the base extension down |
|
|
|
|
|
|
|
|
|
|
|
|
| firmly (figure d). |
|
|
|
|
|
|
|
|
|
|
|
| 7 | Mount the base on the wall |
|
|
|
|
|
|
|
|
|
|
|
|
| (figure e). |
|
|
|
|
|
|
|
|
|
|
|
|
| a) Align holes on base with |
|
|
|
|
|
|
|
|
|
|
|
|
| mounting studs on wall jack. |
|
|
|
|
|
|
|
|
|
|
|
|
| b) Place power cord as shown. |
|
|
|
|
|
|
|
|
|
|
|
|
| c) Pull base down on mounting |
|
|
|
|
|
|
|
|
|
|
|
|
| studs until it locks into place. |
|
|
|
|
| figure d | 8 | Follow Steps | ||||||
|
|
|
|
|
|
|
|
|
|
|
|
| Installation.” |
|
|
|
|
|
|
|
|
|
|
|
|
|
|
|
|
|
|
|
|
|
|
|
|
|
|
|
|
|
|
|
|
|
|
|
|
|
|
|
|
|
|
|
|
|
|
|
|
|
|
|
|
|
|
|
|
|
|
|
|
|
|
|
|
|
|
|
|
|
|
|
|
|
|
|
|
|
|
|
|
|
|
|
|
|
|
|
|
|
|
|
|
|
|
|
|
|
|
|
|
|
|
|
|
|
|
|
|
|
|
|
|
|
|
|
|
|
|
|
|
|
|
|
|
|
|
6