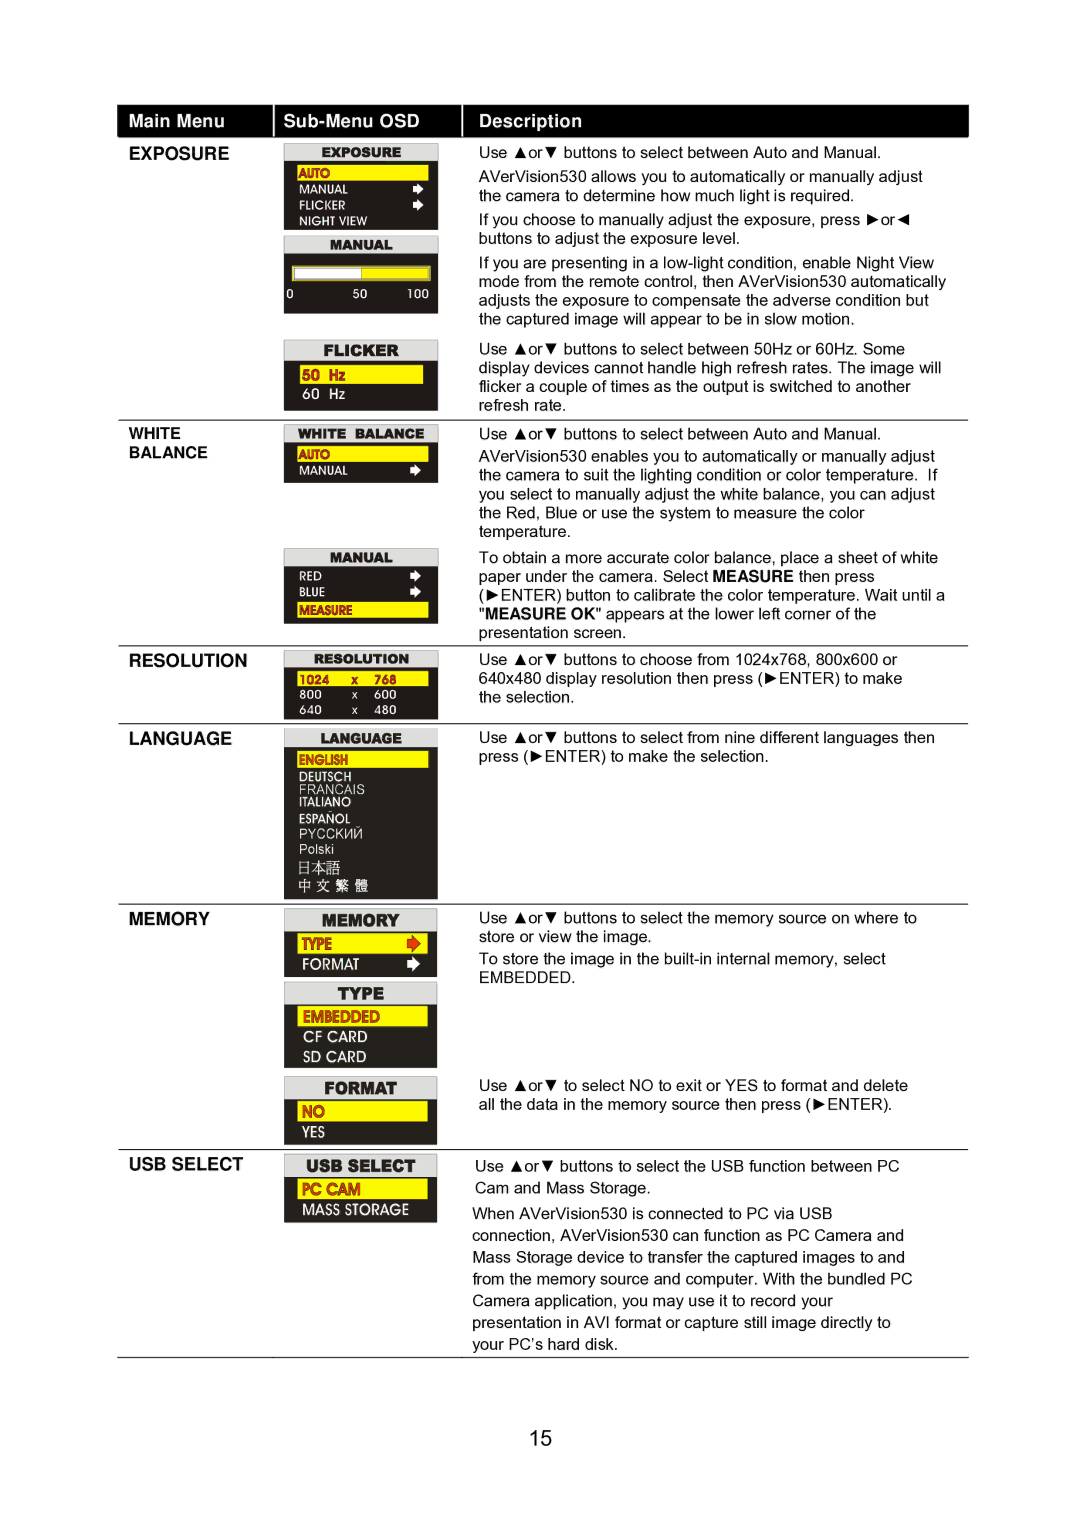
Main Menu | Description | ||||||||
|
|
|
|
|
|
|
|
|
|
EXPOSURE |
|
|
|
|
|
|
|
| Use ▲or▼ buttons to select between Auto and Manual. |
|
|
|
|
|
|
|
| ||
|
|
|
|
|
|
|
|
| AVerVision530 allows you to automatically or manually adjust |
|
|
|
|
|
|
|
|
| the camera to determine how much light is required. |
|
|
|
|
|
|
|
|
| If you choose to manually adjust the exposure, press ►or◄ |
|
|
|
|
|
|
|
|
| buttons to adjust the exposure level. |
|
|
|
|
|
|
|
|
| |
|
|
|
|
|
|
|
|
| If you are presenting in a |
|
|
|
|
|
|
|
|
| mode from the remote control, then AVerVision530 automatically |
|
|
|
|
|
|
|
|
| |
|
|
|
|
|
|
|
|
| adjusts the exposure to compensate the adverse condition but |
|
|
|
|
|
|
|
|
| the captured image will appear to be in slow motion. |
|
|
|
|
|
|
|
|
| Use ▲or▼ buttons to select between 50Hz or 60Hz. Some |
|
|
|
|
|
|
|
|
| |
|
|
|
|
|
|
|
|
| display devices cannot handle high refresh rates. The image will |
|
|
|
|
|
|
|
|
| flicker a couple of times as the output is switched to another |
|
|
|
|
|
|
|
|
| |
|
|
|
|
|
|
|
|
| refresh rate. |
|
|
|
|
|
|
|
|
| |
|
|
|
|
|
|
|
|
|
|
WHITE |
|
|
|
|
|
|
|
| Use ▲or▼ buttons to select between Auto and Manual. |
|
|
|
|
|
|
|
| ||
BALANCE |
|
|
|
|
|
|
|
| AVerVision530 enables you to automatically or manually adjust |
|
|
|
|
|
|
|
|
| the camera to suit the lighting condition or color temperature. If |
|
|
|
|
|
|
|
|
| you select to manually adjust the white balance, you can adjust |
|
|
|
|
|
|
|
|
| the Red, Blue or use the system to measure the color |
|
|
|
|
|
|
|
|
| temperature. |
To obtain a more accurate color balance, place a sheet of white paper under the camera. Select MEASURE then press (►ENTER) button to calibrate the color temperature. Wait until a "MEASURE OK" appears at the lower left corner of the presentation screen.
RESOLUTION |
|
|
|
|
| Use ▲or▼ buttons to choose from 1024x768, 800x600 or |
|
|
|
|
|
| 640x480 display resolution then press (►ENTER) to make |
|
|
|
|
|
| the selection. |
|
|
|
|
|
|
|
|
|
|
|
|
|
|
LANGUAGE |
|
|
|
|
| Use ▲or▼ buttons to select from nine different languages then |
|
|
|
|
| ||
|
|
|
|
|
| press (►ENTER) to make the selection. |
|
|
|
|
|
| |
|
|
|
|
|
|
|
|
|
|
|
|
|
|
MEMORY
Use ▲or▼ buttons to select the memory source on where to store or view the image.
To store the image in the
EMBEDDED.
Use ▲or▼ to select NO to exit or YES to format and delete all the data in the memory source then press (►ENTER).
USB SELECT
Use ▲or▼ buttons to select the USB function between PC Cam and Mass Storage.
When AVerVision530 is connected to PC via USB connection, AVerVision530 can function as PC Camera and Mass Storage device to transfer the captured images to and from the memory source and computer. With the bundled PC Camera application, you may use it to record your presentation in AVI format or capture still image directly to your PC’s hard disk.
15