02Installation
Tuner | 07 |
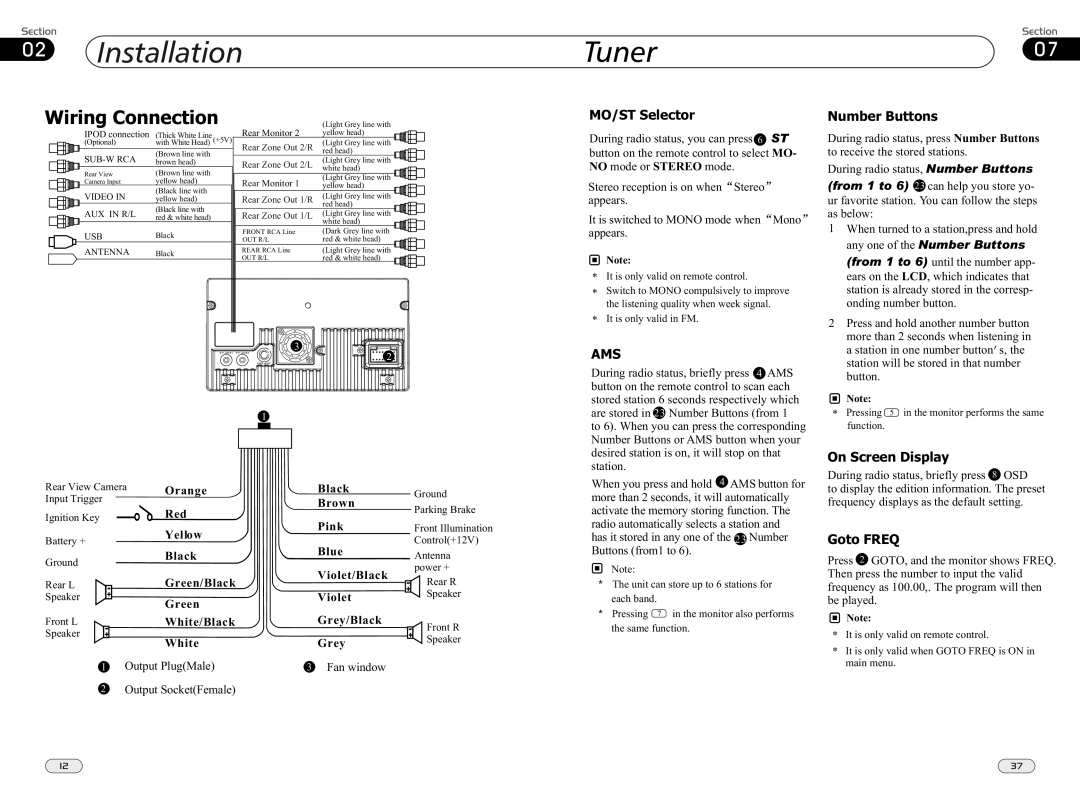
Wiring Connection
IPOD connection | (Thick White Line |
(Optional) | with White Head) (+5V) |
(Brown line with | |
brown head) | |
Rear View | (Brown line with |
Camera Input | yellow head) |
VIDEO IN | (Black line with |
yellow head) | |
AUX IN R/L | (Black line with |
red & white head) | |
USB | Black |
ANTENNA | Black |
Rear Monitor 2 Rear Zone Out 2/R Rear Zone Out 2/L
Rear Monitor 1 Rear Zone Out 1/R Rear Zone Out 1/L
FRONT RCA Line
OUT R/L
REAR RCA Line
OUT R/L
(Light Grey line with yellow head)
(Light Grey line with red head)
(Light Grey line with white head)
(Light Grey line with yellow head)
(Light Grey line with red head)
(Light Grey line with white head)
(Dark Grey line with red & white head)
(Light Grey line with red & white head)
MO/ST Selector
During radio status, you can press ST
button on the remote control to select MO- NO mode or STEREO mode.
Stereo reception is on when Stereo appears.
It is switched to MONO mode when Mono appears.
Note:
*It is only valid on remote control.
*Switch to MONO compulsively to improve the listening quality when week signal.
*It is only valid in FM.
Number Buttons
During radio status, press Number Buttons to receive the stored stations.
During radio status, Number Buttons
(from 1 to 6) can help you store yo- ur favorite station. You can follow the steps as below:
1 | When turned to a station,press and hold |
| any one of the Number Buttons |
| (from 1 to 6) until the number app- |
| ears on the LCD, which indicates that |
| station is already stored in the corresp- |
| onding number button. |
2 | Press and hold another number button |
| more than 2 seconds when listening in |
4 ![]()
1
Rear View Camera | Orange | Black |
| Ground | ||
Input Trigger | Red | Brown |
| Parking Brake | ||
Ignition Key |
|
|
| |||
| Pink |
| Front Illumination | |||
|
| Yellow |
| |||
Battery + |
|
|
| Control(+12V) | ||
|
| Blue |
| |||
Ground |
| Black |
| Antenna | ||
|
| Violet/Black |
| power + | ||
|
|
|
| |||
Rear L | - | Green/Black | - | Rear R | ||
| ||||||
Violet | + | Speaker | ||||
Speaker | + | Green |
| |||
|
|
|
|
| ||
Front L | - | White/Black | Grey/Black | - | Front R | |
Speaker | + | White | Grey | + | Speaker | |
|
|
| ||||
| 1 Output Plug(Male) | 3 Fan window |
|
| ||
2Output Socket(Female)
AMS
During radio status, briefly press AMS button on the remote control to scan each stored station 6 seconds respectively which are stored in Number Buttons (from 1
to 6). When you can press the corresponding Number Buttons or AMS button when your desired station is on, it will stop on that station.
When you press and hold AMS button for more than 2 seconds, it will automatically activate the memory storing function. The radio automatically selects a station and has it stored in any one of the Number Buttons (from1 to 6).
Note:
*The unit can store up to 6 stations for each band.
* Pressing 7 in the monitor also performs
the same function.
a station in one number button s, the |
station will be stored in that number |
button. |
Note:
* Pressing 5 in the monitor performs the same function.
On Screen Display
During radio status, briefly press OSD
to display the edition information. The preset frequency displays as the default setting.
Goto FREQ
Press GOTO, and the monitor shows FREQ. Then press the number to input the valid frequency as 100.00,. The program will then be played.
Note:
*It is only valid on remote control.
*It is only valid when GOTO FREQ is ON in main menu.
12 | 37 |