Assembly Guide
Step 1 - Attach the Lower Lat Tower to the Base Platform
Figure 1
Locate the following items:
• Item #1 - Lower Lat Tower |
| Mounting | Forward |
| Channels | ||
| Screws | ||
|
| ||
• Item #2 - Base Platform |
|
| H |
• Item #H - (4) 3/8" X 3" Button Head Screws |
|
| |
|
|
| |
• Item #N - (8) 3/8" Washers |
|
|
|
• Item #O - (4) 3/8" Nylock Nuts |
|
| N |
|
|
| |
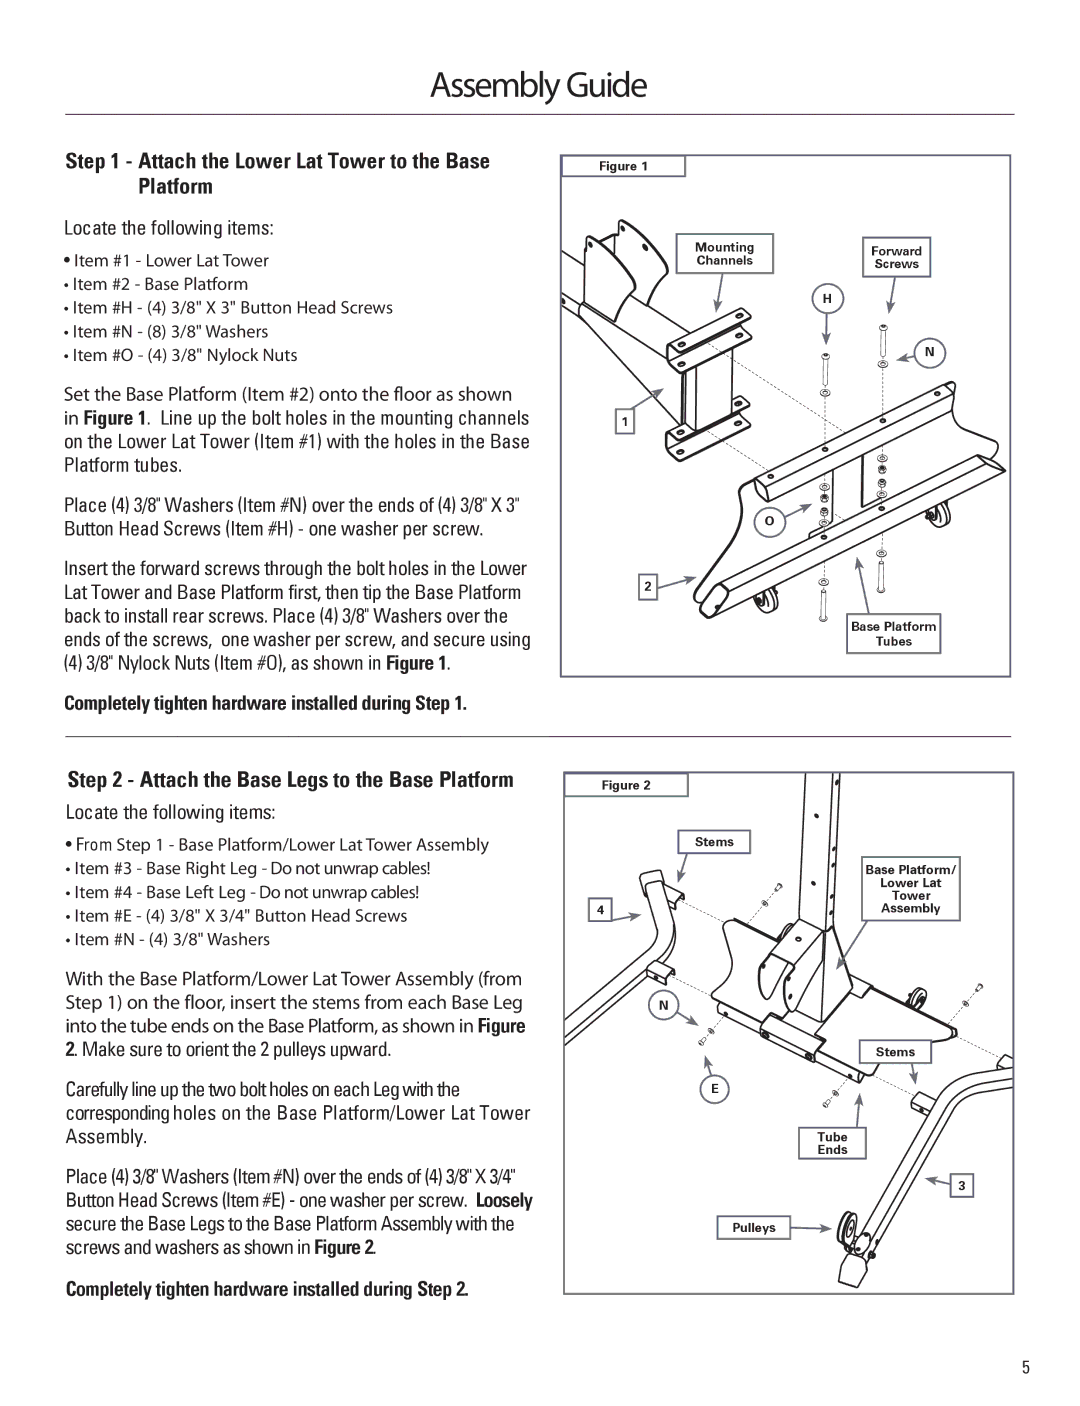
Set the Base Platform (Item #2) onto the floor as shown |
|
|
|
in Figure 1. Line up the bolt holes in the mounting channels |
| 1 |
|
on the Lower Lat Tower (Item #1) with the holes in the Base |
|
|
|
Platform tubes. |
|
|
|
Place (4) 3/8" Washers (Item #N) over the ends of (4) 3/8" X 3" |
| O |
|
Button Head Screws (Item #H) - one washer per screw. |
|
| |
|
|
| |
Insert the forward screws through the bolt holes in the Lower |
| 2 |
|
Lat Tower and Base Platform first, then tip the Base Platform |
|
| |
|
|
| |
back to install rear screws. Place (4) 3/8" Washers over the |
|
| Base Platform |
ends of the screws, one washer per screw, and secure using |
|
| |
|
| Tubes | |
|
|
| |
(4) 3/8" Nylock Nuts (Item #O), as shown in Figure 1. |
|
|
|
Completely tighten hardware installed during Step 1. |
|
|
|
Step 2 - Attach the Base Legs to the Base Platform | Figure 2 |
| |
|
| ||
Locate the following items: |
|
|
|
• From Step 1 - Base Platform/Lower Lat Tower Assembly |
| Stems |
|
|
|
| |
• Item #3 - Base Right Leg - Do not unwrap cables! |
|
| Base Platform/ |
• Item #4 - Base Left Leg - Do not unwrap cables! |
|
| Lower Lat |
|
| Tower | |
• Item #E - (4) 3/8" X 3/4" Button Head Screws | 4 |
| Assembly |
|
|
| |
• Item #N - (4) 3/8" Washers |
|
|
|
With the Base Platform/Lower Lat Tower Assembly (from |
|
|
|
Step 1) on the floor, insert the stems from each Base Leg |
| N |
|
into the tube ends on the Base Platform, as shown in Figure |
|
|
|
2. Make sure to orient the 2 pulleys upward. |
|
| Stems |
Carefully line up the two bolt holes on each Leg with the |
| E |
|
|
|
| |
corresponding holes on the Base Platform/Lower Lat Tower |
|
|
|
Assembly. |
|
| Tube |
|
|
| Ends |
Place (4) 3/8" Washers (Item #N) over the ends of (4) 3/8" X 3/4" |
|
| 3 |
Button Head Screws (Item #E) - one washer per screw. Loosely |
|
| |
|
|
| |
secure the Base Legs to the Base Platform Assembly with the |
| Pulleys |
|
screws and washers as shown in Figure 2. |
|
|
|
Completely tighten hardware installed during Step 2. |
|
|
|
5
