Quick Reference Referencia rápida
TEL 908
Introduction
Responsible Party Brother International Corporation
Declares that the product
Who is covered
91st day to 1 year
Important Information
Save Time Register On-Line
Using this manual
Touch 9500PC
AC adapter
Tape tape cassette
CD-ROM
Regarding software use
Table of Contents
106
103
104
108
118
122
124
Before use
PT-9500PC
Confirming the included accessories
Tape catalog
Rear view
PT-9500PC terms
Front view
This section identifies the main PT-9500PC terms
Lamp display
Lamp condition
Condition Remedy
Preparations before creating labels
Installing the software
Connecting the PT-9500PC
Creating labels
Connecting the PT-9500PC
Connecting to the power source
Connecting to a personal computer
95/NT4.0 Windows 98/98 SE Mac OS Me/2000 Pro/XP
Connecting to a USB port
Follow the following procedures to connect
Prepare the included USB interface Cable
Connecting to a serial port
If the power is on, turn them off
Press the power button on the PT-9500PC
→The power button will light green
Turn on the computer
Installing the tape cassette
Installing the tape cassette
Authorized tape
Check the tape cassette
Install the tape cassette
→ The power button will light green
Press the feed/cut button
Installing the collection tray
Install the collection tray to the PT-9500PC
Open the collection tray support
Installing the software
Types of software used
Touch Quick Touch AV Editor Touch Editor Printer driver
Using Windows
Complete
Using Windows NT 4.0/2000 Pro
Installation precautions
Installing using basic setup
Using Windows XP
Read the contents, and then click Next
Click the button for Basic setup
→The dialog box to select the software to install appears
Touch Quick Editor and P-touch AV
Typical
Select the type of setup you prefer, and then click Next
Read the license agreement carefully, and then click Yes
Compact
Select Yes, install the printer driver., and then click Next
Confirm the contents, and then click
Click Next
Click Continue Anyway
→The Driver Setup Brother PT-9500PC dialog box appears again
Click Finish
→The Brother Setup dialog box appears
Installing P-touch Editor only
Install P-touch Editor 4.0 to design labels
Click the button for Advanced setup
Installing P-touch Quick Editor only
→ The installation preparation begins
→ The User Information dialog box appears
→The Registration Confirmation dialog box appears
Installing P-touch AV Editor only
→ The dialog box to select the software to install appears
→The User Information dialog box appears
→The installation preparation begins
Click the button for P-touch AV Editor
→ The Registration Confirmation dialog box appears
Installing the printer driver only
→The Setup Complete dialog box appears
Click the button for Driver
→The Driver Setup dialog box appears
Refer to steps b-gin Installing using basic setup → P.31
Select USB cable, and then click OK
Select Install, and then click Next
Select Serial cable, and then click
→A dialog box to select the desired baud rate appears
→ a dialog box to confirm the baud rate settings appears
Select the appropriate Serial Port, and then click Next
Select the desired baud rate, and then click Next
Using as a network printer
Select Install, and then click Next Click Next
Drive
For Windows 95/98/98SE/Me/NT 4.0/ 2000 Pro
Setting the personal computer and PT-9500PC baud rate
Set up the PS-9000 print server
Select Printers and Other Hardware
→The Printers and Faxes window appears
Click the Device Setting tab
Click Printers and Faxes
→The Brother PT-9500PC Properties sheet appears
Click Close
Select the desired baud rate Click Apply
→The baud rate will be changed
→The Brother PT-9500PC Properties sheet appears again
Uninstalling the software
Click OK or Yes Touch Editor Touch Quick Editor
Touch AV Editor
Read the contents, and then click OK
Printer is no longer used
Select Delete Brother PT-9500PC, and then click Next
Click Yes
→ Deleting the printer driver is complete
Creating labels with various designs
Using Mac OS
Installing P-touch Editor and the printer driver
Printing labels simply
Programs that can be installed are listed below
Click Quit Click Restart
Program Description
Installing P-touch Quick Editor and the printer driver
Double-click the P-touch Quick Editor Installer icon
→The Installer starts
3Doublefolder. -click the P-touch Editor
→ The P-touch window appears
→ The Mac OS 9 window appears
→ The P-touch Editor 3.2 window appears
To change the drive, click Drive
Selecting the printer
Pull down the Apple menu Select Chooser
Select PT-9500PC Close the Chooser window
Installing the software
Using Mac OS X 10.1 or later
Installing P-touch Editor
4Doublefolder. -click the P-touch Editor
→The Important Information dialog box appears
→The Choose Product Components dialog box appears
Minimal
→The Pre-Installation Summary dialog box appears
Click Done
→The Mac OS X window appears
Installing P-touch Quick Editor
Double-click the P-touch icon
→ The P-touch Quick Editor window appears
→The Choose Alias Folder dialog box appears
Installing the printer driver
Click
Click Continue
Confirm the contents, and then click Continue
Read the contents, and then click Continue
ToAgree.continue with installation, click
Click Upgrade
→The dialog box to confirm the installation appears
To continue with installation, click Continue Installation
Printers available to select
Double click the Applications folder
Double click the Utilities folder
PT-9500PC is already registered
→The Printer List dialog box appears again
Uninstalling P-touch Editor
SelectAdd. PT-9500PC and then click
→ The Applications window appears
Double-click Uninstall P-touch Editor
Click Uninstall
Click Quit
→ The InstallAnywhere Uninstaller starts
→The Uninstall Quick Editor window appears
Double-click Uninstall Quick Editor
2Doublefolder. -click the P-touch Quick Editor
Double-click the Print Center icon
Delete P-touch Quick Editor Prefs
Double-click the Utilities folder
5SelectDelete.PT-9500PC, and then click
Creating labels Windows version
Proceed to Creating labels using P-touch Editor → P.73
Creating labels
Designing & printing labels
For Windows 95/98/98 SE/Me/NT
Creating labels using P-touch Editor
Start P-touch Editor
2000 Pro
Layout window
Text
Symbol
Object dock
Arrange Text
7Click
Creating a name badge
Start P-touch Editor Click
Select the Category and Style
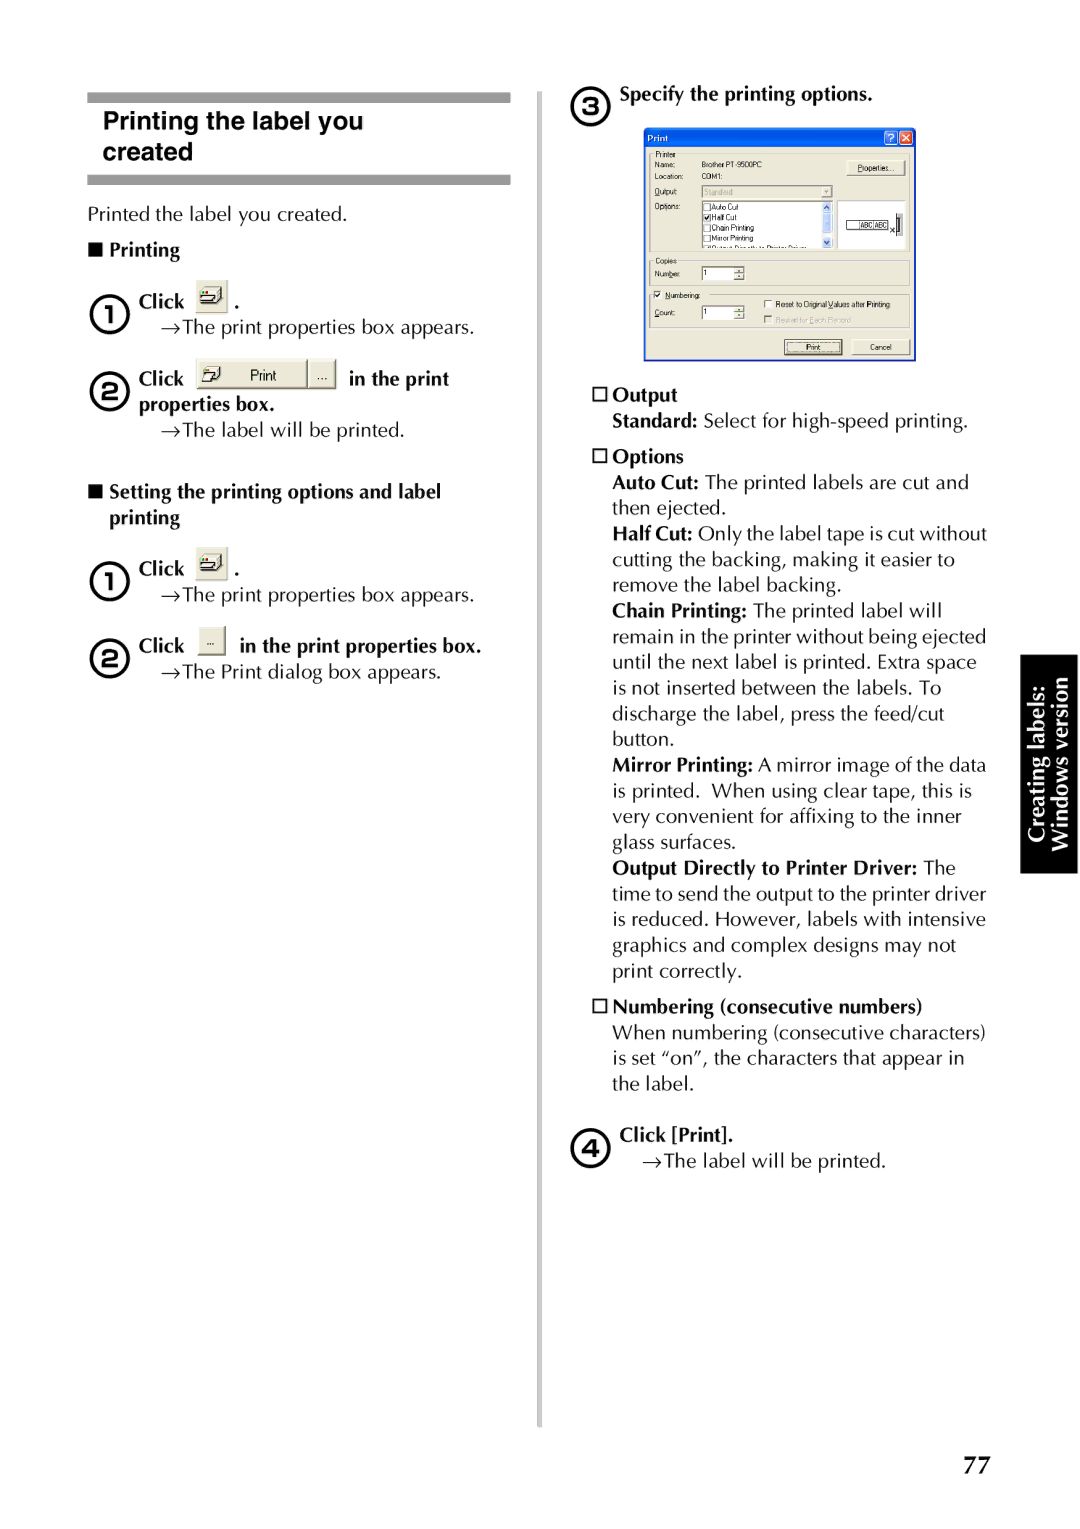
Printing the label you created
Using Help
To display Help, any layout method can be selected
→The P-touch Editor4 Help window appears
Click on the toolbar
Printing Help
Printing all the help file information
Select the printer to print to in the Select Printer area
Creating other types of labels
Sample Described function
Start P-touch Quick Editor
Creating labels using P-touch Quick Editor
Starting P-touch Quick Editor
For Windows 95/98/98 SE/Me/NT 4.0/ 2000 Pro
Other functions
Select Tape Settings
Simple use
Start P-touch Quick Editor
Specifying the text form
Select Text Settings
Using the text history
Specify the Font, Style, Size, etc
Changing the background color
Inserting symbols
Select a symbol
Changing the label view arrangement
Specify the printing options Auto Cut
Label printing
Select Print Options
Half Cut
Start up P-touch AV Editor as described below
Creating labels using P-touch AV Editor
Starting P-touch AV Editor
For Windows 98/98 SE/Me/2000 Pro
→The label view changes to the format for the selected size
Basic operation
Start up P-touch AV Editor
Formatting the text
Importing text
Adding a symbol
→The Input Symbol dialog box appears
Specifying the shortcut key for importing
Select the text that you want to use
Printing the label
Click to the right
Exiting P-touch AV Editor
→The P-touch AV Editor window closes
After printing
Removing the label backing
Close the cover
Creating labels Macintosh version
Proceed to Creating labels using P-touch Editor → P.95
After preparing the Macintosh, start creating labels
For Mac OS X 10.1 or later
Starting P-touch Editor
Start P-touch Editor
Doublefolder. -click the P-touch Editor
Font properties
Click → The font properties box appears
7In the font box, select Atlanta
→The text tool is selected
Label printing
Font size box, select Click on the toolbar
Click Print For Mac OS X 10.1 or later Click Print
Multi Half Cut
Specify the printing options Pages
Auto Tape Cut
Numbering
Halftone/Color
Tape Setting
Output Options
Summary
Using the CD-ROM User’s Guide
→The CD-ROM User’s Guide will be installed
Double-click the User’s Guide folder
102
Using P-touch Quick Editor
Labels can be created simply using P-touch Quick Editor
104
Appendix
Creating bar code labels
Bar code summary
Standard Format Characters Number Windows Macintosh
Precautions for printing bar code labels
Changing the P-touch settings
Changing the USB ID mode
Recognizing the PT-9500PCs as a single printer
Using multiple computers
Changing the baud rate
Bps
→ Self-cleaning will start
Maintenance
Self-cleaning
Label is not printed clearly
Turn off the PT-9500PC
Head roller
→Cleaning will start
Cleaning the cutter
Cleaning tape
When the rollers stop, press the cover release button
113
Troubleshooting
Problem Cause Solution
115
Product specifications
Specification
PT-9500PC
Operating environment
Personal computer
Industrial Series Laminated Tapes
Accessories For USA Only
Avery Labels for P-touch
All tapes are 26.2’ long unless otherwise noted
Laminated Tapes
Stock No Description
120
Stock No Description For Use With Price
Print Server
499.95
Index
Printing
117
Personal computer and PT-9500PC baud
Printing options
Service Center Locations
Contact Information For USA Only
No C.O.D. orders
Supply / Accessory Subtotal
To complete the Order Form
Method of Payment check one
Page
Touch Accessory Order Form For USA Only
Referencia rápida
Introducción
Gracias por adquirir la unidad PT-9500PC
Utilización de este manual
CD-ROM
Adaptador de CA
Cinta casete de cinta
Con respecto al uso del software
Índice
Información previa al uso
101
102
112
120
Información previa al uso
Confirmación de los accesorios incluidos
Catálogo de cintas
Términos relacionados con la PT-9500PC
Vista frontal
Vista posterior
Visualización de las lámparas
Estado de la lámpara
Estado Solución
Conexión de la PT-9500PC
Preparaciones previas a la creación de etiquetas
Instalación del software
Creación de etiquetas
Conexión de la PT-9500PC
Conexión a la fuente de alimentación
Información previa al uso
Conexión a una computadora personal
Conexión a un puerto USB
Personal. Consulte Instalación del software → P.23
Conexión a un puerto en serie
Seleccione la Conexión a un puerto en serie → P.38
Presione el botón de encendido de la PT-9500PC
→Se iluminará el botón de encendido verde
Encienda la computadora
Instalación del casete de cinta
Cinta autorizada
Instalación del casete de cinta
→ Se iluminará el botón de encendido verde
Verifique el casete de cinta
Instale el casete de cinta
Presione el botón FEED/CUT
Instale la bandeja de recogida en la PT-9500PC
Instalación de la bandeja de recogida
Monte la bandeja de recogida
Abrarecogida.el soporte de la bandeja de
Instalación del software
Tipos de software utilizados
Touch Quick Touch AV Editor Touch Editor Controlador de
Impresora
Sistemas con Windows
Instalación
Precauciones de instalación
Instalación mediante la Instalación básica
Touch Quick Editor exclusivamente →
Luego continúe con el paso a →
→Aparece el cuadro de diálogo Choose Destination Location
Se instalarán los siguientes elementos
Sólo se instalarán el P-touch Editor y los clips de arte
→Aparece el cuadro de diálogo Add shortcut
Revise la configuración y luego haga clic sobre Next
→Aparece el cuadro de diálogo Install Driver
Confirme el contenido y luego haga clic sobre OK
→ Se detectarán los programas necesarios
Haga clic sobre Next
→Comienza la preparación para la instalación
Haga clic sobre Continue Anyway
Haga clic sobre Finish
Instalación de P-touch Editor exclusivamente
Instale P-touch Editor 4.0 para diseñar etiquetas
Haga clic sobre el botón correspondiente a P-touch Editor
Instalación de P-touch Quick Editor exclusivamente
→ Aparece el cuadro de diálogo User Information
Extraiga el CD-ROM de la unidad de CD-ROM
Instalación de P-touch AV Editor exclusivamente
Lea el contenido y, a continuación, haga clic sobre Next
→Aparece el cuadro de diálogo User Information
Instalación del controlador de impresora exclusivamente
Haga clic sobre USB cable y luego haga clic sobre OK
→Aparece el cuadro de diálogo Driver Setup
Haga clic sobre el botón del controlador
→Aparece el cuadro de diálogo Confirmation
Haga clic sobre Serial cable y luego haga clic sobre OK
→Aparece un cuadro de diálogo donde
→ Comienza la instalación
→ La velocidad en baudios habrá quedado fijada
Utilización como impresora de red
CD-ROM
→ Aparece el cuadro de diálogo Control Panel
Para Windows 95/98/98SE/Me/NT 4.0/ 2000 Pro
→Aparecerá la ventana Printers and Other Hardware
Haga clic sobre la ficha Device Setting
Haga clic sobre Printers and Other Hardware
Haga clic sobre Printers and Faxes
→Se cambiará la velocidad en baudios
Para Windows 95/98/98 SE/Me, haga clic sobre Utilities
Haga clic sobre Apply
Haga clic sobre Close Haga clic sobre OK
Haga clic sobre OK o Yes Touch Editor Touch Quick Editor
Desinstalación del software
→Aparece la ventana Add or Remove Programs
→ Se elimina el software
Inserte el CD-ROM en la unidad de CD-ROM
Driver Setup
La impresora ya no se utiliza
→ Aparece el cuadro de diálogo
Haga clic sobre Yes
Creación de etiquetas con varios diseños
Haga doble clic sobre el icono P-touch Editor 3.2 Installer
Sistemas con Mac OS
Impresión sencilla de etiquetas
Abajo se detallan los programas que se pueden instalar
Haga clic sobre Quit Haga clic sobre Restart
Programa Descripción
→Comienza el instalador
→ Aparece la ventana Mac OS
→ Aparece la ventana P-touch
Haga doble clic sobre la carpeta Mac OS
→ Aparece la ventana P-touch Editor
Haga clic sobre Install
Selección de la impresora
Seleccione PT-9500PC Cierre la ventana Chooser
Desinstalación de P-touch Editor
Eliminación del controlador de impresora
Consulte Instalación de P-touch Quick Editor → P.59
Sistemas con Mac OS X 10.1 o posterior
Instalación de P-touch Editor
→Aparece la icono P-touch CD-ROM
→Aparece el cuadro de diálogo Choose Product Components
Standard
Minimum
Haga clic sobre Done
Haga doble clic sobre el icono P-touch
Haga doble clic sobre el icono Quick Editor Installer
Instalación de P-touch Quick Editor
Haga doble clic sobre la carpeta P-touch Quick Editor
→Aparece el cuadro de diálogo Choose Alias Folder
Instalación del controlador de impresora
Haga clic sobre
Haga clic sobre Continue
Para continuar con la instalación haga clic sobre Agree
→ Aparece el cuadro de diálogo Easy Install
Confirme el contenido y luego haga clic sobre Continue
→ Aparece el cuadro de diálogo Select a Destination
Haga clic sobre Upgrade
La PT-9500PC ya está registrada
3HagaUtilities.doble clic sobre la carpeta
No hay impresoras disponibles para seleccionar
Haga clic sobre Add
→ Aparece la ventana Applications
Seleccione PT-9500PC y luego haga clic sobre Add
→La PT-9500PC puede utilizarse como impresora
Haga doble clic sobre la carpeta P-touch Editor
Haga clic sobre Uninstall
→Aparece la ventana Uninstall P-touch Editor
→Comienza InstallAnywhere Uninstaller
Haga clic sobre Quit
→Aparece la ventana Uninstall Quick Editor
→ Comienza InstallAnywhere Uninstaller
→Aparece la ventana P-touch Quick Editor
4HagaCenter.doble clic sobre el icono Print
Elimine P-touch Quick Editor Prefs
HagaUtilities.doble clic sobre la carpeta
Seleccione la PT-9500PC y luego haga clic sobre Delete
Creación de etiquetas Versión para Windows
Utilizando Windows
Creación de etiquetas
Active P-touch Editor
Creación de etiquetas utilizando P-touch Editor
Activación de P-touch Editor
Para Windows XP
Banco de propiedades
Ventana de diseño
Seleccione el diseño Haga clic sobre OK
Propiedades de impresión
Organizar el texto
Banco de objetos
Texto
Código de Barras
Creación de un rótulo
Impresión de etiquetas
Utilización de Help
→Aparece la ventana P-touch Editor4 Help
Impresión de un tema específico
Seleccione la ficha Contents
Impresión de Help
Impresión del libro Description of operations
Creación de otros tipos de etiquetas
Muestra Función descrita
Active P-touch Quick Editor
Creación de etiquetas utilizando P-touch Quick Editor
Activación de P-touch Quick Editor
→Se activa P-touch Quick Editor
Otras funciones
Seleccione Tape Settings
Uso sencillo
Haga clic sobre de
Seleccione Text Settings
Utilización del historial de texto
Seleccione el texto que desea utilizar
Cambio de color del fondo
Inserción de símbolos
Seleccione un símbolo
Cambio en la organización del cuadro de texto
Minimización de P-touch Quick Editor Haga clic sobre
Impresión de etiquetas
Seleccione Print Options
Importación de texto desde una aplicación diferente
Inicie P-touch AV Editor como se describe a continuación
Creación de etiquetas utilizando P-touch AV Editor
Inicio de P-touch AV Editor
Para Windows 98/98 SE/Me/2000 Pro
Funcionamiento básico
Inicie P-touch AV Editor
Formato del texto
→Aparece el cuadro de diálogo Input Symbol
Adición de un símbolo
Importación de texto
Impresión de la etiqueta
Haga clic sobre a la derecha de
Salida de P-touch AV Editor
Haga clic con el botón derecho sobre
→La ventana P-touch AV Editor se cierra
Después de la impresión
Extracción de la hoja de respaldo de la etiqueta
Nota
Creación de etiquetas Versión para Macintosh
Creación de etiquetas utilizando P-touch Quick Editor 101
Creación de etiquetas
Para Mac OS
Haga doble clic sobre
Propiedades de fuentes
Especifique la fuente, el tamaño, la letra cursiva, etc
Propiedades del texto
Haga clic sobre en el cuadro de propiedades de la página
→ Aparece el cuadro de propiedades de la página
Establezca el largo de la etiqueta en 4 100 mm
→ Aparece el cuadro de propiedades de la fuente
→La herramienta de texto está seleccionada
Imprima la etiqueta creada
Copies & Pages
Páginas
Se especifica el rango de impresión por página
Especifique el diseño de la etiqueta
Especifique el semitono, el brillo y el contraste
Muestra el resumen de las condiciones de impresión
Haga doble clic sobre el icono User’s Guide Installer
Utilización de la Guía de usuario del CD-ROM
→Se instalará la Guía de usuario del CD-ROM
Aparecen los elementos
Utilización de P-touch Quick Editor
Para Mac OS X 10.1 o posterior
Está instalado Mac OS
Después de la impresión
Apéndice
Creación de etiquetas de códigos de barras 104
Creación de etiquetas de códigos de barras
Resumen de códigos de barras
Formato Caracteres
Apéndice
Reconocimiento de cada PT-9500PC por separado
Cambio de los ajustes del P-touch
Cambio del modo ID USB
Conecte el cable de interfaz USB a la PT-9500PC y al PC
Utilización de varios ordenadores
Cambio de la velocidad en baudios
Apague la PT-9500PC
Autolimpieza
Mantenimiento
La etiqueta no se imprime claramente
→ La autolimpieza comenzará
Limpieza del cabezal de impresión y del rodillo del cabezal
Rodillo del cabezal
Quite el casete de cinta y coloque la cinta limpiadora
Limpieza del cortador
Otros métodos de limpieza
→La limpieza comenzará
111
Solución de problemas
Problema Causa Solución
Las expulsa correcta
Especificaciones del producto
Elemento Especificación
Entorno operativo
Ble
Cintas laminadas de serie industrial
Accesorios sólo para EE.UU
Etiquetas Avery para P-touch
Nº de producto Descripción Precio
Cintas laminadas
Nº de producto Descripción
Azul marino sobre fondo blanco 1/2 12 mm 24,99
Cintas laminadas de 3/4 18 mm de anchura
Cintas laminadas de 1/4 6 mm de anchura
Servidor de impresión
Índice alfabético
24, 32, 49, 56, 71
Macintosh
119
Velocidad en baudios de la computadora
Información de contacto sólo para Eeuu
Subtotal de accesorios / suministros $
No se admiten pedidos contra reembolso
Método de abono marque uno
Page
Nº de producto Descripción Cantidad Precio
LN2975001

 .
. .
.