Software Users Guide
Contents
How to use the Users Guide Html Manual
About This Manual
Symbols Used in this Manual
Setup & Operation Guide Quick Start Guide
Manual Structure
Choose the type of label you want to create
Label Creation Overview
From Label Creation to Printing
Create and print the label
Create and print a label using P-touch Editor
Create and print a label using P-touch Address Book
After creating a template
Select an option in the Startup dialog box and click
How to Use P-touch Editor
Starting P-touch Editor
Layout window
Creating an Address Label
Printing a Label
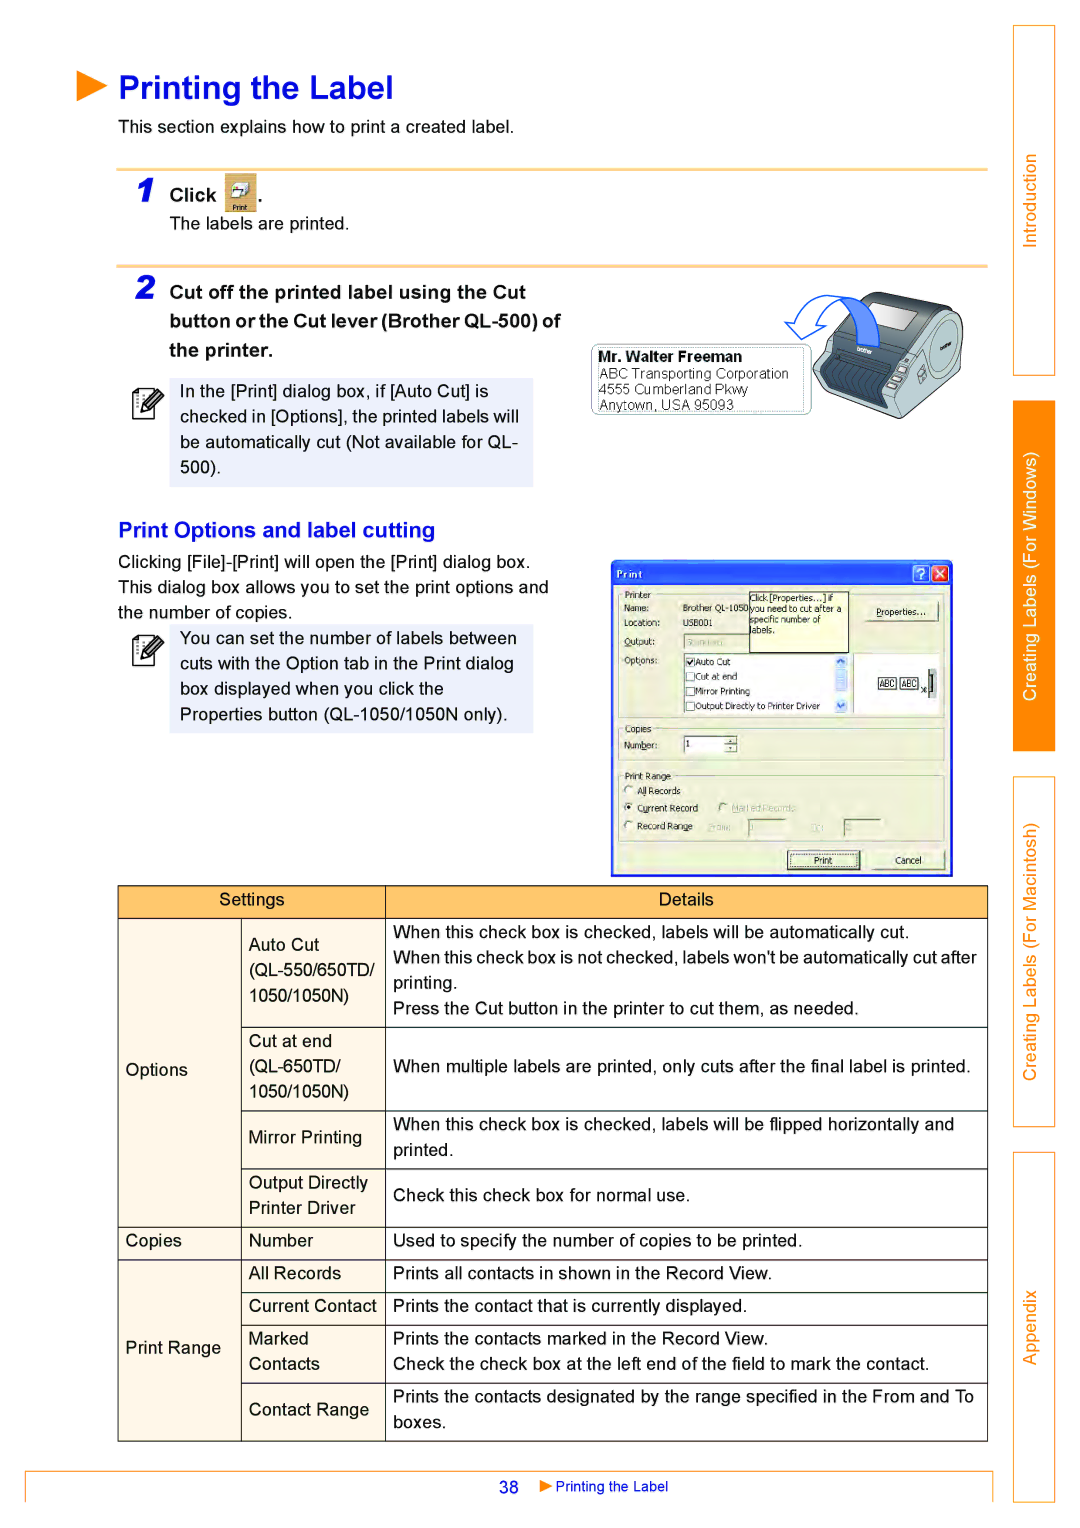
Print Options and label cutting
Click File-Save As
Saving a Label
Opening a Label File
Click File-Open
Creating Different Types of Labels
Touch Editor Help window
Using the P-touch Editor Help
Opening the Help files
Starting P-touch Editor
Specify the Printer item and click
Printing a Help description
Select the range of topics to be printed Click
Opening the Label List
Using the Label List
Creating Labels Efficiently
Click File-Database-Label List
„Form View
Switching the Label List view
„Record View
Entering data
Layout Styles
„What is a Layout Style?
„When is it useful to use a Layout Style?
„Changing the Layout Style for each DK Roll
„Using a Layout Style to create labels
Return to the Layout window to check the labels
„Creating and registering a new Layout Style
Click File-New
11Select the layout style you have created Click
Choose the Print Options
Printing labels from the Label List
Click in the Print properties
Print Range, specify the records to be printed
Start the P-touch Editor and specify the label size
Using external database files
Prepare a database file
Click File-Database-Connect
Specify how the file will be opened, Click
Click Text
10Select Bar Code
11Click in the Print properties
Add-In settings
Creating Labels with Other Applications
Toolbar in the Add-In Preview window
Creating labels using Microsoft Word
Microsoft Word
How to add the Microsoft Word text to a label list
Creating labels using Microsoft Excel
Microsoft Excel
How to add the Microsoft Excel text to a label list
Microsoft Outlook
On the Microsoft Outlook standard toolbar, click
„When importing other than Contact information
How to add the Microsoft Outlook text to a label list
„When importing data from the Contacts window
How to Use the P-touch Address Book
Starting the P-touch Address Book
Layout style selection view
Menu bar
Text toolbar
Contact list combo box
Enter data for each item
Creating a New Contact
Click File-New Contact. Or, click
New Contact form toolbar
Importing the Contact Data
Importing the contact data in CSV format
Click File-Import-Outlook Contacts
Editing the Contact Data
Importing the Outlook contact data
Click File-Edit Contact. Or, click
Printing the Label
How to Use P-touch Transfer Manager & P-touch Library
Starting up P-touch Transfer Manager
Explanations of the Icons
Folder view
Drag the transfer data to the folder you just made
Transferring label templates from the PC to the printer
Select the printer to transfer data to
Select the data or folder you want to Transfer,then click
Click Yes
Creating and transferring a new message QL-650TD only
Select the printer to back up from, then Click
Backing up label templates
Deleting all the printer data
Right click the printer, then select All Delete
Select the printer, then click
Changing printer settings from the PC
Change settings as necessary
Click Set
Printing labels
Starting up the P-touch Library
Opening and editing data
Select the data you want to edit, then click
Searching labels
Click Begin Search
Choose the label you want to create
Procedure for Creating and Printing Labels
Overview
Entering text Î Creating labels Î
Double-click the P-touch Editor 3.2 folder
Using the P-touch Editor
Starting the P-touch Editor
Database Toolbar
Layout Window
Print Toolbar
Layout Window
Property Dock
Click on in the Property dock
Select Standard Address Label
„Copies & Pages
Printing Options
Click on in the print bar
„P-touch Editor
„Roll Setting
„Halftone/Color
Opening the Users Guide Html Manual
How to use the Users Guide Html Manual
Installing the Users Guide Html Manual
„Summary
User’s Guide Html Manual Window
„Main Window
Sharing the printer
Using this printer as a Shared Printer
Using the PS-9000 Print Server sold separately
Network hub Brother QL- Series Network cable USB cable
Serial Cables
Controlling with the ESC/P Commands
Available Commands
Brother QL-650TD/1050/1050N
From Control Panel, open Printers and Faxes Printers
Installing the Printer Driver
Printing Directly from Other Applications
Select each item and click
Close the Printers and Faxes Printers window
Select Brother QL-500/550/650TD/1050/ 1050N
Printing from Other Applications
Click File-Print
For Windows
Uninstalling the Software
Uninstalling the P-touch Editor
Uninstalling the Printer Driver
For Macintosh
Click Delete Applications-P-touch Editor 3.2 folder
Specifications
Product Specifications
Operating Environment

 Printing the Label
 .
.