Manual de Instrucciones
Important Safety Instructions
Instrucciones Importantes DE Seguridad
For Users in the UK, EIRE, Malta and Cyprus only
Please Read These Instructions Before YOU USE the Machine
LEA Estas Instrucciones Antes DE Utilizar LA Máquina
Contents
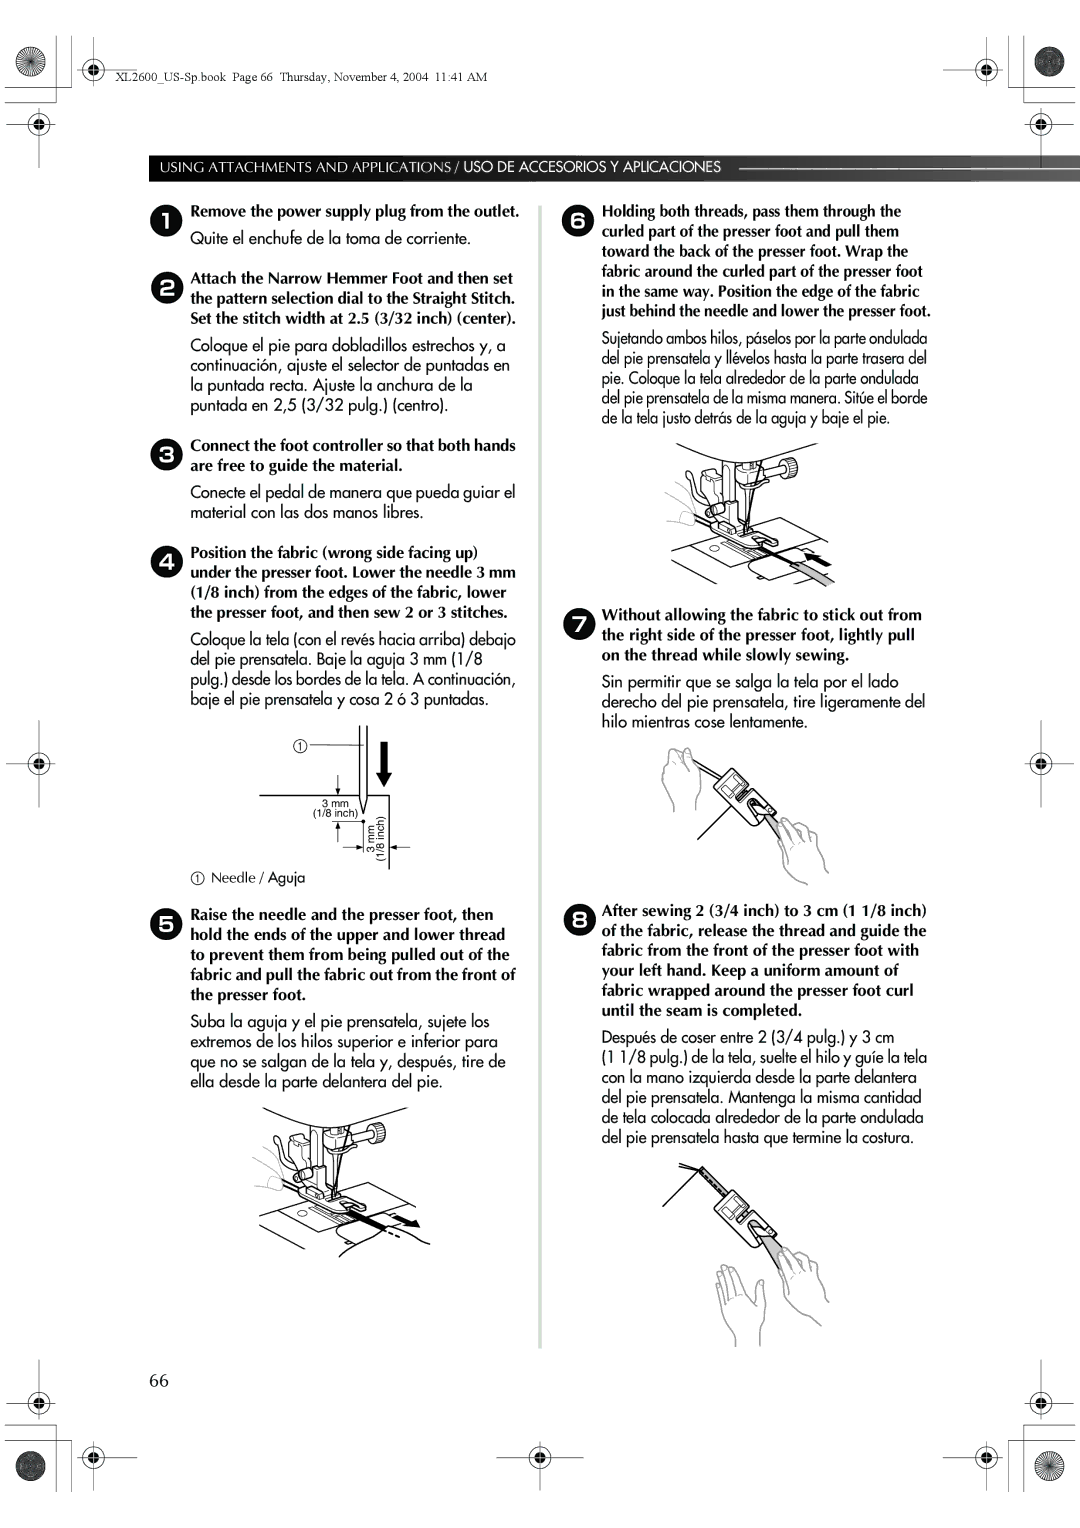
Using Attachments and Applications
Costura con aguja gemela Tensión del hilo
Control de longitud de puntada Costura elástica
Devanado de la bobina Enhebrado del hilo inferior
Enhebrado del hilo superior
Fruncidos Zurcidos Aplicaciones
Cambio de la bombilla Limpieza Solución de problemas
Utilización del pie móvil
Main Parts
Para cortar los hilos, páselos por el cortador de hilo
Esta pieza sostiene el carrete de hilo
Permite subir y bajar la aguja de forma manual
Accessories / Accesorios
Part Name Part Code Others
Optional Accessories / Accesorios opcionales
Using Your Sewing Machine USO DE LA Máquina DE Coser
Sólo para EE.UU
Connecting Plugs Conexión de enchufes
Foot Controller / Pedal
Machine must be unplugged. For U.S.A. only
Replacing the Needle Cambio de la aguja
Checking the Needle Comprobación de la aguja
Parallel space / Espacio paralelo
Presser foot lever / Palanca del pie prensatela
Presser Foot / Pie prensatela
Changing the Presser Foot Cambio del pie prensatela
Shank / Lengüeta
Flat bed attachment / Unidad de cama plana
Using a Free-arm Style Uso del estilo de brazo libre
Flat Bed Attachment Unidad de cama plana
Slide the flat bed attachment to the left to release it
Pattern Selection Dial Selector de puntadas
Controls / Controles
Stitches
Stitches / 25 puntadas
Pattern / Dibujo Stitch Name
Manual
3/16 Fixed / Fija
Fixed / Fija
13/64 3/32
Stitches Nombre de la puntada
3/16 3/32
Selección de un tipo de puntada elástica
Stitch Length Dial Control de longitud de puntada
Stretch Stitching Costura elástica
Stitches / 35 puntadas Selecting a Stretch Stitch
Reverse sewing lever / Pulsador de retroceso
Stitch Width Dial Control de anchura de puntada
Reverse Sewing Lever Pulsador de retroceso
Numbers marked on the dial represent the stitch width
Winding the Bobbin / Devanado de la bobina
Threading the Machine / Enhebrado DE LA Máquina
XL2600US-Sp.book Page 27 Thursday, November 4, 2004 1141 AM
Actual size Tamaño real 11.5 mm
Lower Threading Enhebrado del hilo inferior
Pulg This model Other models
Cover / Tapa Slide button / Deslizador
Cover as shown by the line
Replace the cover so that the end
Illustration
Cutter / Cuchilla
Suba el pie prensatela con la palanca del pie prensatela
Upper Threading / Enhebrado del hilo superior
Putneedle.the thread behind the guide above
Apague la máquina y baje la palanca del pie prensatela
This feature is only available on certain models
Hook / Ganchillo Thread / Hilo
XL2600US-Sp.book Page 35 Thursday, November 4, 2004 1141 AM
Vuelva a colocar la tapa de la bobina
Sewing with a Twin Needle Costura con aguja gemela
Quick-set Bobbin Threading
3Replace the bobbin cover
Modelos equipados con un enhebrador de aguja
Attaching the Twin Needle Colocación de la aguja gemela
1Thread the left needle
Models Equipped with a Needle Threader
Upper Tension is too Loose
Thread Tension Tensión del hilo
Correct Tension / Tensión adecuada
Upper Tension is too Tight
Tipo de tela Hilo Medida de la
Fabric Type Thread Size of Needle
Medida Aguja
XL2600US-Sp.book Page 40 Thursday, November 4, 2004 1141 AM
Straight Stitching / Costura recta
Changing Sewing Direction Cambio de la dirección de costura
Pase el hilo superior por la punta del pie prensatela
Zig-zag
Zigzag Stitching Costura en zig-zag
Finishing Sewing Finalización de la costura
Machine Para preparar la máquina para la siguiente
Satin Stitch / Puntada para satén
Esta costura actúa como costura reforzada
Sew on the fold as in Fig. C
Blind Hem Stitching Costura invisible para dobladillo
Cosa en el pliegue como se indica en la figura C
3/16
Adjust the thread tension so that it is tighter than normal
Shell Tuck Stitching Costura de concha
Elastic Stitching Costura elástica
Sewing Elastic / Costura de gomas
Double Action Stitching Costura de doble acción
Joining Fabric / Unión de trozos de tela
3/16
Patchworking Costura de patchwork
Overedge Stitching Costura de sobreorilla
Puntada de
1Setstitch.the pattern selection dial to an overedge
Feather Stitching Costura de plumas
Ajuste el selector de puntadas en la puntada de sobreorilla
Hoja
Decorative Stitching Costura decorativa
Zig-zag triple
Puntada
XL2600US-Sp.book Page 51 Thursday, November 4, 2004 1141 AM
Ojales
Making a Buttonhole Realización de un ojal
Length Width Pattern
Foot
Step
Making a Buttonhole Realización de un ojal Step / Paso
Pattern
Zona cosida Dibujo
Adjusting Buttonholes Ajuste de ojales
Stitch Length Width
5Connectoutlet. the power supply plug into the wall
2Removeoutlet. the power supply plug from
Sewing Buttons Costura de botones
Zipper foot / Pie para cremalleras
Zipper Insertion Costura de cremalleras
Centro
Recta
Sewstitches.a single row or many rows of straight
Gathering / Fruncidos
Puntada recta
SetStitch.the pattern selection dial to Straight
De la
Darning / Zurcidos
Appliqués / Aplicaciones
Stitch Length
Otro
3Cutstitching.away any fabric that is left outside
Corte toda la tela que quede fuera de la costura
De la Dibujo
Keep fingers away from moving parts, especially needles
Asegure con unas cuantas puntadas rectas al final del diseño
Cosa el contorno del diseño moviendo el aro de bordado
Using the Walking Foot Utilización del pie móvil
Optional Accessories / Accesorios Opcionales
16-3/16 16-1/8
2Raise the needle and the presser foot
Using the Quilting Foot Utilización del pie para acolchados
Remove the power supply plug from 1outlet
Recta
Quilting design / Diseño de acolchado
6SetStitch.the pattern selection dial to the Straight
Stitch Name Length Width Pattern
Using the 1/4-inch Quilting Foot
Utilización del pie para acolchados de 1/4 pulgadas
Nombre de la
Después de coser entre 2 3/4 pulg. y 3 cm
Zig-zag
Any Puntada Cualquiera Recta
Screw / Tornillo Guide / Guía Folded hem / Dobladillo
4SetStitch.the pattern selection dial to the Zigzag
Ajuste el selector de puntadas en la puntada de zig-zag
Screw / Tornillo Guide / Guía
Changing the Light Bulb Cambio de la bombilla
Maintenance / Mantenimiento
Coja la caja de la bobina y tire de ella hacia la izquierda
Cleaning / Limpieza
Cleaning brush / Cepillo de limpieza Race / Pista
Graspthe left.the bobbin case, and then lift it out to
Tab / Pestaña Notch / Muesca Screws / Tornillos
Install the needle plate cover
Symptom Possible cause How to put it right
Troubleshooting
Fabric is
Lower
Or breaks
Thread ten
Pitched noise While sewing
Stitches are
Skipped
There is a high
Síntoma Causa posible Solución Referencia
Solución de problemas
Se rompe
El hilo superior
El hilo inferior
La tela está
La tensión del
Hilo no es
Correcta
Aguja
No se puede
Utilizar el
Enhebrador de
Numerics
Index
Bobina rápida Bombilla
Opcionales Aguja
Aguja gemela Colocación
Bobina