Table 3 — Heat Anticipator Settings


UNIT VOLTAGE


208/230


460


575


UNIT

Heater


Configuration

Heater


Configuration

Heater


Configuration


2-Stage


2-Stage


2-Stage


kW*

1-Stage

kW*

1-Stage


kW*

1-Stage


Stage 1

Stage 2


Stage 1

Stage 2


Stage 1

Stage 2


10.4, 16.0

0.3


NA

NA

13.9, 16.5

0.3


NA

NA

17.0, 34.0

0.3


NA

NA

548D

24.8, 32.0

0.6


0.3

0.3

27.8, 33.0


42.4, 50.0

0.9


0.6

0.3

41.7, 50.0

0.6


0.3

0.3

51.0

0.6


0.3

0.3

*Heater capacity (kW) is based on heater voltage of 208 v, 240 v, 480 v and 575 v. If power distribution voltage to unit varies from rated heater voltage, heater kW will vary accordingly.

Fig. 10 — Defrost Board

4.On size 120 units, install vertical discharge block-off plate over duct openings. See Fig. 13.

5.Economizer is factory-installed in unit and secured with screws. See Fig. 14.

NOTE: Be sure rear economizer flange is engaged under tabs in vertical return-air opening.

6.To convert to horizontal discharge application:

a.Rotate the economizer 90 degrees until the econ- omizer motor faces the outdoor section (see Fig. 15).

b.Remove shipping screw and tape from baromet- ric damper and rotate the barometric relief damper hinge 90 degrees. Barometric relief damper should open vertically to operate properly.

c.Install horizontal discharge block-off plate over the opening on the access panel. (Block-off plate MUST be installed before installing hood assem- bly.) See Fig. 16.

7.Remove existing 12-pin blue and yellow wire jumper plug and store. Insert 12-pin economizer plug into economizer harness. See Fig. 14.

8.If ventilation air is not required, proceed to Step 9. If ventilation air is required, determine the minimum position setting for required airflow. See Fig. 17.

Adjust minimum position setting by loosening the screws on the position setting bracket. See Fig. 18. Slide bracket until the top screw is in the position determined by Fig. 17. Tighten screws.

9.Remove tape and shipping screw from outdoor-air thermostat (OAT). Fas-ten OAT to inside of hood using screws and speed clips provided. See Fig. 19. Make sure OAT terminals are positioned up.

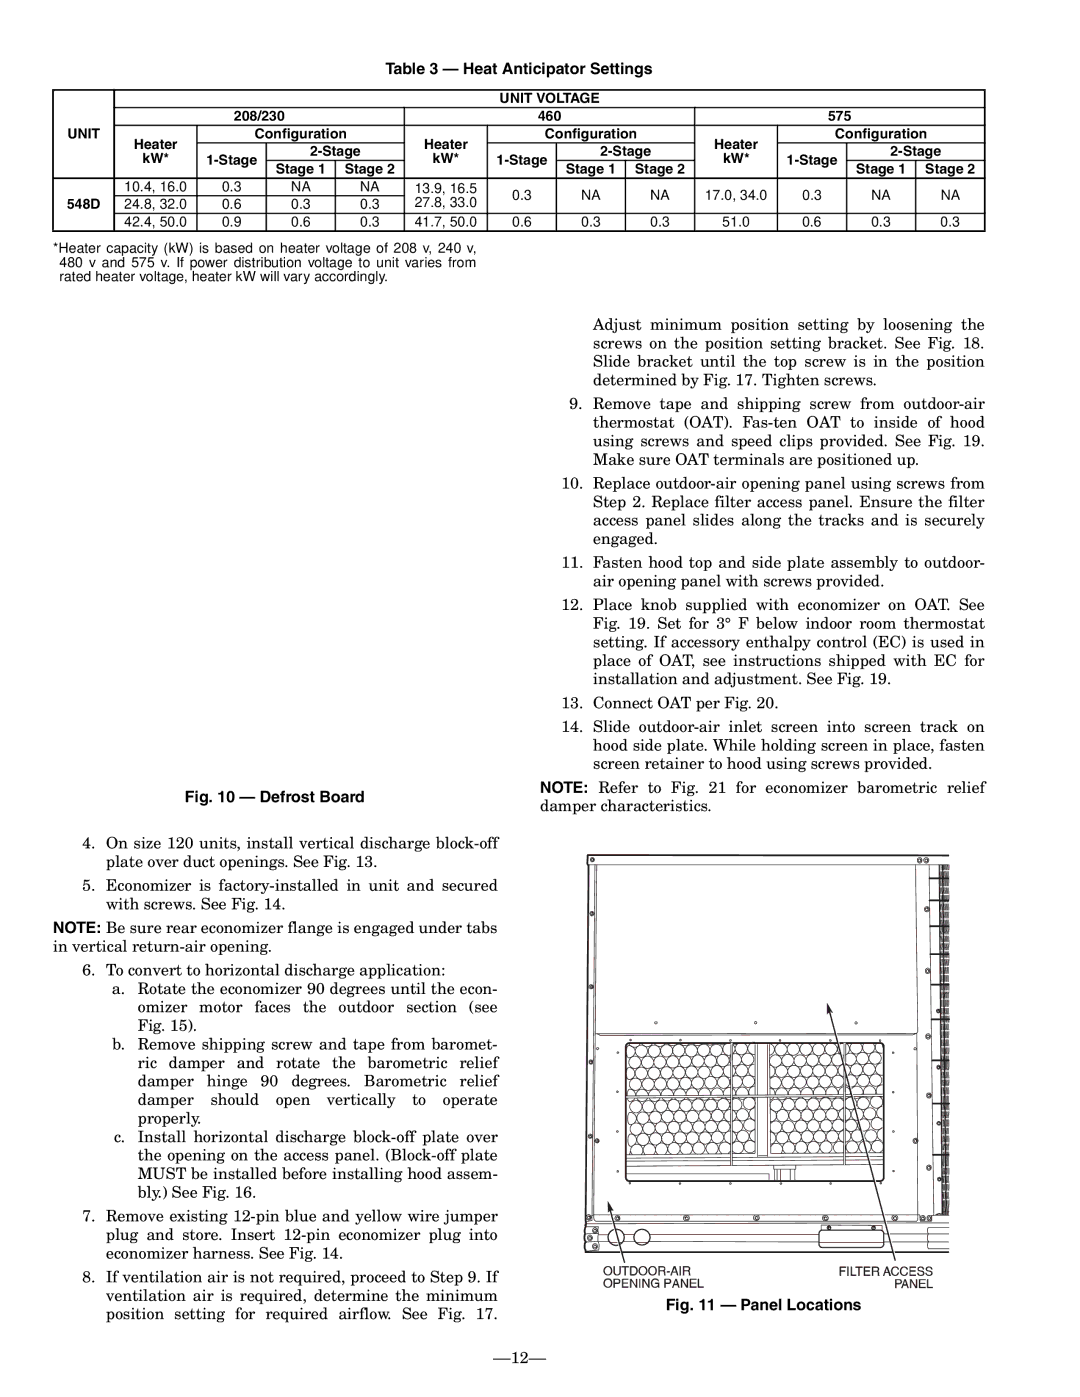
10.Replace outdoor-air opening panel using screws from Step 2. Replace filter access panel. Ensure the filter access panel slides along the tracks and is securely engaged.

11.Fasten hood top and side plate assembly to outdoor- air opening panel with screws provided.

12.Place knob supplied with economizer on OAT. See Fig. 19. Set for 3° F below indoor room thermostat setting. If accessory enthalpy control (EC) is used in place of OAT, see instructions shipped with EC for installation and adjustment. See Fig. 19.

13.Connect OAT per Fig. 20.

14.Slide outdoor-air inlet screen into screen track on hood side plate. While holding screen in place, fasten screen retainer to hood using screws provided.

NOTE: Refer to Fig. 21 for economizer barometric relief damper characteristics.

Fig. 11 — Panel Locations

12

Page 12
Image 12
Bryant 548D installation instructions Unit Voltage, 208/230 460 575, Stage

548D specifications

The Bryant 548D heat pump stands out in the HVAC market for its robust performance, energy efficiency, and advanced technology. Known for its reliability, this particular model is designed to provide optimal heating and cooling for both residential and light commercial applications.

One of the standout features of the Bryant 548D is its variable-speed compressor, which allows for precise temperature control and enhances comfort levels in any environment. This technology enables the 548D to operate efficiently at different speeds, adjusting its output based on the heating or cooling demand. As a result, homeowners can enjoy consistent temperature regulation without the wide fluctuations typical of single-stage systems.

In addition to the variable-speed compressor, the Bryant 548D utilizes advanced refrigerant technology. It employs the environmentally friendly Puron refrigerant, which not only improves the unit's efficiency but also reduces its carbon footprint. This makes the 548D a sustainable choice for those looking to minimize their environmental impact while still enjoying superior heating and cooling performance.

Another key characteristic of the Bryant 548D is its impressive energy efficiency rating, often exceeding the minimum requirements set by the Department of Energy. With a high Seasonal Energy Efficiency Ratio (SEER) for cooling in warmer months and an excellent Heating Seasonal Performance Factor (HSPF), the 548D minimizes energy consumption while maximizing comfort.

The 548D also features Quiet Operation technology, ensuring that the system runs quietly in the background without disrupting daily activities. This is particularly beneficial for light commercial spaces or homes where noise can be a concern. The sleek design and compact size make the unit easy to install in various settings without occupying excessive space.

Furthermore, Bryant incorporates advanced smart technology within the 548D model. The system can be integrated with smart thermostats, allowing users to monitor and control their heating and cooling settings remotely. This feature not only enhances convenience but also enables homeowners to program their systems for maximum efficiency.

In conclusion, the Bryant 548D heat pump is an exceptional choice for those seeking a reliable, efficient, and technologically advanced heating and cooling solution. Its combination of variable-speed compression, eco-friendly refrigerant, high energy efficiency, and quiet operation positions it well in the competitive HVAC market, making it a top choice for both residential and light commercial applications. By investing in the Bryant 548D, consumers can enjoy superior comfort and lower energy bills year-round.